Adding Context & Logic
In project management, infusing activities with context is crucial. In Merlin Project, you can enrich activities, milestones, and groups with additional information and interlink them to establish dependencies. Moreover, you can incorporate extra time to ensure conservative deadlines by integrating lead/lag to dependencies.
Integrating Dependencies: Creating Logic in Projects
Recalling from the previous chapter, we converted our activities from a Mind Map to the Work Breakdown structure. Now, these activities can be organized into thematic categories, representing various project phases such as "preparation," "execution," and "follow-up activities." Grouping similar activities reduces complexity, simplifies planning, and often reveals synergy effects.
You can create groups in various ways:
-
Indenting and Outdenting Activities: Merlin Project allows you to indent activities to create groups or outdent them to revert them back to individual activities. Simply press ⌃+⌘+→ to indent activities and ⌃+⌘+← to outdent them. You can also find this function under "Structure > Indent" or "Structure > Outdent."
-
Drag & Drop: Select one or more activities and drop them on another existing activity. The latter one then turns into a group, while the previously selected activities are now indented activities—also known as "child." You can also directly create a child activity by selecting an activity and pressing [⌥+⌘+G].
Once you have grouped all activities that share logical commonalities, it is time to add milestones. Milestones differ from activities as they denote a reference point, e.g., the start and end of a project, as well as events in between. We recommend setting at least one milestone for the project start and end, as well as for each project phase. This allows you to always reference the expected date of phase/project completion.
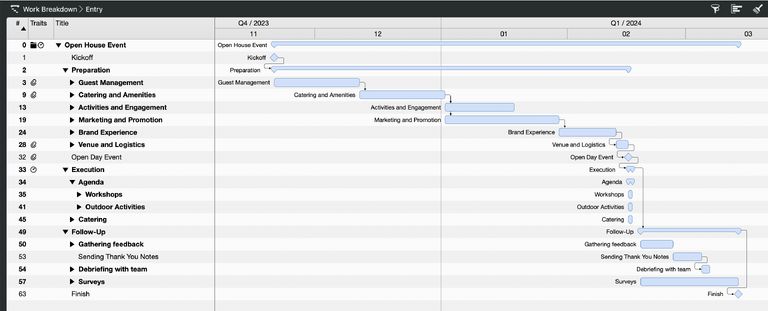
For our Open Day, you have already grouped your activities by clustering them into different branches. To give a better understanding of the different time phases, you divide the branches/groups into Preparation, Execution, and Follow-up activities.
Now you should estimate the required time to complete each activity. In Merlin Project, this is done through the concepts of Work and Duration.
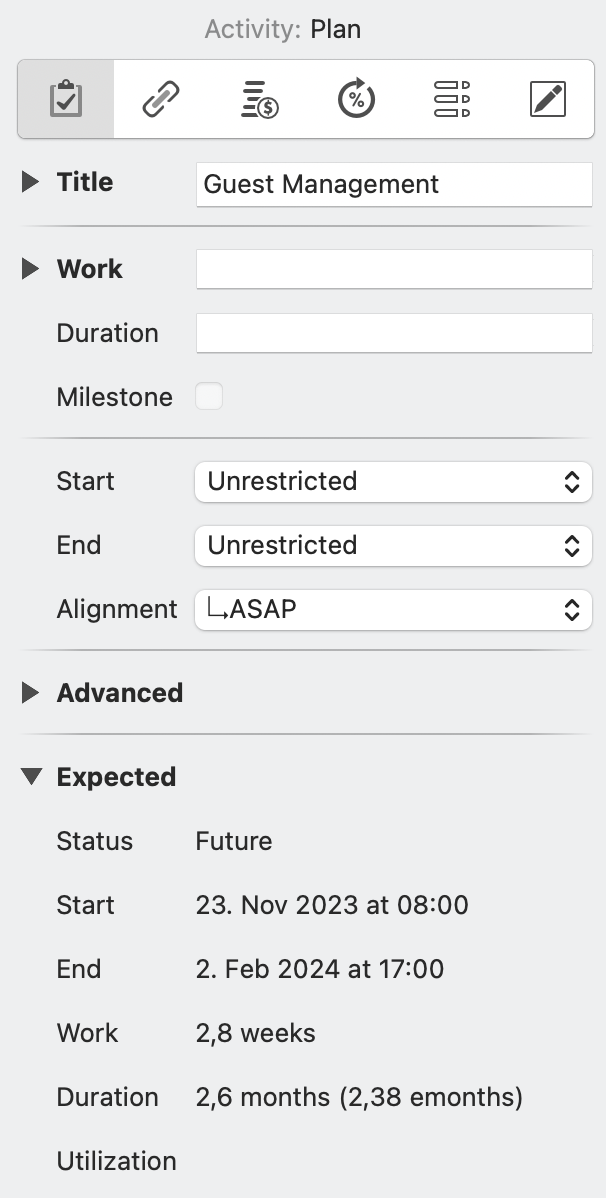
To enter data on the work and duration of a specific activity, simply go into the Activity Inspector. You will see a list of 6 icons. For now, we will focus on the first one "Activity: Plan." Here you can enter time values for work and duration—the first two fields of the inspector. You can enter time values in hours, days, etc., or use the values eHours, eDays to include holidays, weekends, and other events that you marked as non-working time. The difference between these two fields is quite simple: Work explains the concrete amount of hours, days, etc., required to complete the task. Duration describes the time frame in which this work is done. This can mean that work and duration are equal. However, in some cases, the duration of an activity is longer than the work required to complete it. Let's put these insights into practice:
Integrating Dependencies: Creating Logic for our Open Day Event
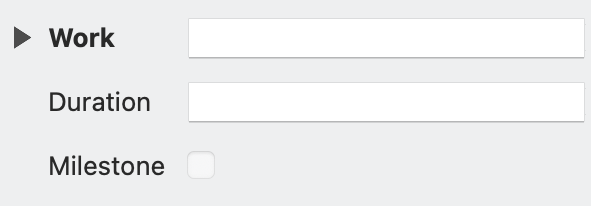
The difference between work and duration can be easily depicted through our Open Day event. Taking the "Catering and Amenities" group as an example, we might expect that selecting the right catering service requires 2 weeks. There are several options: once contacted, we wait for their offer and then compare all offers regarding their price and F&B selection. During these 2 weeks, we won't be working non-stop to talk and assess caterers. Therefore, we enter the time in the field Duration and not in the field Work.
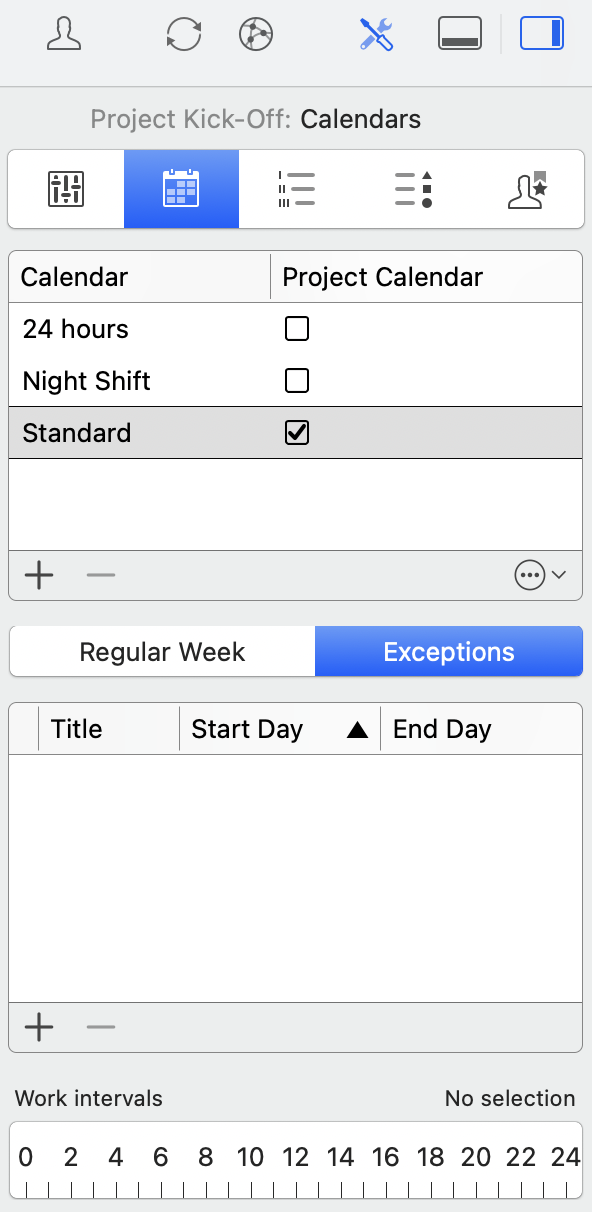
Side Note: In the case of our Open House Day, we might expect some activities to be done during a weekend. Based on the standard work calendar, the weekend is marked as non-working time. To plan activities for the weekend, you can adapt the working time by clicking on "Project Settings" > "Calendar" and go to "Exceptions." Here you can add a new day by clicking on the plus symbol, then enter the date and draw the working times with your mouse in the "Work intervals" field. For further information on the project Settings and how to set up the work calendar, check out our manual.
Now it's time to create dependencies.
The essence of project management is understanding the flow of activities. One task often cannot start until another is finished. Merlin Project offers you multiple ways to create such dependencies. You can create these dependencies through selecting two or more activities, right-clicking on them and choosing "Link," and then selecting the type of dependency you want to create. By default, an End to Start connection is created, which means Task B cannot start until Task A is finished. However, you can also create dependencies by holding the option key and linking activities yourself or through the inspector for dependencies. Let's look at the latter two options in detail:

-
Via the Option key: This is the easiest way to set up dependencies. Simply hold down the Option key and hover over an activity with your mouse. You will see a black dot either at the beginning (far left) or end (far right) of the activity you hover over. When you click, you create an arrow. Simply drag it to either the start or end of another activity to create a dependency. Whether you start at the beginning or end of the initial activity will define whether it will be an end-to-... or start-to-... dependency.
-
Via the Inspector Tool: Merlin Project’s Inspector for Dependencies provides a quick glance and an editing platform for dependencies. Here, you can quickly adjust the type of dependency and integrate buffers as needed. Simply click on a connection arrow and open the inspector by clicking on the far-right icon in the Toolbar. Here, you can easily adapt the connection type (end-to-start, end-to-end, start-to-start, start-to-end).
Integrating Lead/Lag: The Importance of Buffers
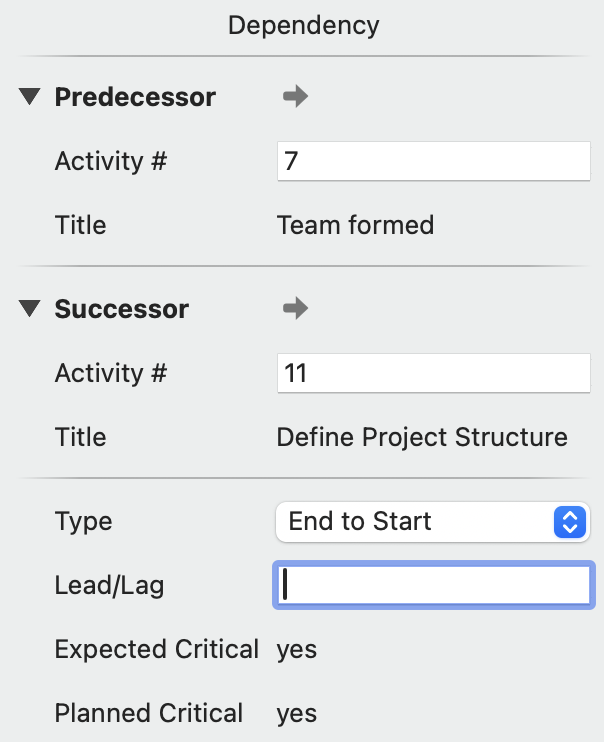
While we are already discussing the Dependency Inspector, let's add a buffer between activities. This buffer allows you to provide a breather before the next task commences.
Merlin Project introduces this concept as lead/lag. With this feature, you can set a specific time delay between connected activities. Within the Dependency Inspector, simply add the amount of time you want to provide as a buffer in the lead/lag field. This field follows the same logic as work & duration. Thus, you can either use Hours, Days, etc., or eHours, eDays, etc., to enter your lead time. This ensures that your project is not only logically structured but also realistically planned.
Transitioning from Net Plan to the Work Breakdown Structure in Merlin Project requires a focus on setting up clear connections between activities and understanding the role of buffers or leeways. By grouping similar activities, establishing dependencies, and integrating buffers, you can create a robust and efficient project structure that is both logical and flexible.
Integrating Lead/Lag into the Open Day Event

Returning to our Open House Event and the caterer selection activity, we are uncertain whether two weeks will be enough for this task. In recent times, we've experienced that several adaptations to the offering, as well as price negotiations, played an increasing role in the selection of a suitable caterer. Therefore, we want to avoid that this activity becomes a bottleneck that delays future project phases. To reflect this uncertainty, we add a buffer of another week for this activity through the lead/lag field in the Dependency Inspector.
Now that you have set up the general project logic and added initial context, you are tasked to coordinate your team to execute the project and give an initial cost assessment to plan and execute the Open Day. Therefore, it is time to look into costs and resources. These aspects will be discussed in the next two chapters.
We’re happy to refer you to our partners. They offer dedicated Merlin trainings for any topic and support rolling out Merlin across your projects.
We recommend: Gareth Watson, certified Merlin Project Trainer (online & inhouse)
Do you have questions or want to connect with us on social media? Then click on the buttons below.

 E-mail
  Linkedin