You have several different possibilities for inserting resources into your project:
- From the Mac OS X Address Book.
- From MS Entourage.
- From the Library (which is taken from the Mac OS X Address Book and MS Entourage).
- Manual resource entry.
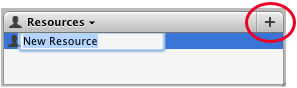
Whenever you would like to create or transfer a new resource in your project, simply drag it from its source into the resource well (on the bottom right of the Merlin main window). Alternatively, you can click on the plus symbol in the resource list or use the Resource view
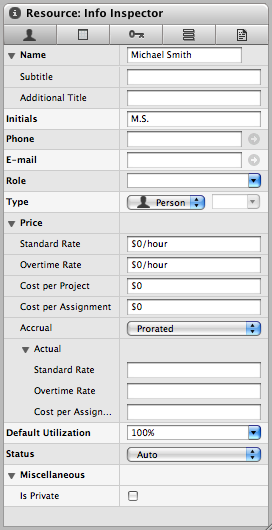
When you select a resource in the Resource view or double-click on a resource in the resource list, the details of this specific resource are displayed in the Inspector.
When this icon  or this icon
  is displayed next to the name of the resource, it is an indication that the resource has been inserted from either Mac OS X Address Book or MS Entourage. Clicking on the icon will start the relevant application and display the person in the address book. As the resources are linked to the relevant data record, all modifications you make in the source application can be reflected back in Merlin.
To refresh the contact information of inserted resources
- Switch to the Resources view
- Select the resource you want to update or simply select them all<
- Ctrl click the selection
- Call ‘Refresh address’ out of the contextual menu shown.

Note: To disconnect inserted resources from the related contacts, call ‘Disconnect from Address’ out of the contextual menu shown.
Merlin supports many types of resources. They are:
 Person: equivalent to a worker or individual.
 Company: Contractor (group or individuals), suppliers, etc.
 Equipment: Machinery, tools, etc
 Material: Raw materials, supplies. Materials differ from the other types in that it doesn't have overtime rate and the option to determine the measuring unit (not just time unit). For example, you can choose "Kg" for measuring your material amount and your standard rate becomes cost per Kg and not per time unit like all other types.
It is possible to enter the resource costs. Entering an amount when a rate is expected will automatically change it into a rate/hour when you leave the relevant field. The currency type defined in the Project Settings is applied. If you would prefer to use a time unit other than hours, simply use the costs in the "Rate/Time" unit notation. The following abbreviations can be selected:
- "y" for years
- "mo" for months
- "w" for weeks
- "d" for days
- "h" for hours
- "m" for minutes
- "s" for seconds
Whenever you assign a resource to an activity, the entered rates will be used as a basis for the cost calculations:
This is a the utilization that is given to a resource when assigned to an activity.
The automatic Status shows whether a resource is over or under utilized. If you manually select a flag, the automatic function of this feature is deactivated and the selected flag will always be displayed. Please see Utilization to discover the meaning of the flags colors.
Each resource has its own calendar. By default, the calendar is based on the project calendar. If you wish to make specific changes to a specific resource, such as marking their vacation time, you have to do it in the resource calendar.
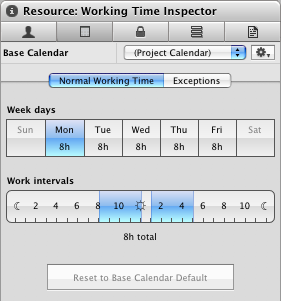
- Select the desired resource in the Resources View
- Click on the calendar tab in the inspector
- Select the calendar the resource calendar is based on. By default, it is based on the project calendar.
- Under the "Regular" tab, select any changes to the resource working hours. These changes will happen every day for every selected day of the week so they are recurring in nature.
- If you wish to mark one-off type events such as vacations and sick time, use the "Exceptions" tab to enter your dates.

- Click the "+" to add an entry to the exceptions list.
When a resource calendar is specified, Merlin intersects the resource calendar with the Project calendar. This behavior can be overridden by specifying which "Precedence" the assignment calendar should take.
