Introduction
Meet Merlin Project!
Welcome to Merlin Project! Like the wizard from the Arthurian legend, this software has magic powers that will make your projects a lot easier. Developed by project managers who work with this software every day, Merlin Project has gone through many practical tests and is constantly being improved.
This document is intended for beginners who want to get an idea of project management with Merlin Project. Therefore we start with a short tour through Merlin Project. The functionalities are presented on the basis of a fictitious project, in which the individual features of Merlin Project are described. Since Merlin Project users are active in different industries, we have selected a sample project that everyone can relate to: the relocation of a company. Similarities with real projects and people are purely coincidental and unintentional. The story of our example project is enhanced by explanations of the Merlin Project functions.
|
|
This is a fictitious project. We strongly advise against reusing the project plan presented here. All examples are mainly used to describe the functionality of Merlin Project. |
In this tutorial we use the terminology of the Project Management Body of Knowledge, Third Edition PMBOK® of the Project Management Institute (PMI). All terms are explained in the glossary.
Conventions in This Introduction
The story of our example project is set italic.
Menu commands and labels in the graphical user interface of Merlin Project and key combinations are set verbatim in the text, for example File → New….
All PMBOK terms are written bold.
In some cases, different or slightly different terms are used in the Merlin Project graphical user interface. This is mainly due to the fact that some of the PMI terms are long and do not fit into the standard user interface. This is why Merlin Project calls Net Plan and not Project Schedule Network Diagram. These cases will be pointed out separately.
Since ProjectWizards frequently releases new versions and updates of software, the images in this documentation may differ from your screen display.
Additional Help for Merlin Project
Merlin Project comes with a comprehensive help system. You can find various help options in the menu Help → Merlin Project Help:

-
Merlin Project Helpopens the help with explanations of all important functions. -
Demo Documentopens a sample document. -
Tutorialsopens your web browser, which then loads the ProjectWizards support page with various quick guides for Merlin Project. -
Release Notesopens your web browser with a version history and documentation of the changes made to the software. -
Supportopens your web browser, which then loads the general support page of ProjectWizards. -
Create Support Profil…if you encounter a problem in Merlin Project and want to report it to ProjectWizards. Information about your computer and its environment will be collected to help the support team isolate possible causes for the problem. Of course, no personal information is collected or transferred to ProjectWizards. If you have selected this option, a file is created on your desktop with a file name based on the pattern Profile-x.tgz, where x stands for several digits. This file can be sent to ProjectWizards in case of a support request.
If you do not find the information you are looking for in these places, simply write an e-mail to support@projectwizards.net. You will briefly receive an answer to your questions.
Legal Information
Please note that operating instructions, manuals and software are protected by copyright. Copying, duplicating, translating or converting to any electronic medium or machine readable form in whole or in part without prior written permission from ProjectWizards is prohibited. All other rights to the software are defined in the included license agreement. The rights to other trademarks and product names mentioned in this manual are the property of their owners and are hereby acknowledged. The naming of products that are not from ProjectWizards is for information purposes only and does not constitute an advertisement. ProjectWizards does not guarantee the selection, performance or usability of these products.
A Short Tour of Merlin Project
|
|
You don’t know Merlin Project yet? Then please follow this short tour. It will help you to easily understand the basics of Merlin Project, the structure of the main window and the most important concepts. |
Installation
To make it easier for you to follow the examples in this book, we recommend to install Merlin Project now at the latest:
-
You can obtain the latest software version of Merlin Project from our website. By clicking on "Start download for Mac" a zip file will be placed in your download directory.
-
In case the archive does not unzip automatically, please double-click the .zip file.
-
A double click will start the program - if necessary you will be asked if you want to move the program into your program directory.
-
Done!
If you use Merlin Project frequently, you might want to keep the Merlin Project icon in the macOS Dock. To do this, click once on the Merlin Project icon in the Applications folder, hold down the mouse button and "drag" the icon into the Dock. Now Merlin Project is only one click away.
Let’s Start
Now let’s take a closer look at Merlin Project. After launching Merlin Project, a window will open with a number of useful options:
-
Create an empty document: A blank sheet, almost as beautiful as a successfully completed project.
-
Open the demo document.
-
Start a new document based on a template.
-
Show the list of recent documents.
-
Find and open an existing document using the Finder.
-
And lots of room for folders with their own templates to start new documents from.

Since we assume that you want to look around a bit first, select the option Empty Document and click on Create.
Main Window
The main window of Merlin Project is divided into three areas:
-
Toolbar: The toolbar contains icons for frequently used options in Merlin Project. These options can be applied to selected project content and the main window with a single mouse click.
-
Work area: This is where your work takes place: Work Breakdown (Gantt charts), network, resource management, reports and attachments are displayed here. Select the view in the upper left. The first time you open Merlin Project, the work breakdown is displayed here.
-
Inspector: If you select a row in the work area, the Inspector displays all detailed information.
|
|
If you need more space for an area, simply enlarge it by moving the mouse cursor to the edge; the mouse cursor changes. Press and drag the mouse at the same time to resize the area. |
Each of these areas offers versatile functions. Most of them are described in detail in the following chapters; in this section we will first explain the basics.
Toolbar
The contents in the toolbar can be organized via the menu View → Customize toolbar …. Move individual symbols, add more or remove symbols you do not need.
Main Area
In the main area, project information is primarily presented and edited graphically in a table. Six views are available and can be selected by clicking on the corresponding buttons above the main table:
-
Work Breakdown: The activity view, in which the activities can be edited and Gantt charts can be created and edited.
-
Net Plan: The net plan view, in which the dependencies between the activities can be defined.
-
Resources: In the resource view, you can view and edit information about the resources.
-
Assignments: The assignment view gives you an overview of the use of resources.
-
Report: Here you can create various reports.
-
Attachments: You can attach checklists, files, events, information, issues and risks to individual activities. They are now always quickly available.
In the menu View → Zoom you adjust the size of the views. In this way you can, for example, display a complex project plan at a glance.
The Work Breakdown view itself consists of two parts:
-
the outline
-
the Gantt chart
You can adjust the view of these two parts by moving the dividing line in the desired direction.

The following information is shown as standard in the outline area:
-
Number of the activity
-
Traits of the activity (small symbols representing information such as deadline restrictions)
-
Title of the activity
-
Given Work
-
Given Earliest Start
-
Resources
-
Number of the Predecessors
The Gantt chart is another view option of the outline area. Call View → View Options to open the options for the work breakdown view. Here you will find various visual setting options of the Gantt chart.
|
|
Switch on the group boundaries here in order to store related activities in the Gantt chart with an area and thus display them as a group. In this way, you create a clearer overview for complex project plans. |
Inspector
The inspector is context sensitive. This means that the inspector changes depending on the row that is currently selected. If you click on an activity in the main area, the Inspector becomes an activity Inspector; if you click on the time scale above the Gantt chart, the Inspector becomes the Time Scale Inspector. The advantage of this approach is that you do not have to place a separate window or palette on the screen for each unit. Instead, you can use your screen mainly for the work area for which you need the most space. In some cases, the Inspector offers several views that can be accessed via tabs in the Inspector and that contain additional options.
Details
This area is a special functionality of Merlin Project, because it makes the work of project managers much easier. Instead of opening a different program for each attachment and documenting or checking the details there, Merlin Project allows you to store such data in Merlin Project itself.
-
You show and hide the detail area with this symbol.
-
Here the detailed information is shown for the line selected in the main work area.
The Details area allows the management and overview of many different types of information as an attachment in the same window:
-
Checklists
-
Events
-
Files
-
Information
-
Issues
-
Risks
But the detail section can do even more, as we will see later in this book.
Project Initiation
Start
Tell me how your project begins, and I’ll tell you how it ends. (Project Wisdom)
Projects do not begin with the start of the project management software. They usually have a history which then leads to a project in a more or less formal process.
Our sample project begins in front of a vending machine for drinks, where Mr. Anton, the CEO of GigaProject, addresses a new colleague: "You are Mr. Meier, the new project manager, aren’t you? "Yes, I am. What can I do for you?" Mr. Anton smiled. "I have a small project for you, if you can even call it that. Yesterday I signed the lease contract for a new building we’re moving into." Meier knew that the current building was bursting at the seams and that possible office spaces were being sought. He was surprised that a decision had already been made. "That was quick. Now what does my project consist of?" "It’s a very simple story, actually" said Mr. Anton. "We’ve already rented the new building, so you don’t have to worry about a thing. All that needs to be done is move the furniture and files from the old building into the new building. We did the same 25 years ago. Nothing complicated. The move must also have been completed by the end of June, our old lease could not be terminated any faster. Plenty of time by then."
„That really doesn’t sound difficult." nodded Mr. Meier. "But I assume that 25 years ago there was hardly any computers in this company. I would imagine that things are a little more complicated today. You will certainly want to be able to read your e-mails on your first day in the new building, and I don’t want to disappoint you there. So let me first gather all the information.“ Mr. Anton seemed almost outraged: "Talk to Mr. Schulze, our IT guy, he should take care of it. But he should not spend so much money again! Choose a cheap removal company, the ones from last time only cost 10,000 dollars, so it should not cost much more than that now. Otherwise, come by next week and we’ll go over everything. It’s important that the colleagues don’t stand around too long during the move." With these words, Mr. Anton left the hall and went back to his office. Mr. Meier noticed too late that Mr. Anton had taken the drink from the vending machine that Mr. Meier had just paid for.
In an ideal project management world, projects are started in formal initiation processes. In reality, however, they often start in the same way as in our example project, informally, with little available information and under time pressure. Merlin Project offers project managers a framework even for projects that initially appear chaotic: the project templates.
Project Templates
Merlin Project is delivered with several project templates, including templates for software development, the construction of a family home and many other projects. Unfortunately, a relocation project is not yet included in Merlin Project, so we start with a new empty document.
Initial Settings
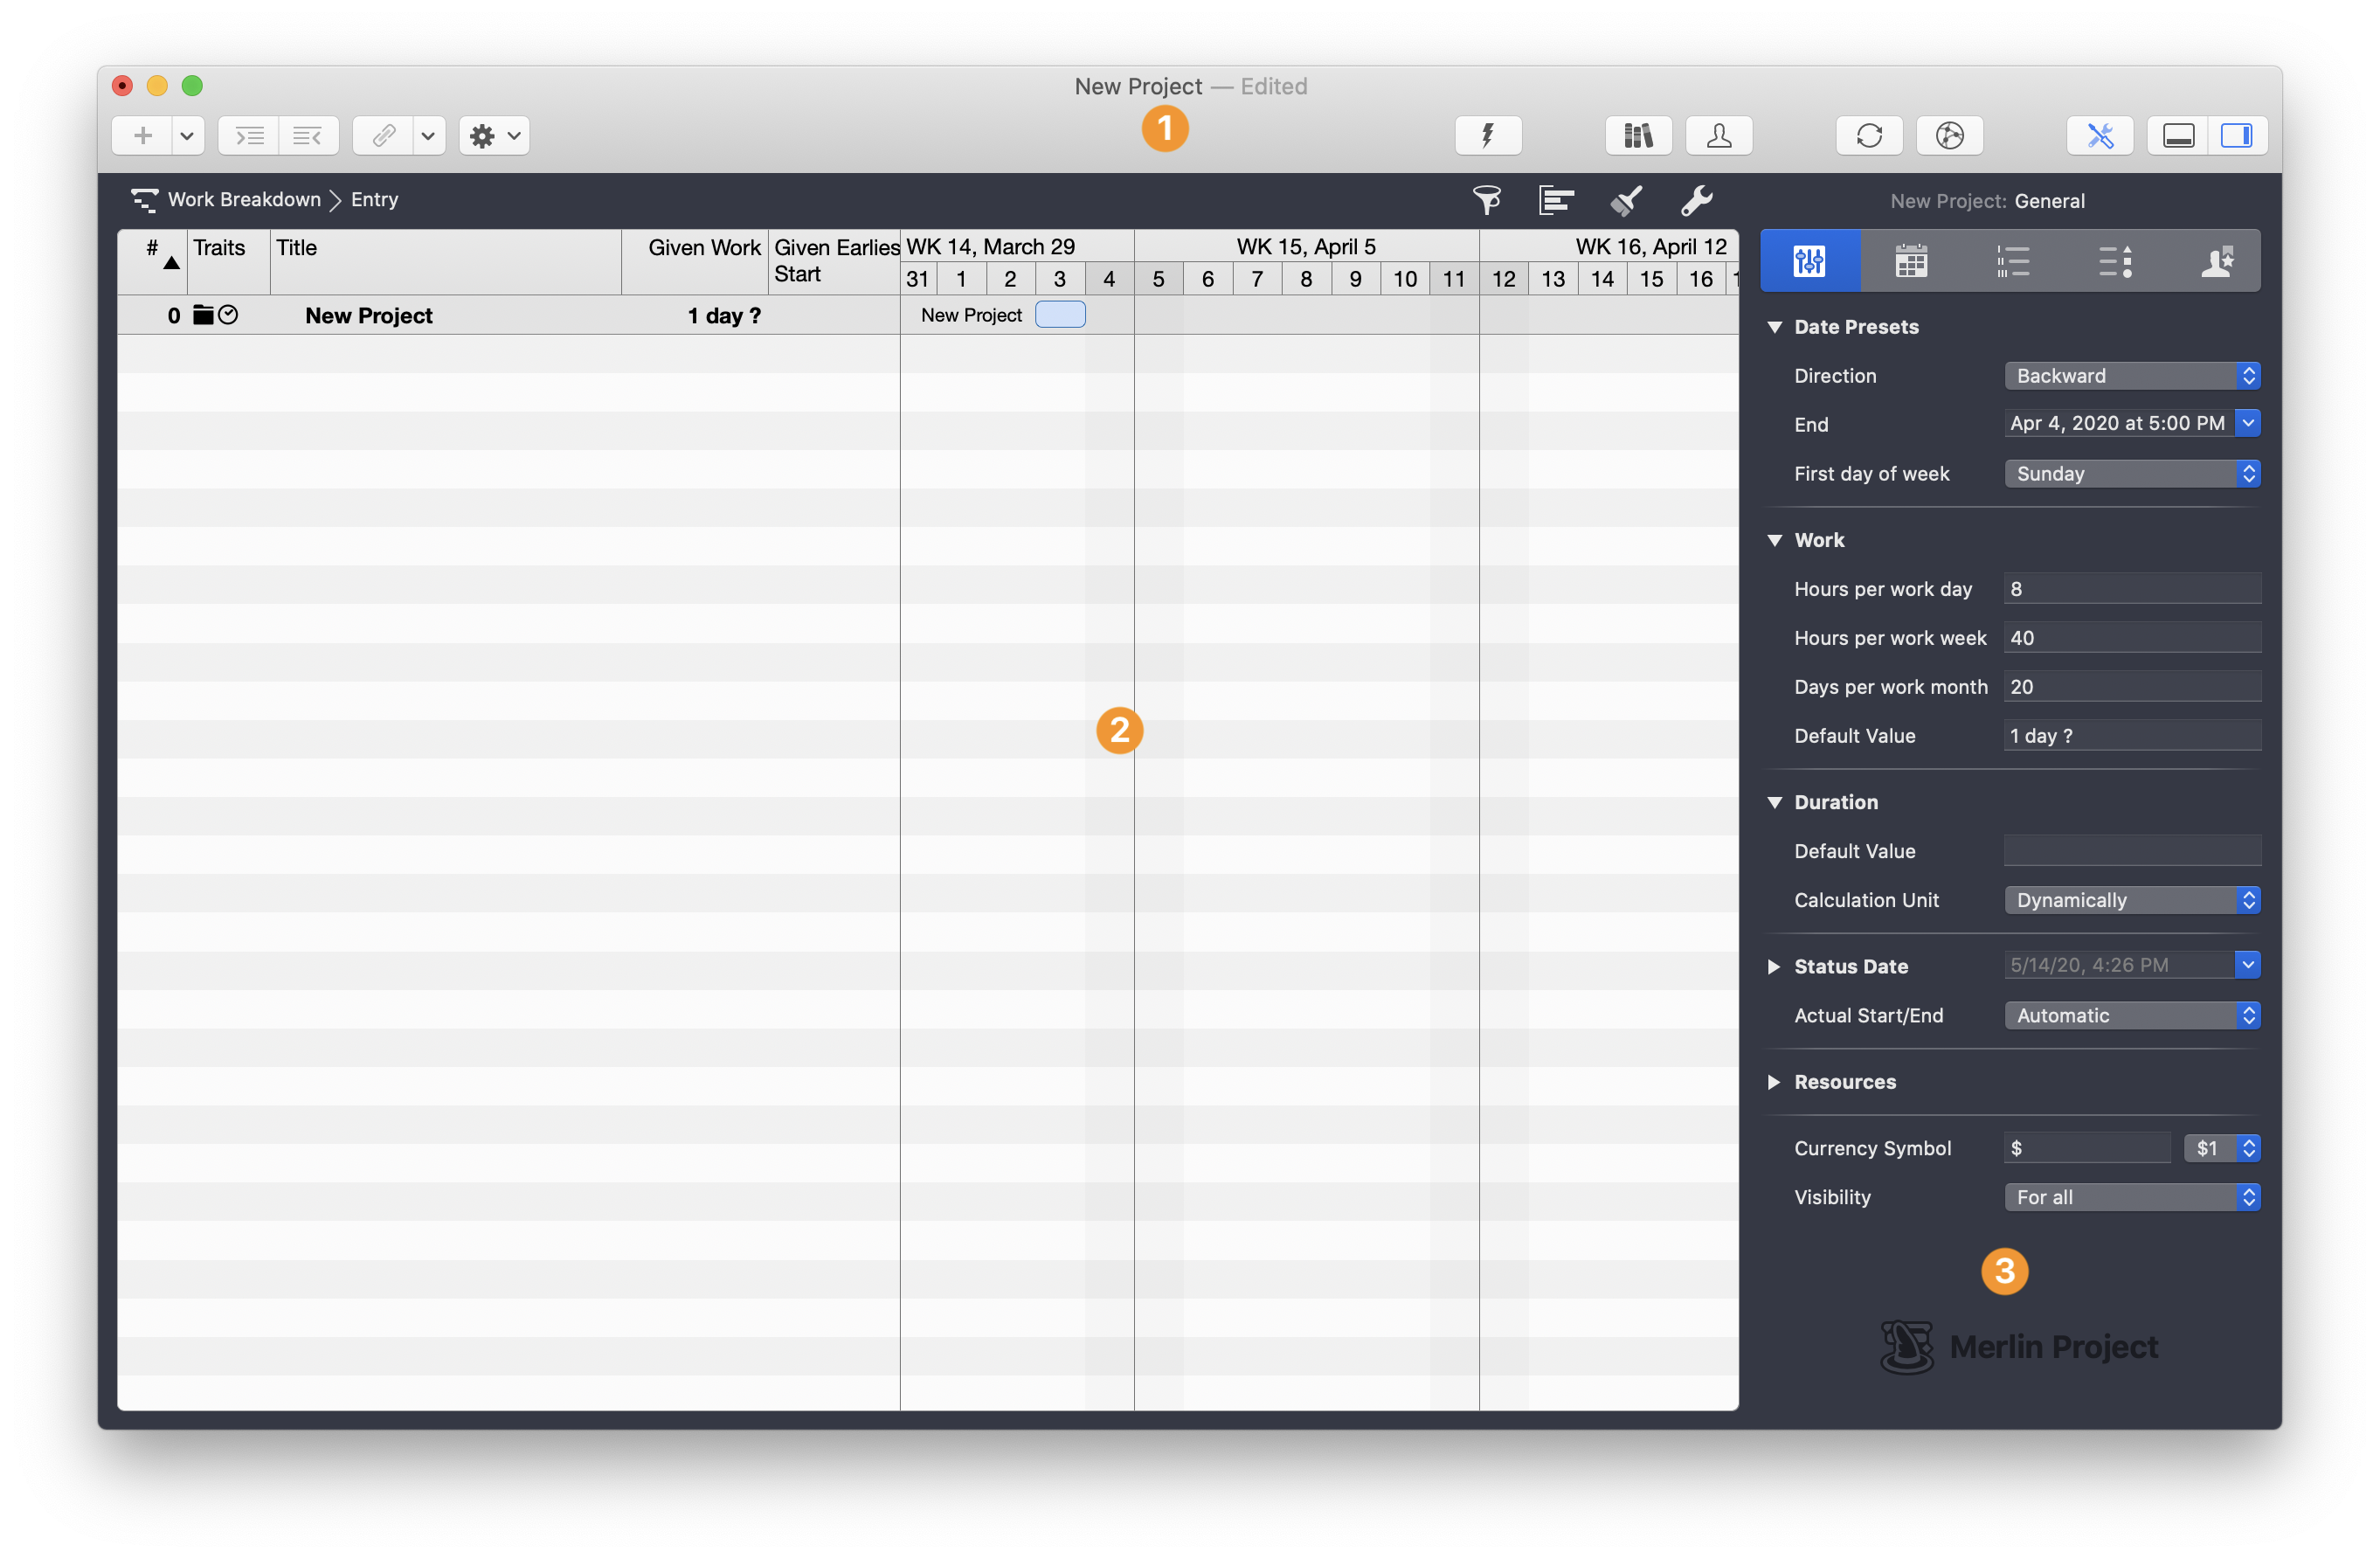
When editing the project file for the first time, it is advisable to make the following initial settings directly, which affect the whole project. Therefore our software opens the project settings in the Inspector first.
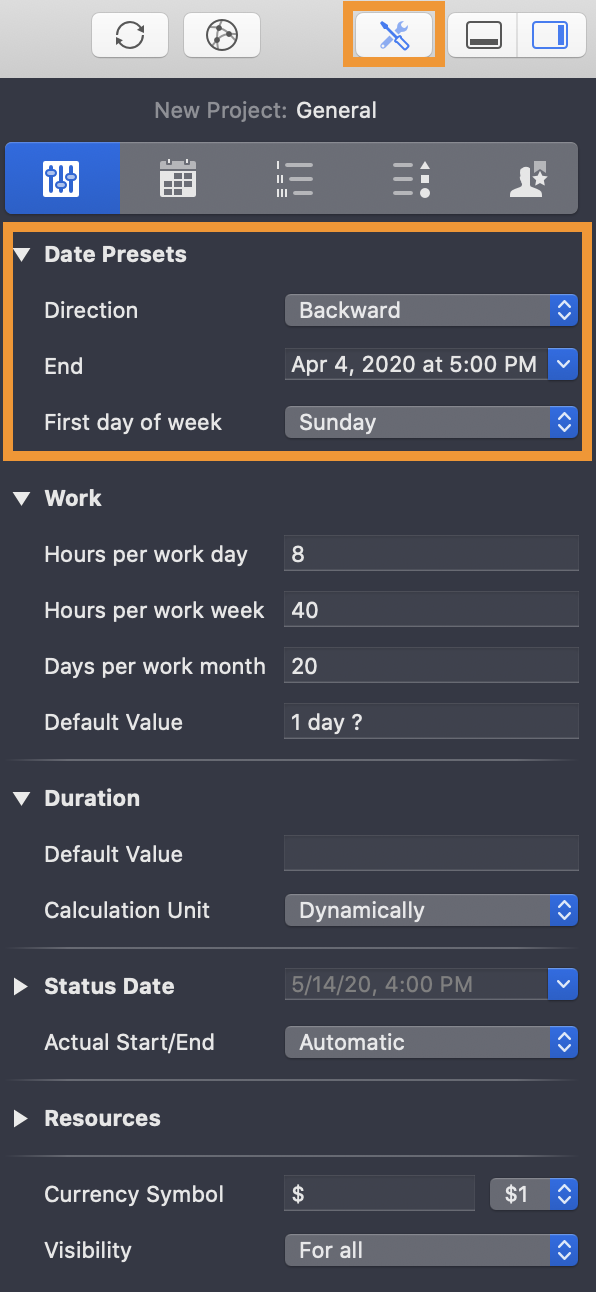
Here you set the following:
-
Direction of planning (backward or forward)
-
Start or end date
-
Default values for planning working times
-
Objectives (project scope)
Give the project a meaningful name. By default, Merlin Project will name it New Project_. Enter the name you wish in the first row. It will also be used when you save the project for the first time.
|
|
Change the file name in the Finder and assign a different name independent of the project title. |
Our example project is a classic case for backward planning, because there is a fixed end date that must not be exceeded. The end date is June 30, because the company must have moved out of the old building by then.
|
|
The direction setting influences whether an activity without fixed dates is planned according to the start or finish date. |
In the next step you should check whether the default values for working times specified in the settings apply to your project. If there are deviations, for example, shorter or longer working times per day by default, you can define them here.
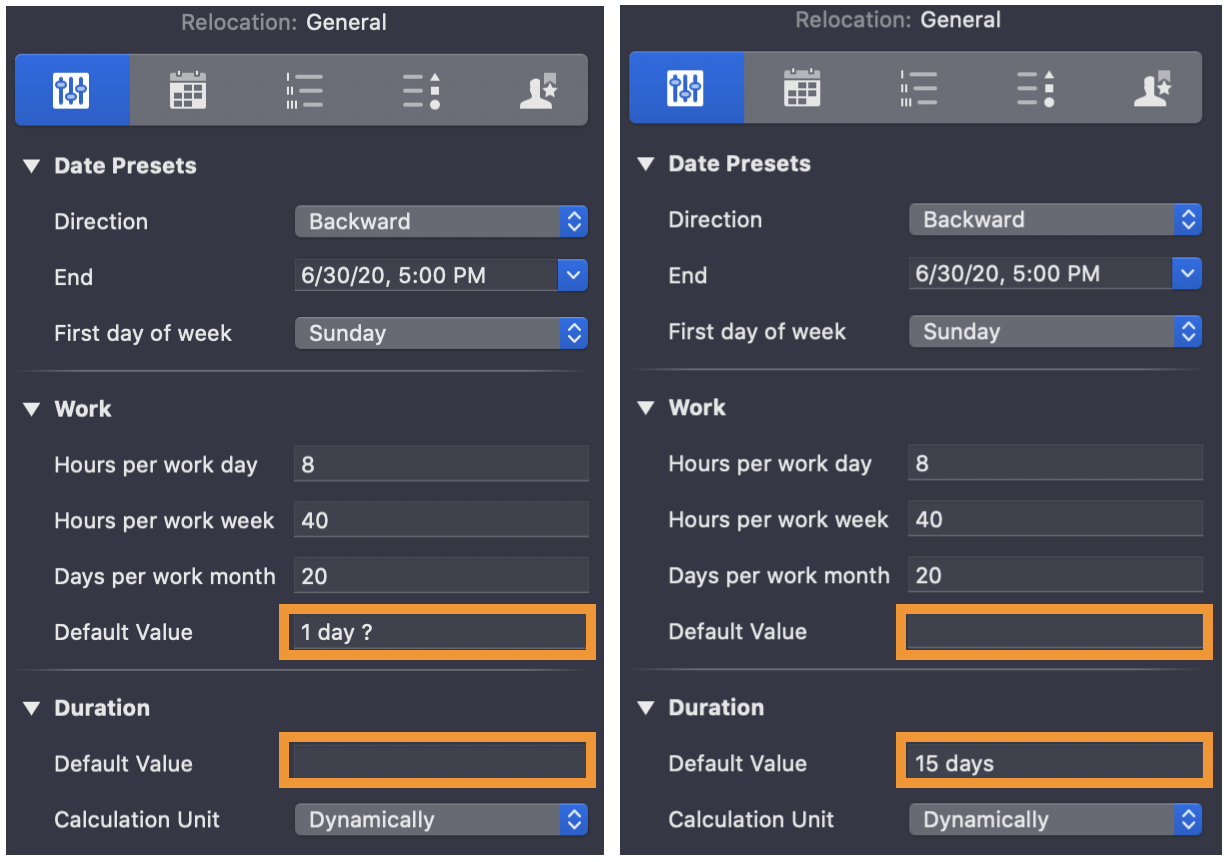
You can also set default values for new activities here. The default setting specifies that a new activity has a working time of 1 day? The duration is not defined. You can adjust this for your project if you know, for example, that your activities usually have a duration of at least 15 days, but the working time is very individual:
Defining the objectives at the beginning of a project is one of the most important steps, because, freely according to Seneca, if a sailor does not know which shore to head for, then no wind is the right one. You should agree the goals in writing with all parties involved in the project, because on the one hand people are forgetful ("Didn’t I say 7,000 dollars budget?"), on the other hand writing down goals usually makes it easier to specify what has to be achieved. Goals should be measurable, because the success of your project is measured by the achievement of these goals. In our example project the following goals were set by the management:
-
Budget of 10,000 dollars must be adhered to
-
The move must have taken place by June 30
-
The productivity of the employees should suffer as little as possible from the move
Select the top line with the project name in the main area. The Inspector for the project opens. In the last tab Notes you can note down targets:

By entering the targets of your project here, you not only make sure that you are clear about them; at the same time, they are only a click or two away, in case you are not sure about the targets anymore.
|
|
The notes stored at this point are also listed in reports. Thus, if you record the objectives under Notes, you have always placed the project scope in a present position. |
Collect and Document Information
As a general rule, the most successful man in life is the man who has the best information. (Benjamin Disraeli)
Especially at the beginning of a project, the flood of information that affects the project manager is overwhelming. Information needs to be recorded, evaluated and systematically filed. Merlin Project offers an intelligent tool that supports information processing: The attachment type Information.
One approach to collecting information at the beginning of a project is the analysis of historical information, which means the documentation of previous projects. The experience gained from similar projects can usually be used profitably for a new project. In our example project we already mentioned that the company had moved some time ago, so our project manager is now in a quest for information:
It was the 4th of April, less then three months left until the move had to be completed. Mr. Meier went to Ms. Weber, the assistant to the managing director, to ask her about the move 25 years ago. Ms. Weber sent him to the basement ("Do I look so old that I would have been here at that time?") where the documents of the former relocation were stored. There Meier found some invoices, among others from a moving company, but also from a beer and sausage supplier, who apparently had taken care of the physical well-being at a housewarming party. As expected, there were no records about the computers at that time, also no documentation of the whole project, which could have helped Mr. Meier. However, the rental contract for the current building was in the folder, and Mr. Meier saw on the second page that renovation was necessary when moving out. Apparently, this project was a bit more complicated. At his desk, Mr. Meier began to collect all the information he already had. The handover of the old building had to take place by June 30th at the latest when the lease expired. Since renovation work had to be done beforehand and this could not be done while the colleagues were still in the office, the move had to take place before the renovation could begin. Furthermore, the objective was that the interruption caused by the move should be as short as possible. This could be ensured, for example, by dismantling the furniture in the old building after work, transporting it and then reassembling it in the new building until the next morning. Another goal was to keep the budget for this project relatively low. After a short time, Mr. Meier put together some information.
Now let’s look at how this information can be stored in a structured way in Merlin Project.
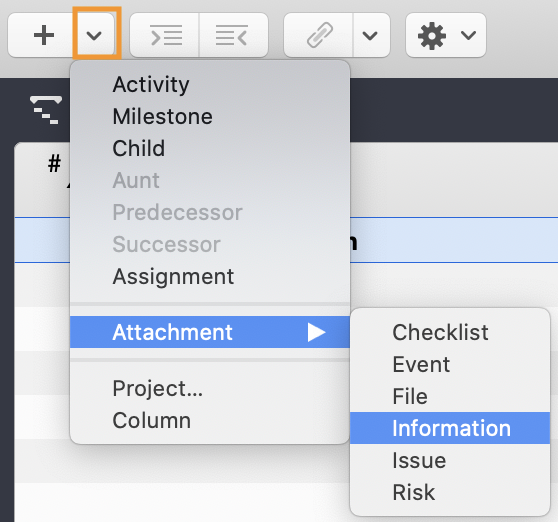
To add an item of information as an attachment to your Merlin Project plan, select Insert → Attachment → Information from the menu or click on the drop-down arrow next to the '+' symbol in the toolbar.
You can give the information a meaningful title that makes it easier to find the it again. The title can also be displayed in reports.
The most important step is documenting the information in the Information Inspector. There are 4 tabs available in the Inspector for this purpose:
-
Info
-
Costs
-
User-defined
-
Notes
In the first tab Info the following information can be documented:
-
Title
-
Author
-
Notification Date
-
Type
-
By telephone
-
In writing
-
Personal
-
-
Status: The status values differ depending on what you selected under Type; for example, if you selected "Personal", you can choose between the following status values
-
In the office
-
At customer
-
Conference
-
Trade show
-
-
URL
In the second tab Costs, you can enter costs associated with the information.
The third tab offers you numerous additional information via tags and fields, which will not be discussed in detail here.
You can save notes in the fourth tab and thus make them easy to find.
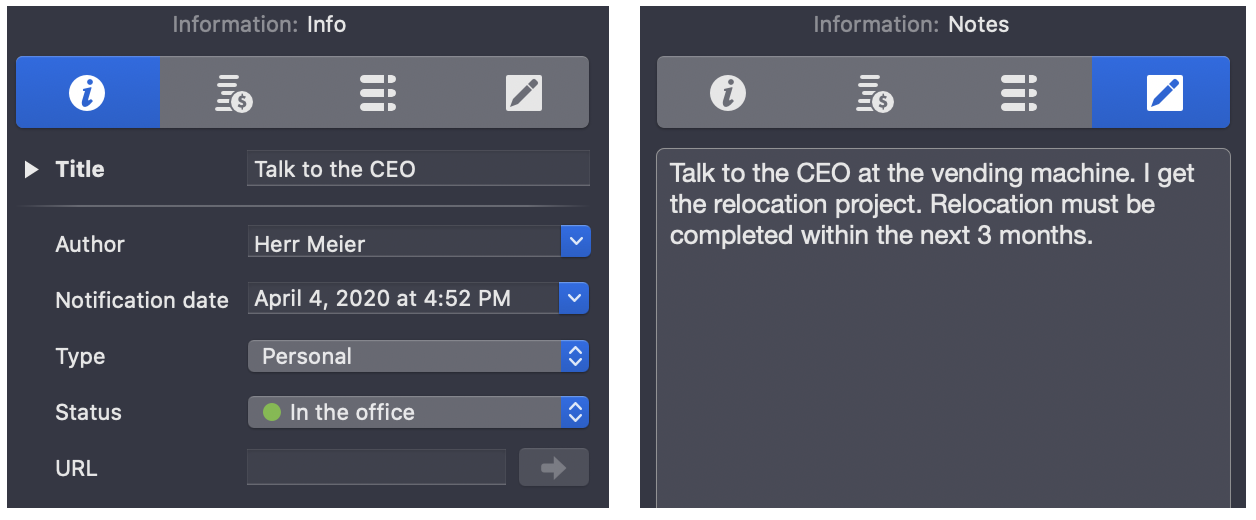
In our example project, Mr. Meier documents the conversation with the managing director at the vending machine, the information that after moving out, there is still renovation work to be done, but also thoughts and ideas, such as the nightly move. Information should also be documented because this simplifies the creation of a Lesson Learned document.
Project Charter: External Files and Merlin Project
What’s not written on paper has never been said. (source unknown)
It is a good habit to conclude the initiation phase of a project with a Project Charter, a document that describes the framework conditions of a project.
For example, a Project Charter should include the following information:
-
What is the project about?
-
Why is the project being carried out and what is the purpose of the project?
-
What are the goals of the project?
-
What are the assumptions and constraints under which the project is carried out?
-
What numerical criteria should be used to measure the success of the project?
-
What are the results of the project?
-
What authority does the project manager have?
Some project managers have the project charter signed by the client, because the goals and assumptions of a project may be forgotten. The Project Charter should be passed on to the project staff so that they can gain an insight into the framework conditions of the project as well as the project manager.
The Project Charter will not be the only external document you will be dealing with in a project. Contracts, historical data from previous projects, presentations and much more will be distributed within the project team and beyond. Often you will also have multiple versions of a file when you work on a document with other people. Merlin Project offers you a very comfortable way to manage these documents.
The Project Charter is now used as an example of a file that you add as an attachment to Merlin Project. To do this, drag a file from the Finder onto a task in Merlin Project and release the mouse button. In the dialog box that now appears, you can choose between the following options:
-
Link the file to the selected activity
-
Copy the file into your Merlin Project document
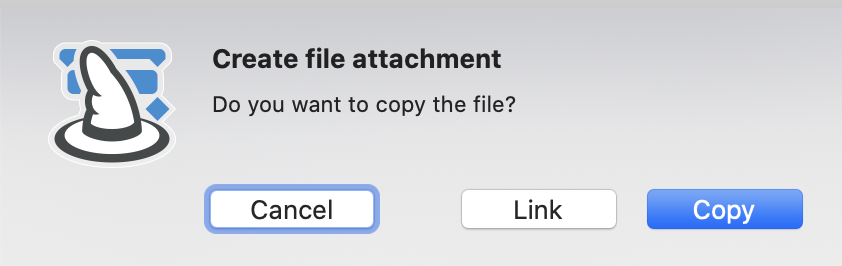
If the file is a project file or an importable format, you have the option to create a subproject.
|
|
You should link files if you work with large files or if you have already created a folder structure outside Merlin Project that others can access (e.g. via a document management system). |
In the file inspector you can add additional information to files. Again there are 4 tabs available:
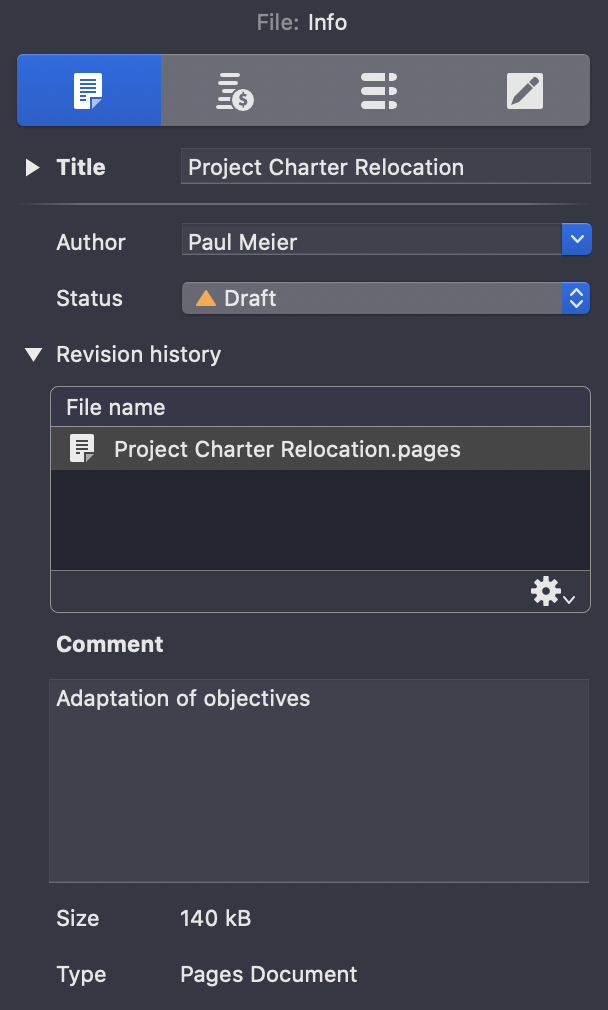
We take a closer look at the first tab Info. It offers the following contents:
-
Author
-
Status of the document; Merlin Project offers the following status values:
-
New
-
Draft
-
In Revision
-
Technical Review
-
Legal Review
-
Review by Customer
-
Declined
-
Approved
-
You don’t have to use all values in your project, of course, but the list can serve as a reminder of who should have seen a document.
-
Version history
-
Comment (refers to the respective version)
The Revision history field deserves a closer look. For example, your Project Charter may not be accepted in the first version, so you will be asked to make changes. Simply drag and drop any modified version of the document into the Versions window instead of inserting it as a new, independent element in Merlin Project. This gives you an overview of the attachments in general and at the same time the versions of each attachment. You can also add comments to each version.
|
|
Please note that other information such as the status of a document does not refer to one version, but to the document in general. |
Project Planning
Resources
Mr. Meier considered who would be part of his project team. In this project every employee of the company was a stakeholder, because every employee was affected. It was impossible to reconcile all opinions, so Meier thought it was a good idea to involve the works council, Mr. Becker, as a representative for these stakeholders. Mr. Schulze had already mentioned Mr. Anton, and of course Mr. Anton was also a stakeholder.
|
|
So that you do not have to scroll to the glossary at the end of the document: A stakeholder is a person or an organisation that is touched in some way by a project, be it through participation in the project, through passive witnessing (next to your house is a large construction site for 6 months) or through the results (a 12-lane highway is being built on the construction site). Stakeholders can act actively or passively, consciously or unconsciously for or against the interests of a project, and therefore it is important to involve them. |
Without resources, a project cannot be carried out, be it human resources that provide their labour or material resources such as stones for building a house. Merlin Project distinguishes four types of resources:
-
Person
-
Material
-
Company
-
Equipment
The default resource, which always applies if an activity has not been assigned yet to a resource, always belongs to the type Person.

Ideally, some or even all resources required for the project are already in your macOS address book or in Microsoft Outlook. You can display the contents of the address books directly in the Merlin Project Library via Merlin Project → Settings → Library.

Now you can simply drag and drop resources from the library into the resources view of the main table or into the resources window. Data such as phone number and email address, if available in the address books, is automatically transferred.
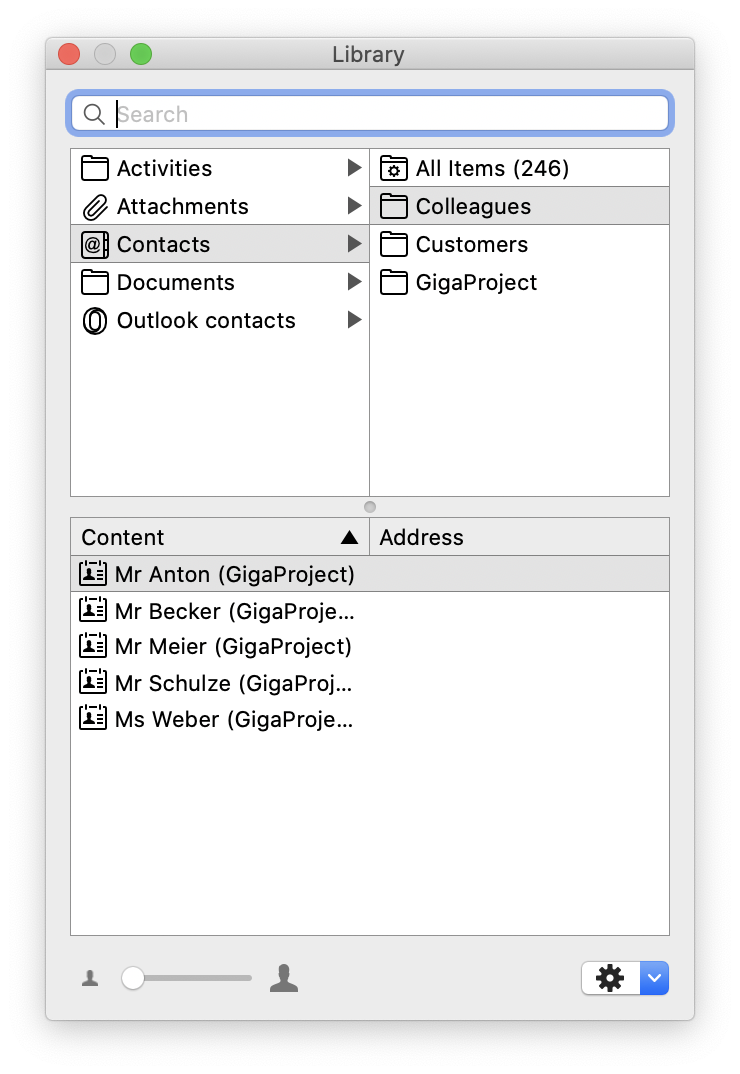
If the required resource is not yet available in one of the address books, it can be added to the project either by using the key combination ⌘ and N in the resource view or by adding it to the project in the menu.
By default, a new resource is of type 'Person' and the resource name field is waiting for your input. Initials are automatically created from the name. Resources of type Person can be assigned to roles. Merlin Project already comes with the following roles:
-
Customer
-
Stakeholder
-
Project Lead
-
Project Manager
-
Task Manager
-
Developer
-
Technician
-
Marketing
-
Sales
-
Support
-
Team Member
-
Temporary
-
Consultant
According to the definition of the PMBOK, the project team includes, in addition to the project management team, all those who contribute to the project through work. Apart from the members of the project team, stakeholders do not have to contribute to the project. Nevertheless, they are seen as a resource in Merlin Project. Stakeholder management tries to incorporate the expectations of stakeholders into the project. The term try is used intentionally because stakeholders can intentionally or unintentionally withhold information. In addition, some stakeholders outside the project team will request reports on the progress of the project.
In the Resource Inspector you can add additional information to a resource. For example, the cost of a resource is important information for budget planning and control. The costs of a resource are divided into:
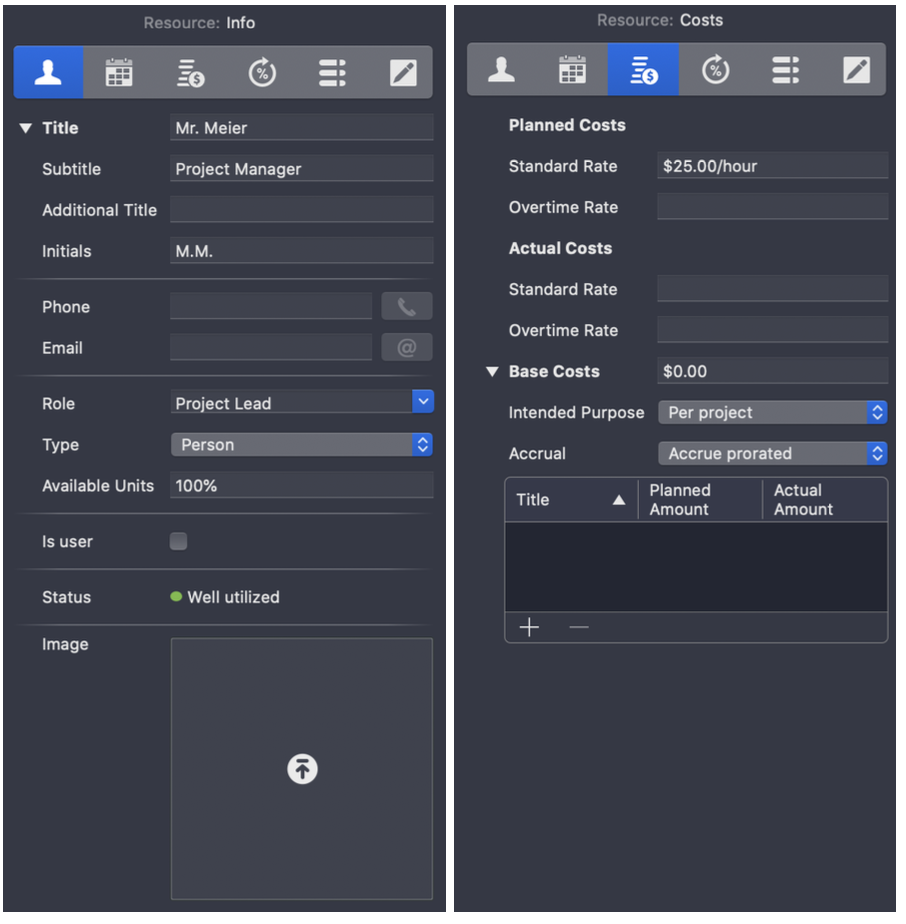
-
Standard Rate: The normal hourly wage (planned and actual costs)
-
Overtime Rate: Hourly rate for overtime (planned and actual costs)
-
Base Costs: Operating costs if an additional amount per assignment (e.g. for travel costs) or per project has been agreed with a resource.
Furthermore, the availability can be defined. It is generally assumed that a resource is working 100% on a project and is therefore 100% utilized.
In the Calendar tab, you enter special working times for a resource that differ from the times that apply across projects. For example, the availability of part-time employees or vacation times can be mapped in the project plan:
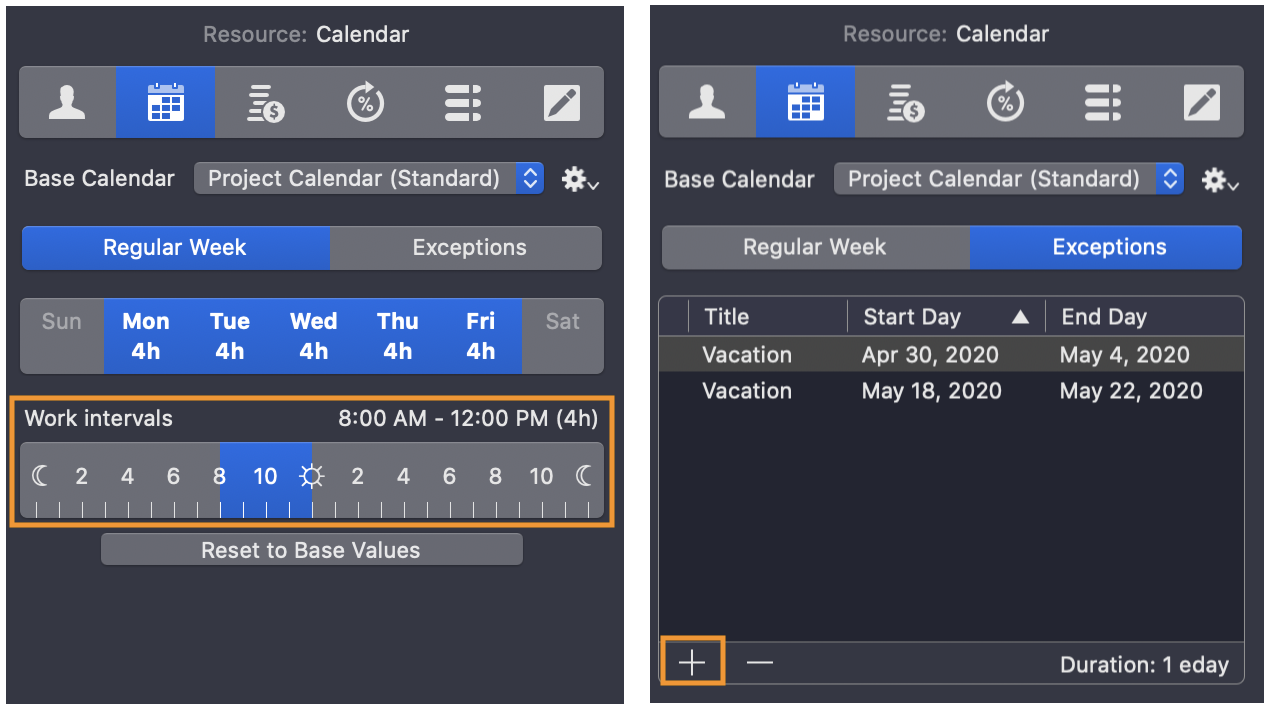
In the figure, the working time per day was set to 4 hours in the tab 'Regular week' using the slider under 'Work intervals'. In addition, two days of vacation were entered into the resource calendar via the + in the bottom left corner of the inspector in the tab Exceptions. During the period of these exceptions, no more tasks can be assigned to the resource.
The Work Breakdown Structure (WBS): What needs to be done?
A project cannot be done in a single activity (otherwise it would probably not be a project). To be able to manage a project, it is divided into smaller work packages, which in turn are divided into tasks. This is done in a so-called Work Breakdown Structure (WBS). In our Project Management Glossary you can find more information about the WBS.
A WBS is the basis for planning a project. According to the PMI, a WBS is a graphical representation of the hierarchy of project work packages. Many project managers have had good experience with the method of mindmapping, which can be used to create a WBS. With Merlin Project you can create mind maps, then edit them in the ongoing project planning and use them as a basis for creating the project plan.
Starting from a starting point (name of the project), the project is divided into its components, which are drawn in branches. These components are divided into smaller parts and branches are drawn to the branches of the mind map until you reach the individual activities.
Especially the creation of a mind map in cooperation with the project team opens up the creative potential of the team and facilitates the flow of information, because all information is available to everyone in a 'tangible' way.
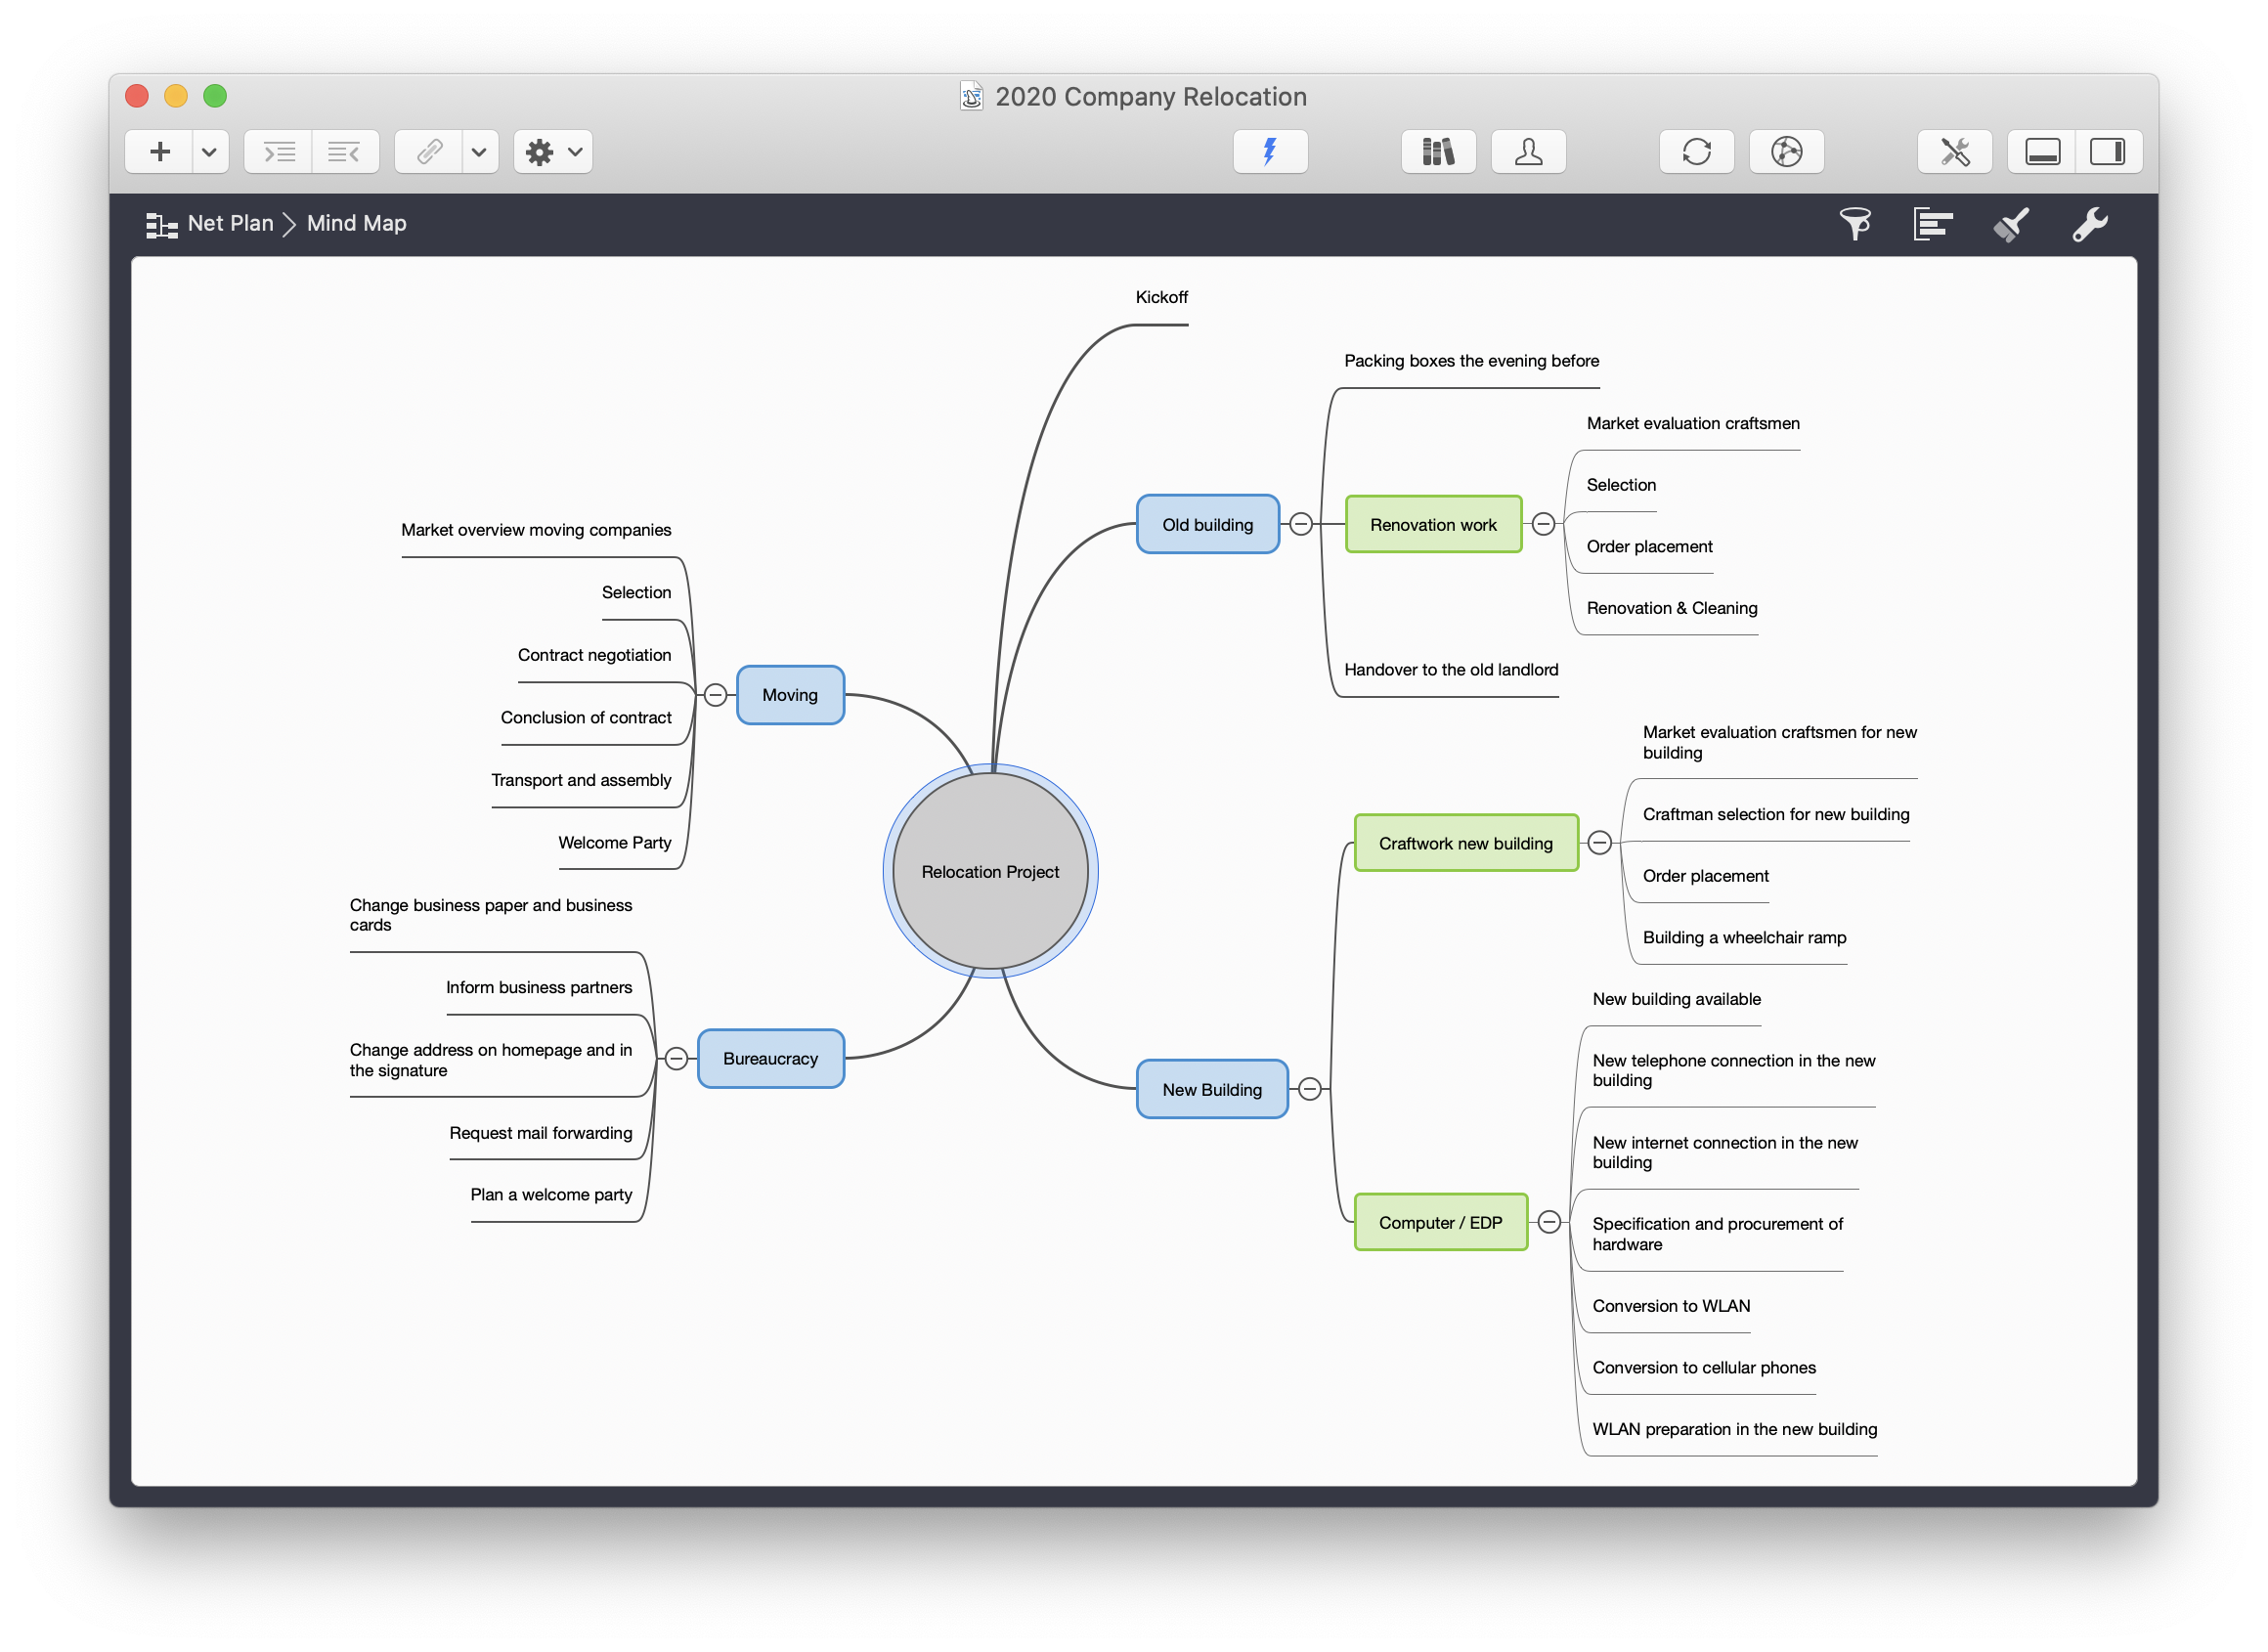
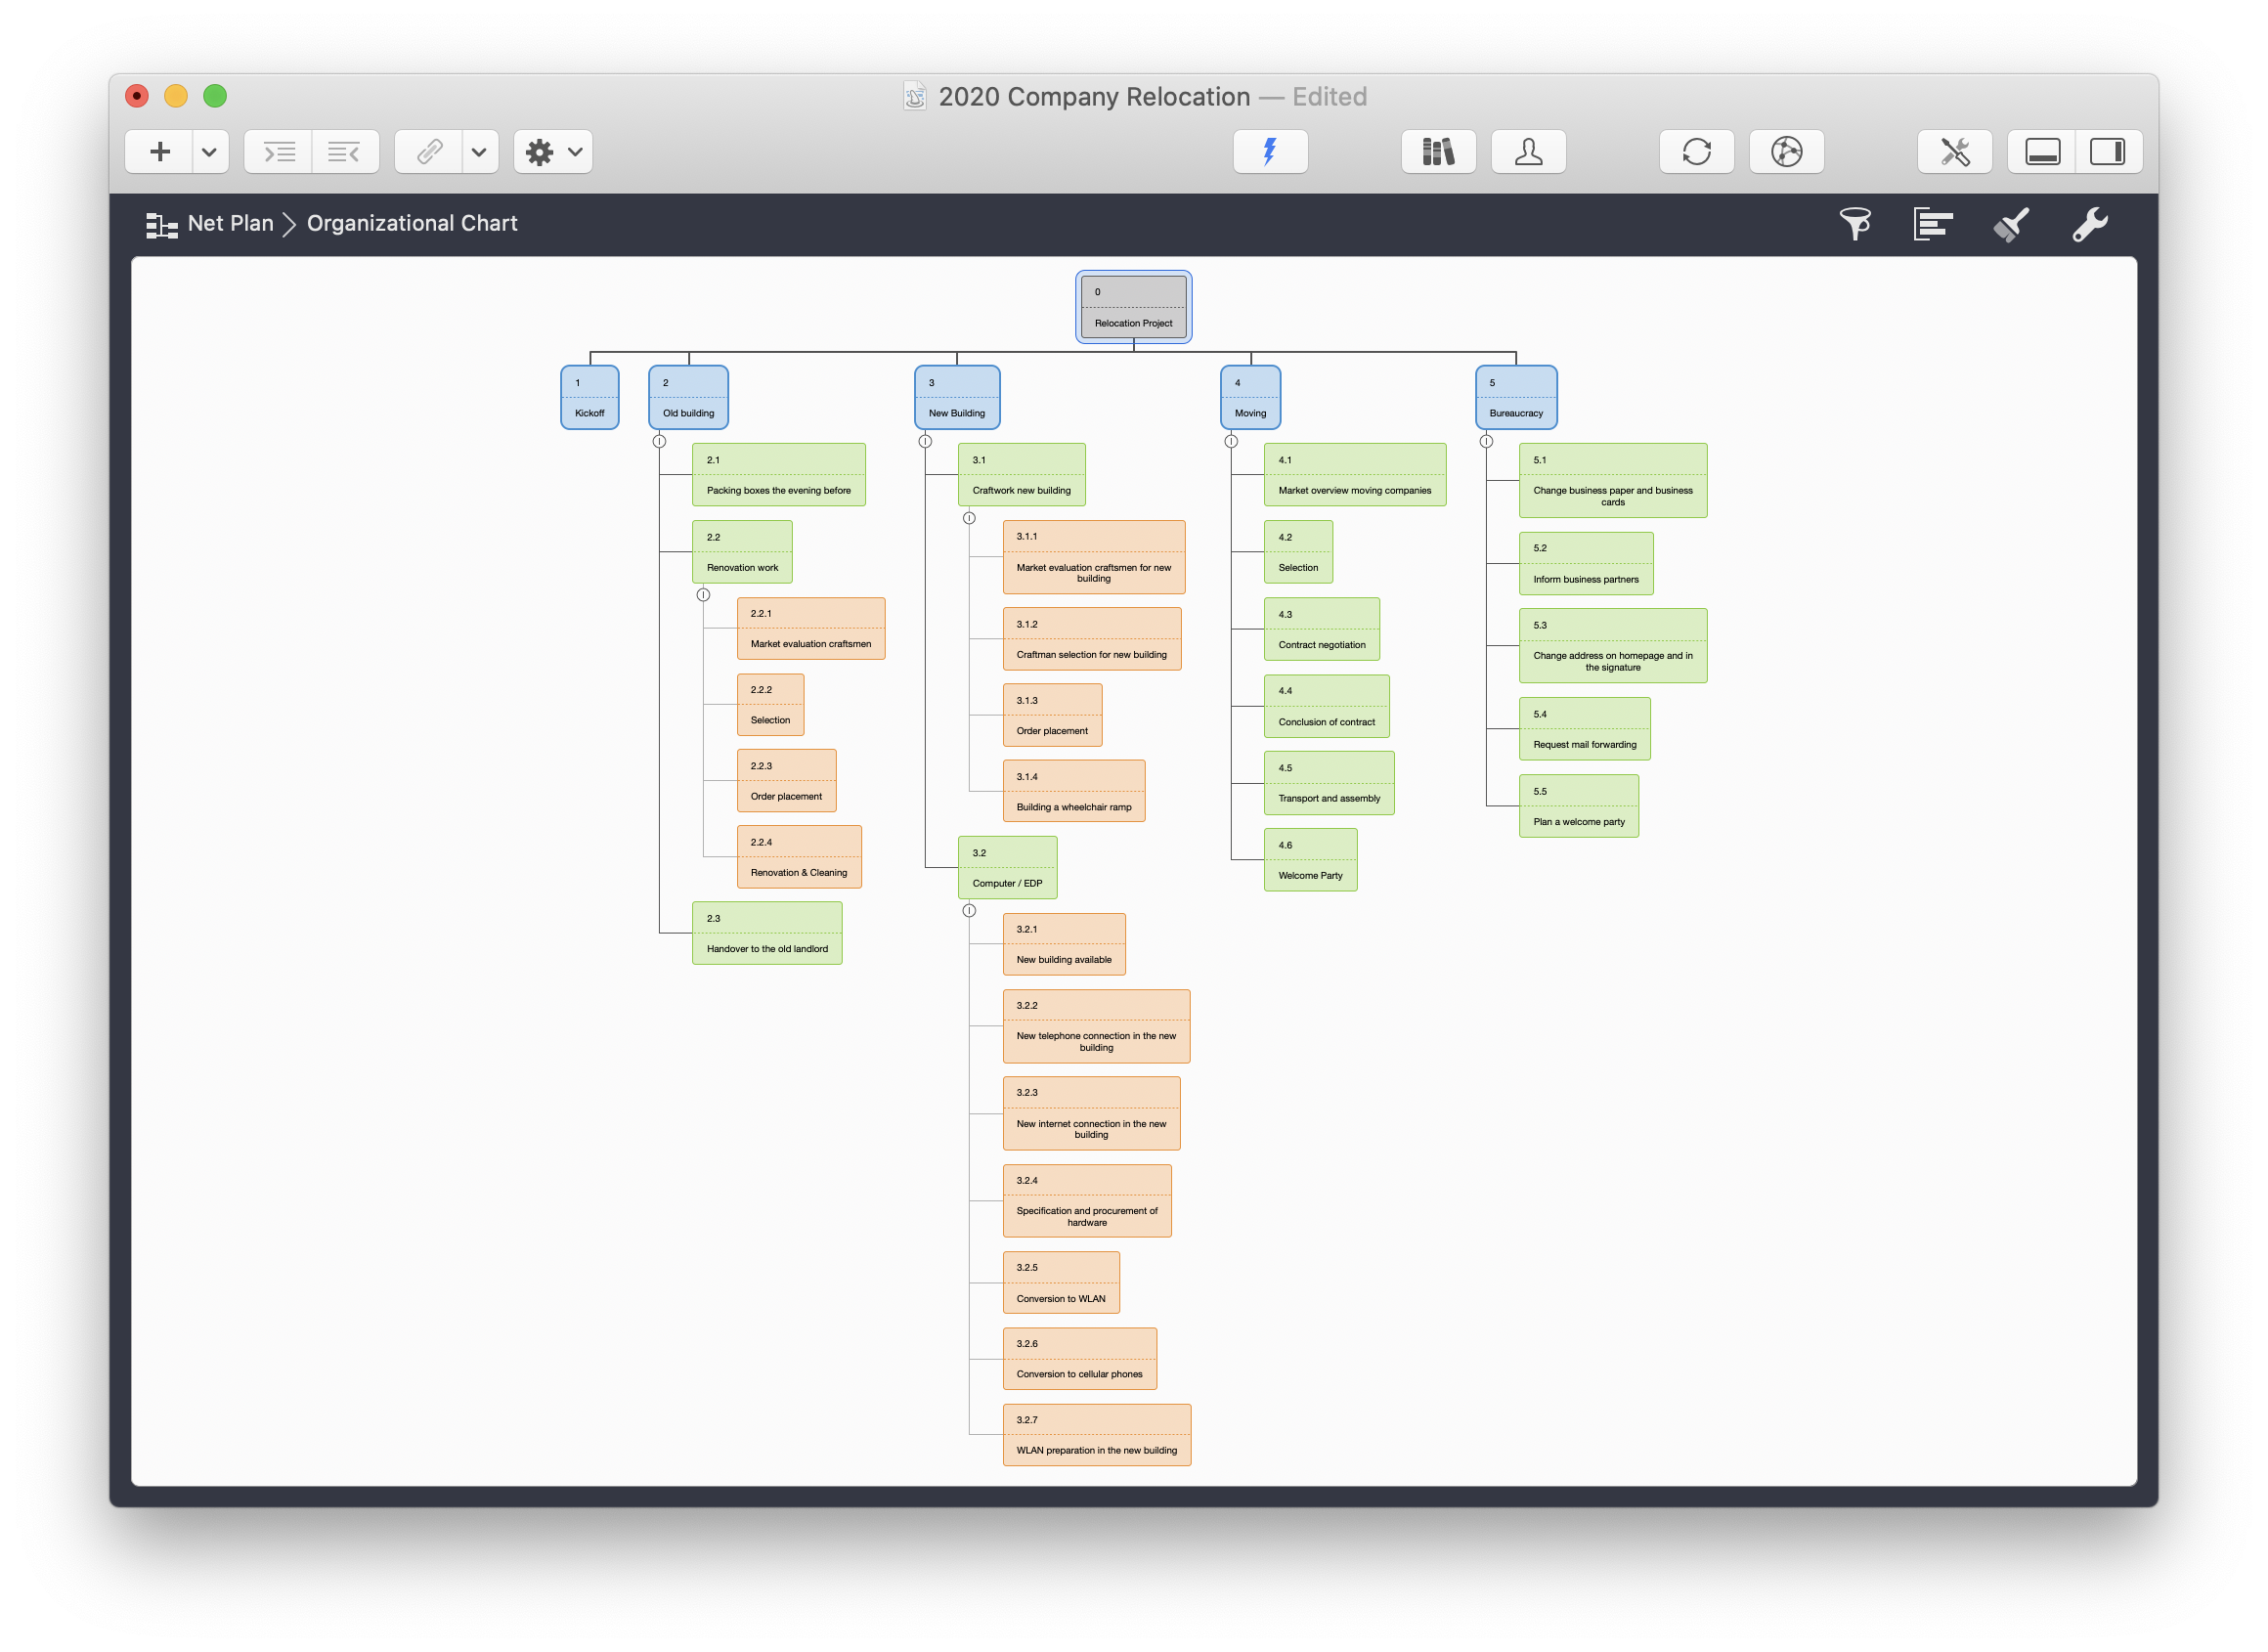
In Merlin Project, a mind map can be converted into a WBS by customizing the view. In Merlin Project the WBS is called 'Organizational Chart' and you can find it under View → Net Plan → Organizational Chart. In our example project, the mindmap shown above results in the following picture as WBS:
A WBS is prepared by the project team, because the project team usually (hopefully) consists of experts who know what needs to be done to complete a work package. Work packages are broken down into activities in such a way that their effort can be estimated with relative certainty and ideally can be handled by one person. In the project management world, there are different views on how small or how large an activity can be at least or at most; suggestions range from 4 to 80 hours. The decisive factor here is the project itself: If you are building a space station, an activity granularity of 4 hours is most likely not appropriate. Ideally, each activity is also independent of others, i.e. there is no interface to another activity in progress while it is being processed. (Of course, independence does not mean independence from the completion of previous tasks).
A WBS also ensures a common understanding of the project scope. If something is not in the WBS, it is not part of the project. To get a more precise understanding of the work, some projects create a so-called Work Breakdown Structure Dictionary, in which each work package is described in detail. To enable an exact assignment, WBS codes are usually used, a uniform numbering or marking of the work packages.
You can configure the WBS codes under File → Project settings. To do so, open the third tab Codes in the Project Settings Inspector and there the tab WBS Codes:
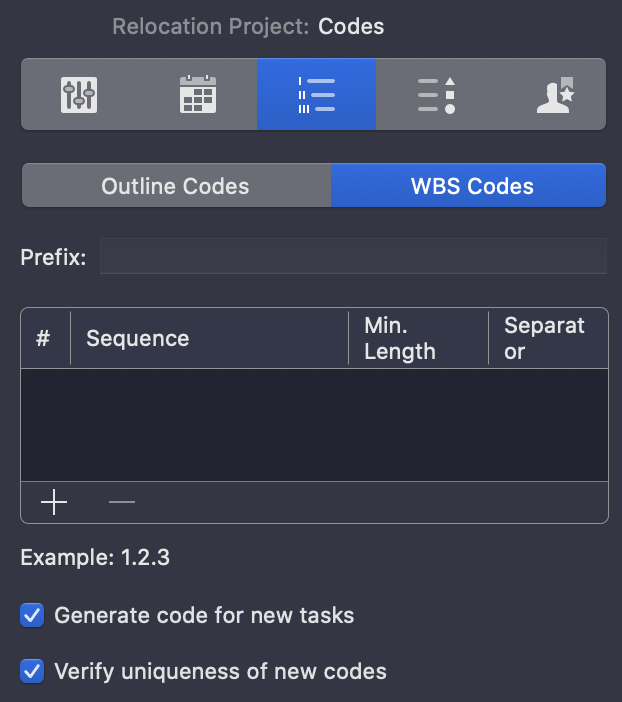
This is then interesting if your project environment specifies a certain type of WBS code (for example: there should always be a "PRO" in front of each WBS code). In the WBS settings you can specify exactly how the WBS code has to look like, which signs it has, how long it has to be and which separators should be used.
In our example project Mr. Meier cannot possibly create the WBS on his own. For example, he has no expertise in setting up computer networks, which is necessary for the construction of the new site. Nor is he an expert in aspects of occupational health and safety that should be clarified before moving into a new building. It is therefore necessary for Mr. Meier to prepare the WBS together with his colleagues Schulze and Becker:
The next day Mr. Meier drove to the new building with Mr. Schulze and Mr. Becker. It was only a few minutes away from the old building. The car had just been parked when Mr. Becker noticed that the entrance was only accessible via stairs: "Our CEO certainly hadn’t noticed that, but we have a wheelchair user who can’t be carried in and out every morning and evening. Inside the building it was noticeable that there were no cable shafts to lay the cables for the company network. The workplaces of the company still operating there were equipped with cellular telephones and computers with WLAN adapters, so that no cables were necessary. "This will be expensive, and I doubt we will be able to find someone to do it by June," Mr. Schulze said. "Or we could switch to WLAN, then we won’t need cables." "That means extra costs for the equipment." Mr. Meyer interjected. "It’s cheaper to buy a few WLAN adapters than to upgrade the whole building." Mr. Schulze replied. "The advantage would also be that we could carry out the changeover in the old building now and then set up a second access point here, so that we are immediately back in the network when we leave the old building. The same applies to the telephone. We could save ourselves a lot of trouble." Mr. Meier thought it was a really good idea. "I’ll send you some figures tonight on how much it costs to upgrade with Wi-Fi compared to installing cable ducts." Mr. Schulze added. All that remained was to prevent Mr. Anton from simply laying the cables on the floor with duct tape.
Just before they left, they met the managing director of the company that was still using the building at the time. "When can we move in?" asked Mr. Meier. "Well, actually not until July 1st, but we will be out two weeks before that. And if you want to measure something before then, you are of course welcome to come by. But please do any reconstruction work, everything that’s loud and dirty, not before we’ve left."
You were on your way back when Mr. Becker asked if either of them had seen a caretaker’s apartment? "No, I’m sure there was none," replied Mr. Meier. "I don’t know where else it could have been." "And where should Mr. Schroeder go then," Mr. Becker asked, "he’d have to get out of his janitor’s apartment." Ramp, wiring, caretaker’s apartment - no one had these points on the note.
Returning to the office, the three gentlemen sat down together again and talked about the work packages necessary to complete the project on time. After some time, the original short list had turned into a long list of large packages, which in turn were divided into smaller activities. For each activity they gave a first estimate. For some activities this was not yet possible; for example, nobody knew how long it would take to build a ramp for the wheelchair user.
The conversation with Mr. Schröder revealed that he was retiring in 5 months and then had to move out of his caretaker apartment anyway. He too was surprised that the building was abandoned so quickly. Mr. Meier assured him that he would find a solution.
In our example project, the experts identified further work packages. Simply listing all work packages and activities would not be advantageous for clarity, so that a grouping according to finished results (called deliverables) is usually created. In our example project, there will be several finished results:
-
The old building has to be renovated for moving out before it can be handed back to the landlord
-
The new building must be prepared before moving in
-
The relocation itself
-
Bureaucratic things
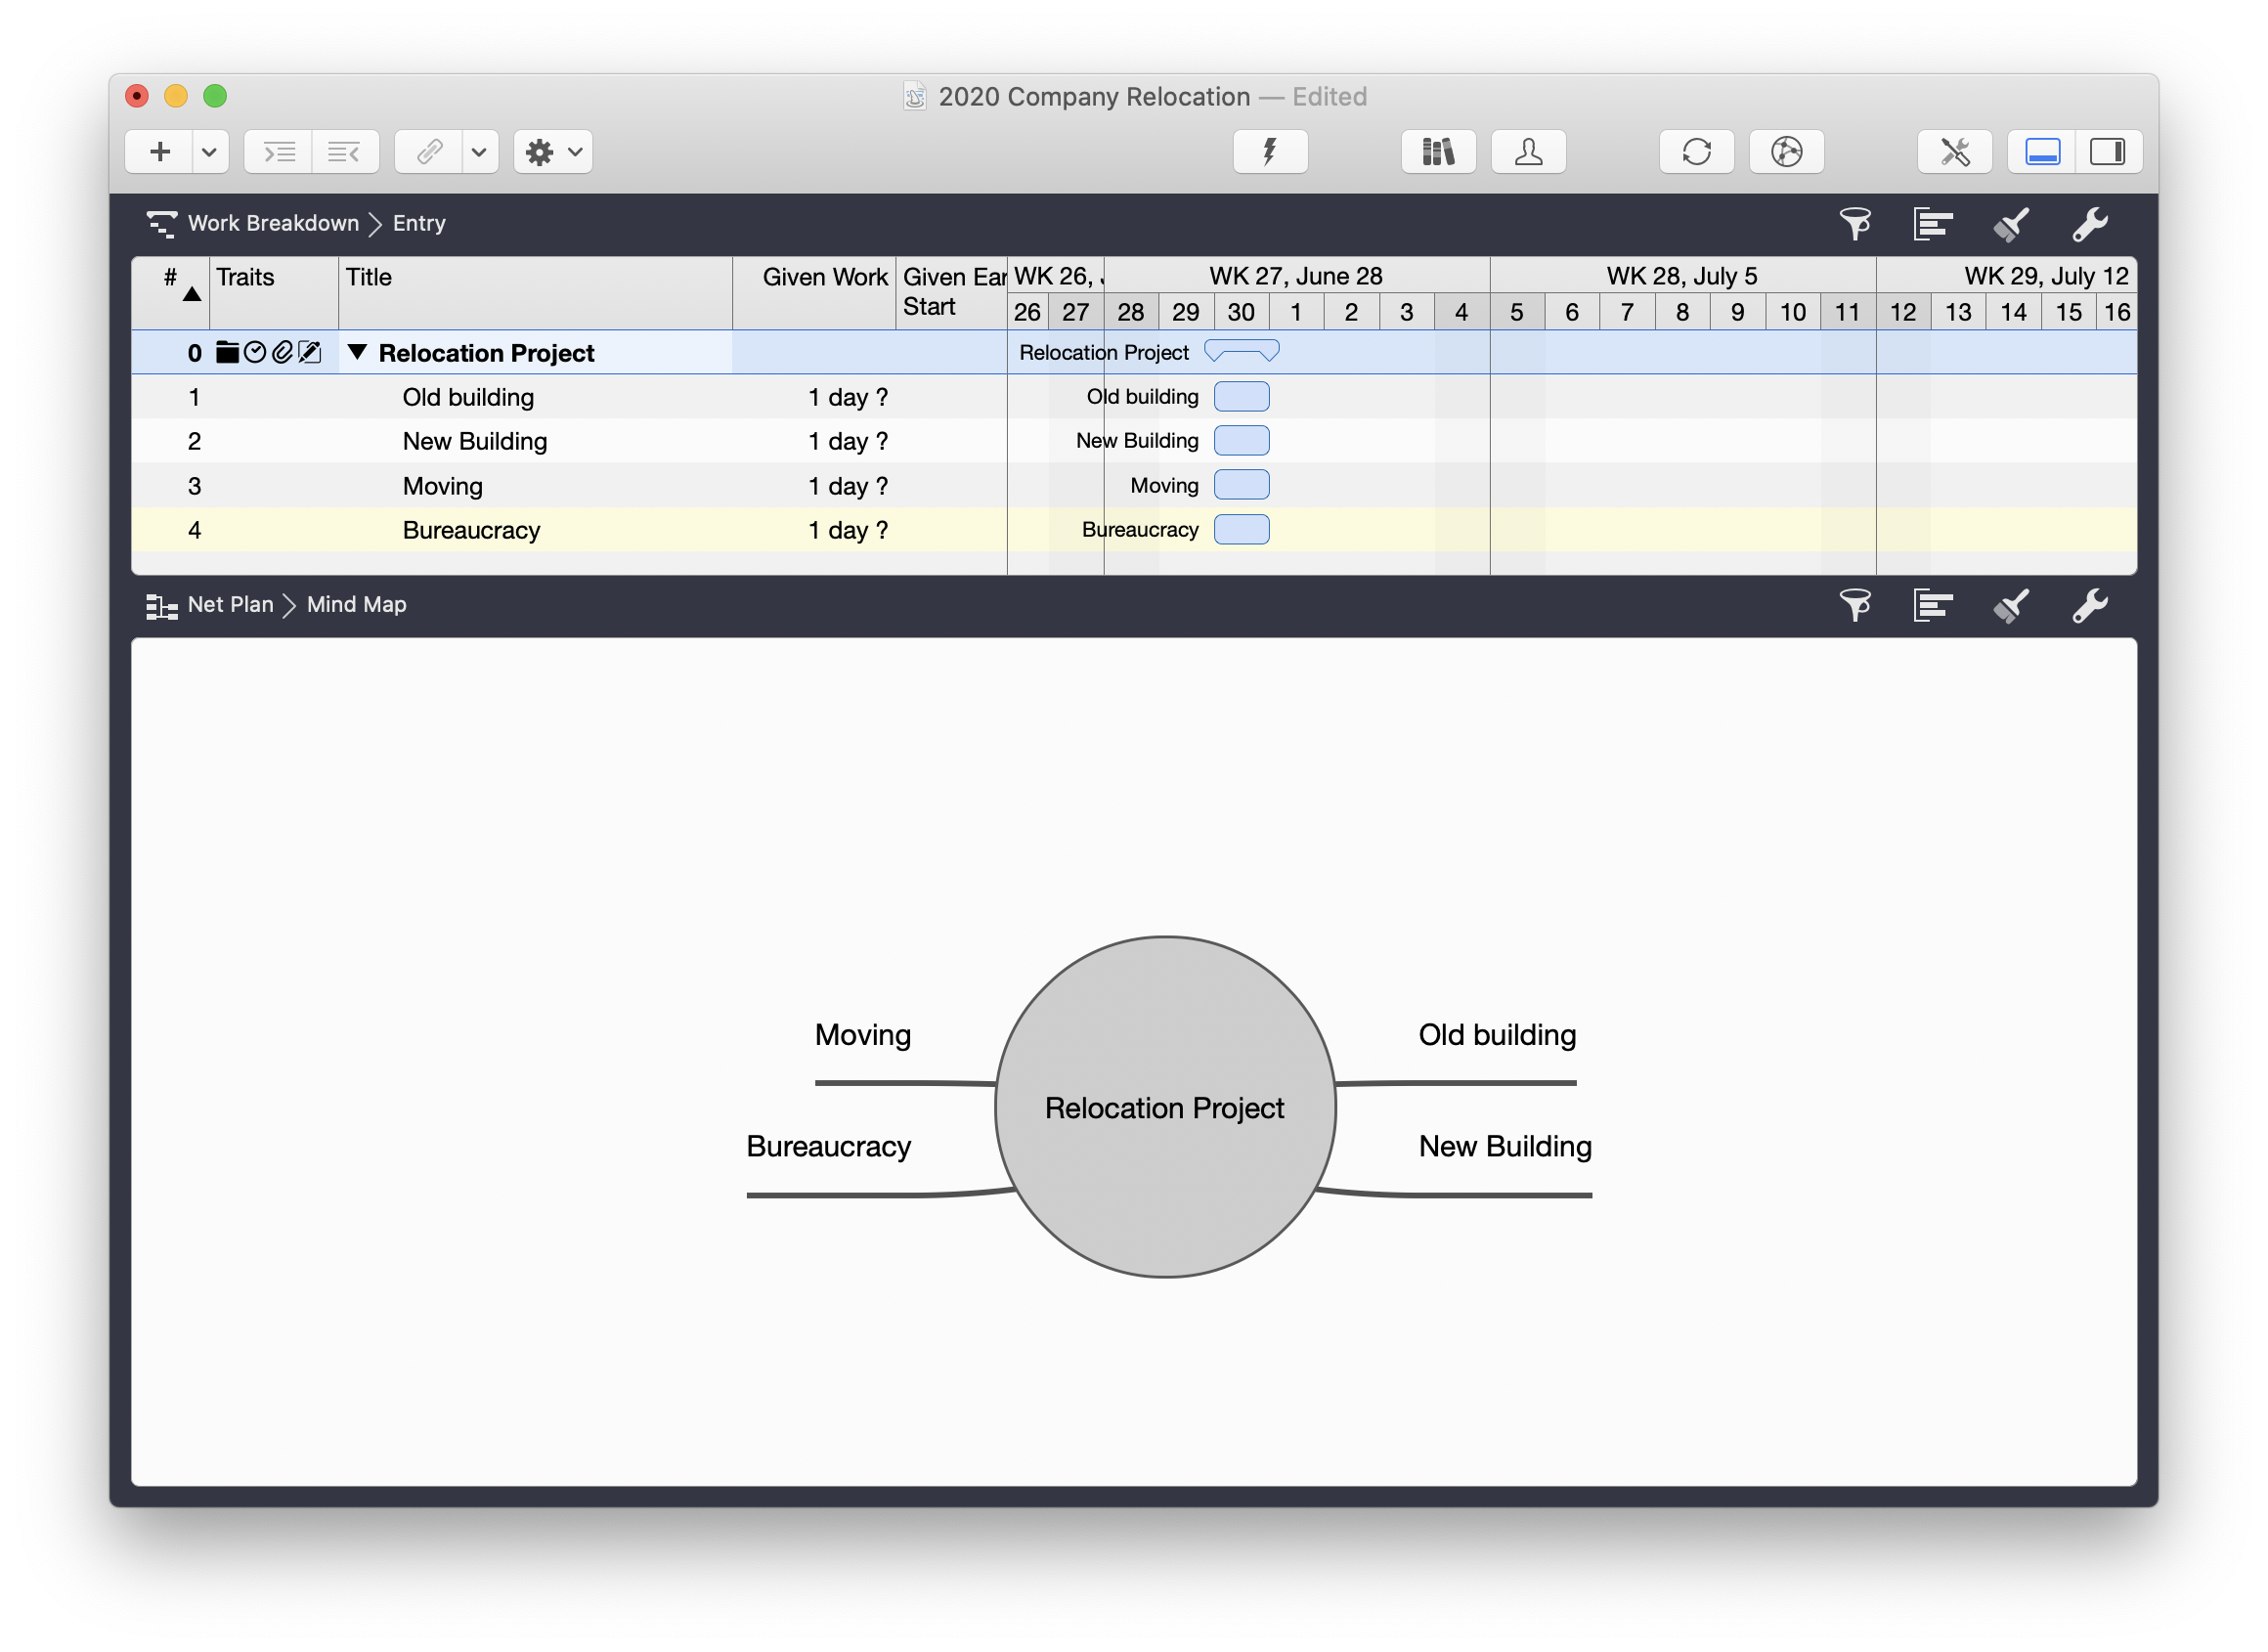
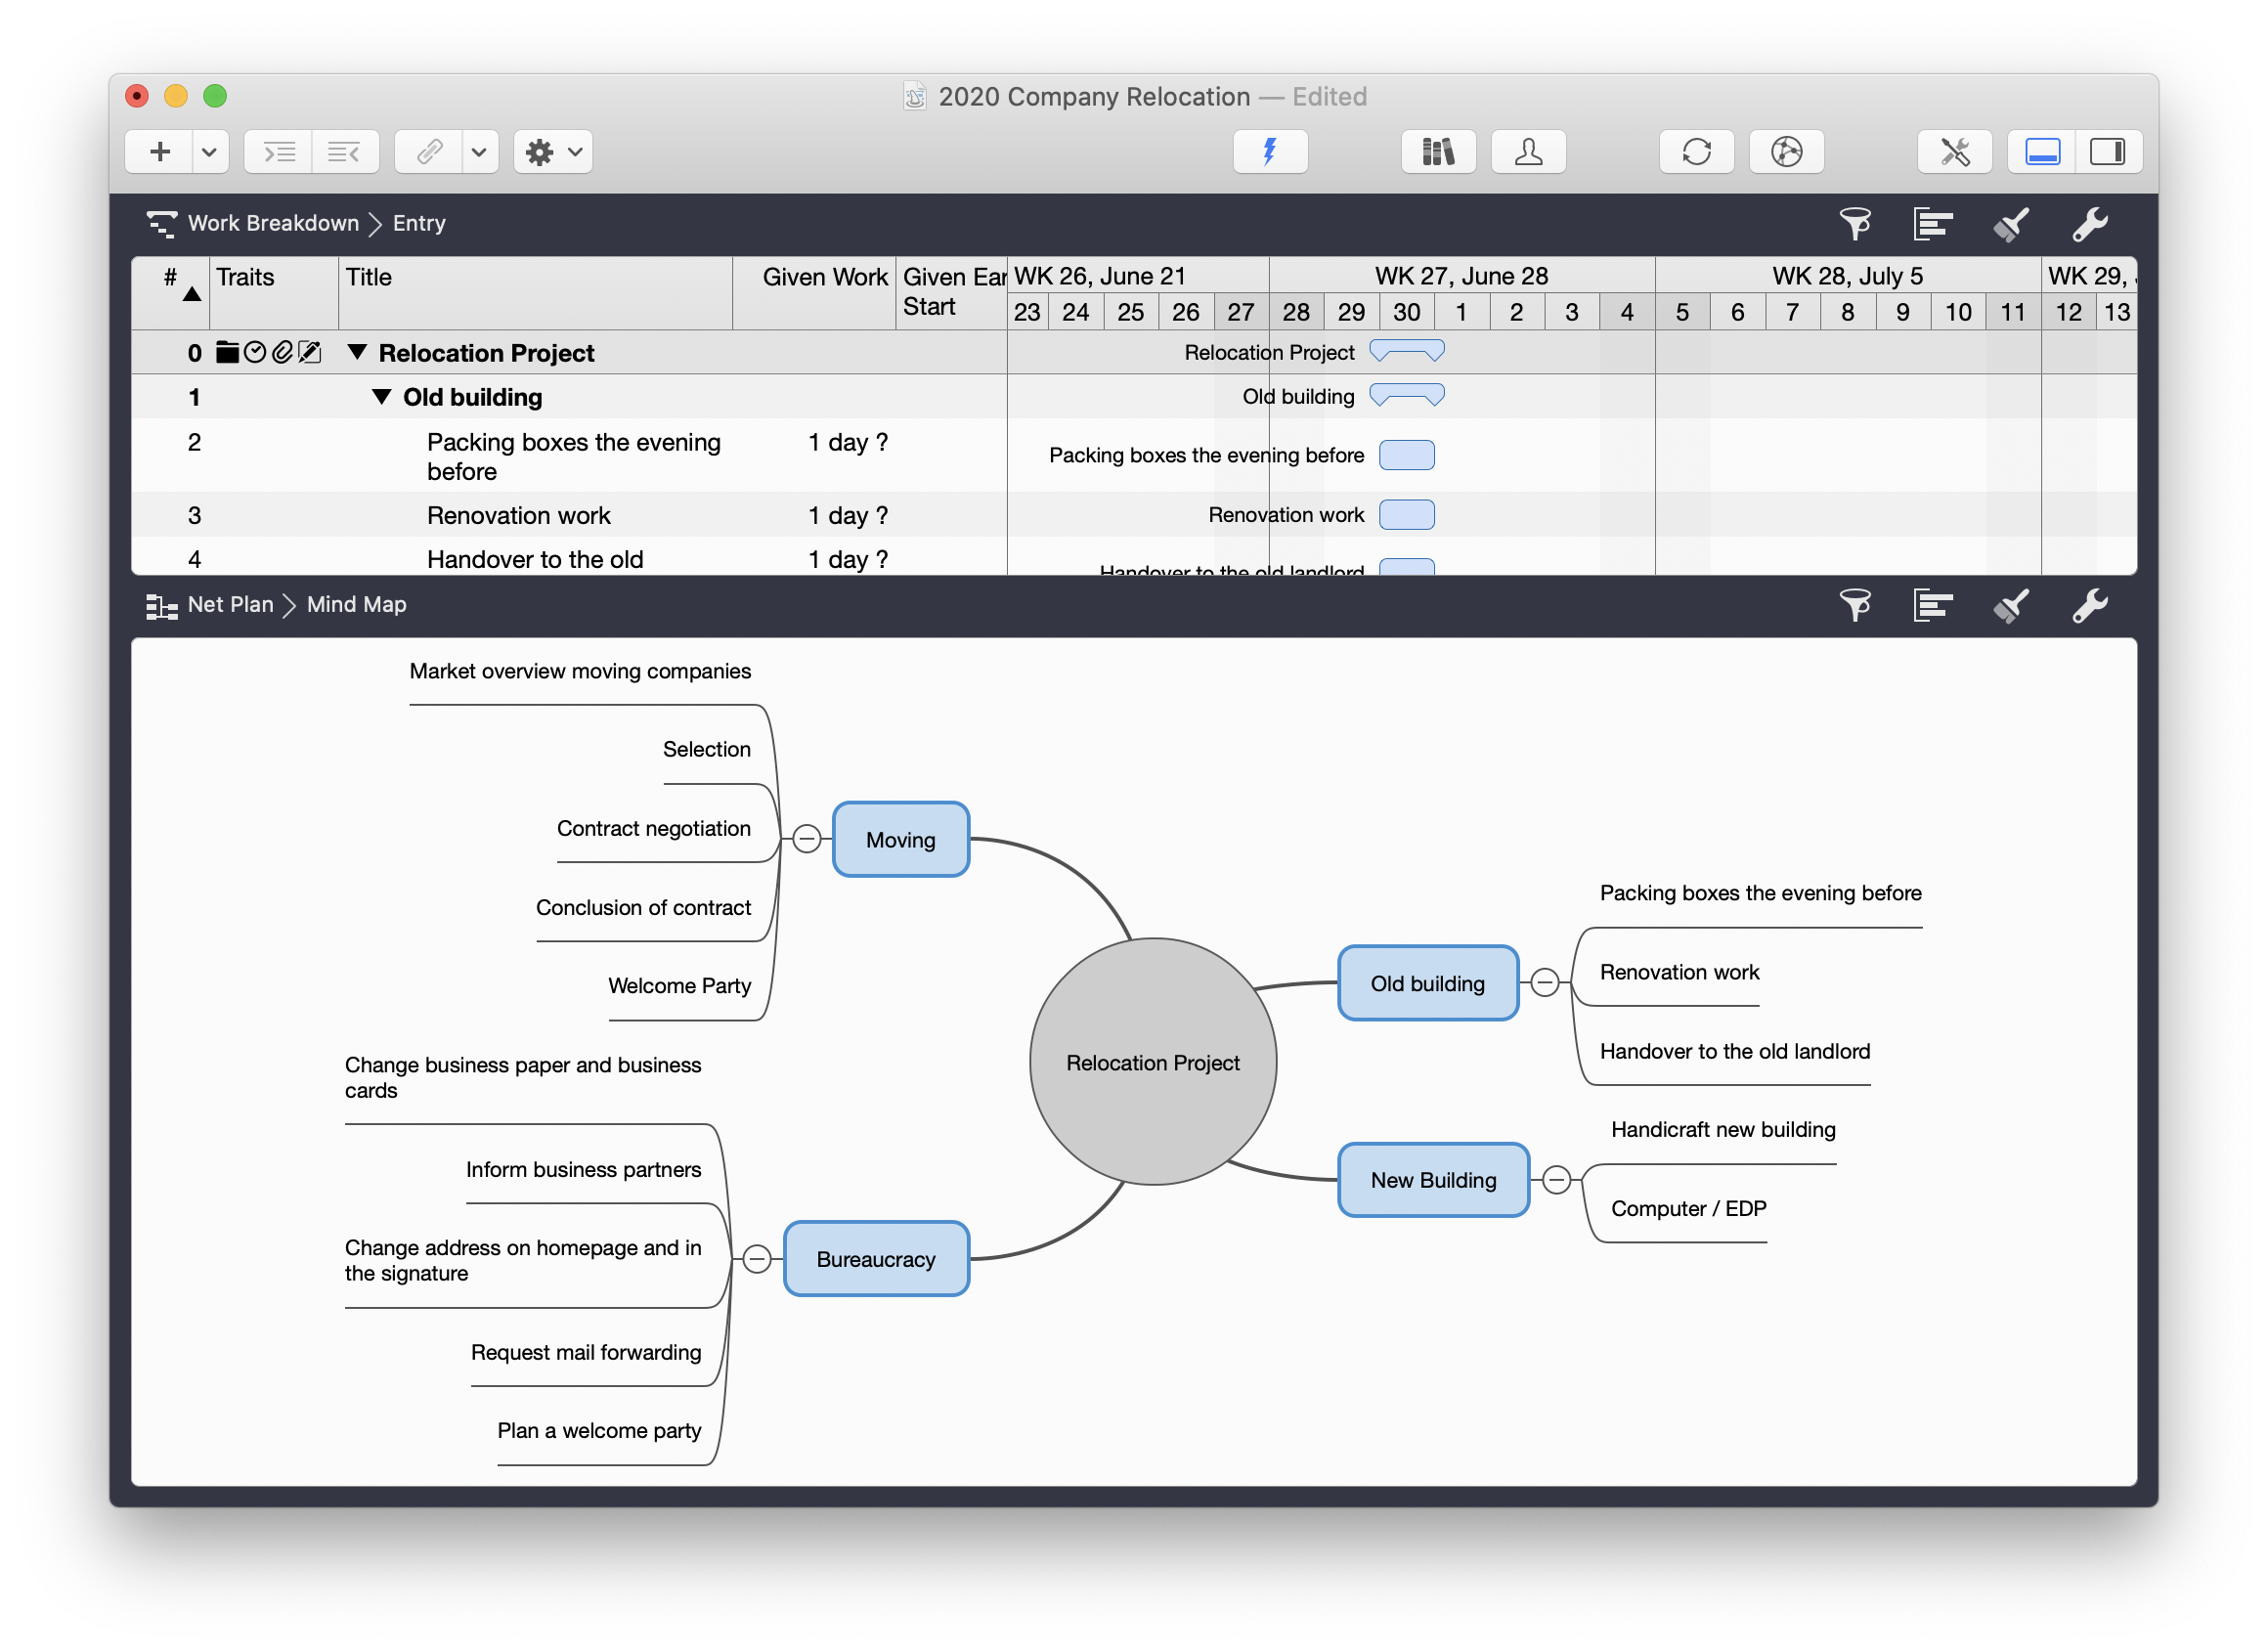
These points are simply entered one below the other in the structure plan. In the view Netplan → Mindmap the following picture then results:
|
|
The figure shows the work breakdown in the upper area and the mind map in the lower detail area. |
These points can be broken down further in the following. The preparation of the new building, for example, is again broken down into processes such as:
-
Handicraft work new building, e.g. construction of the ramp for wheelchair users
-
IT work
The activity 'Craftsmanship for new building' can be disassembled:
-
Market evaluation craftsmen
-
Selection of craftsmen for new building
-
Order placement
-
Building a wheelchair ramp
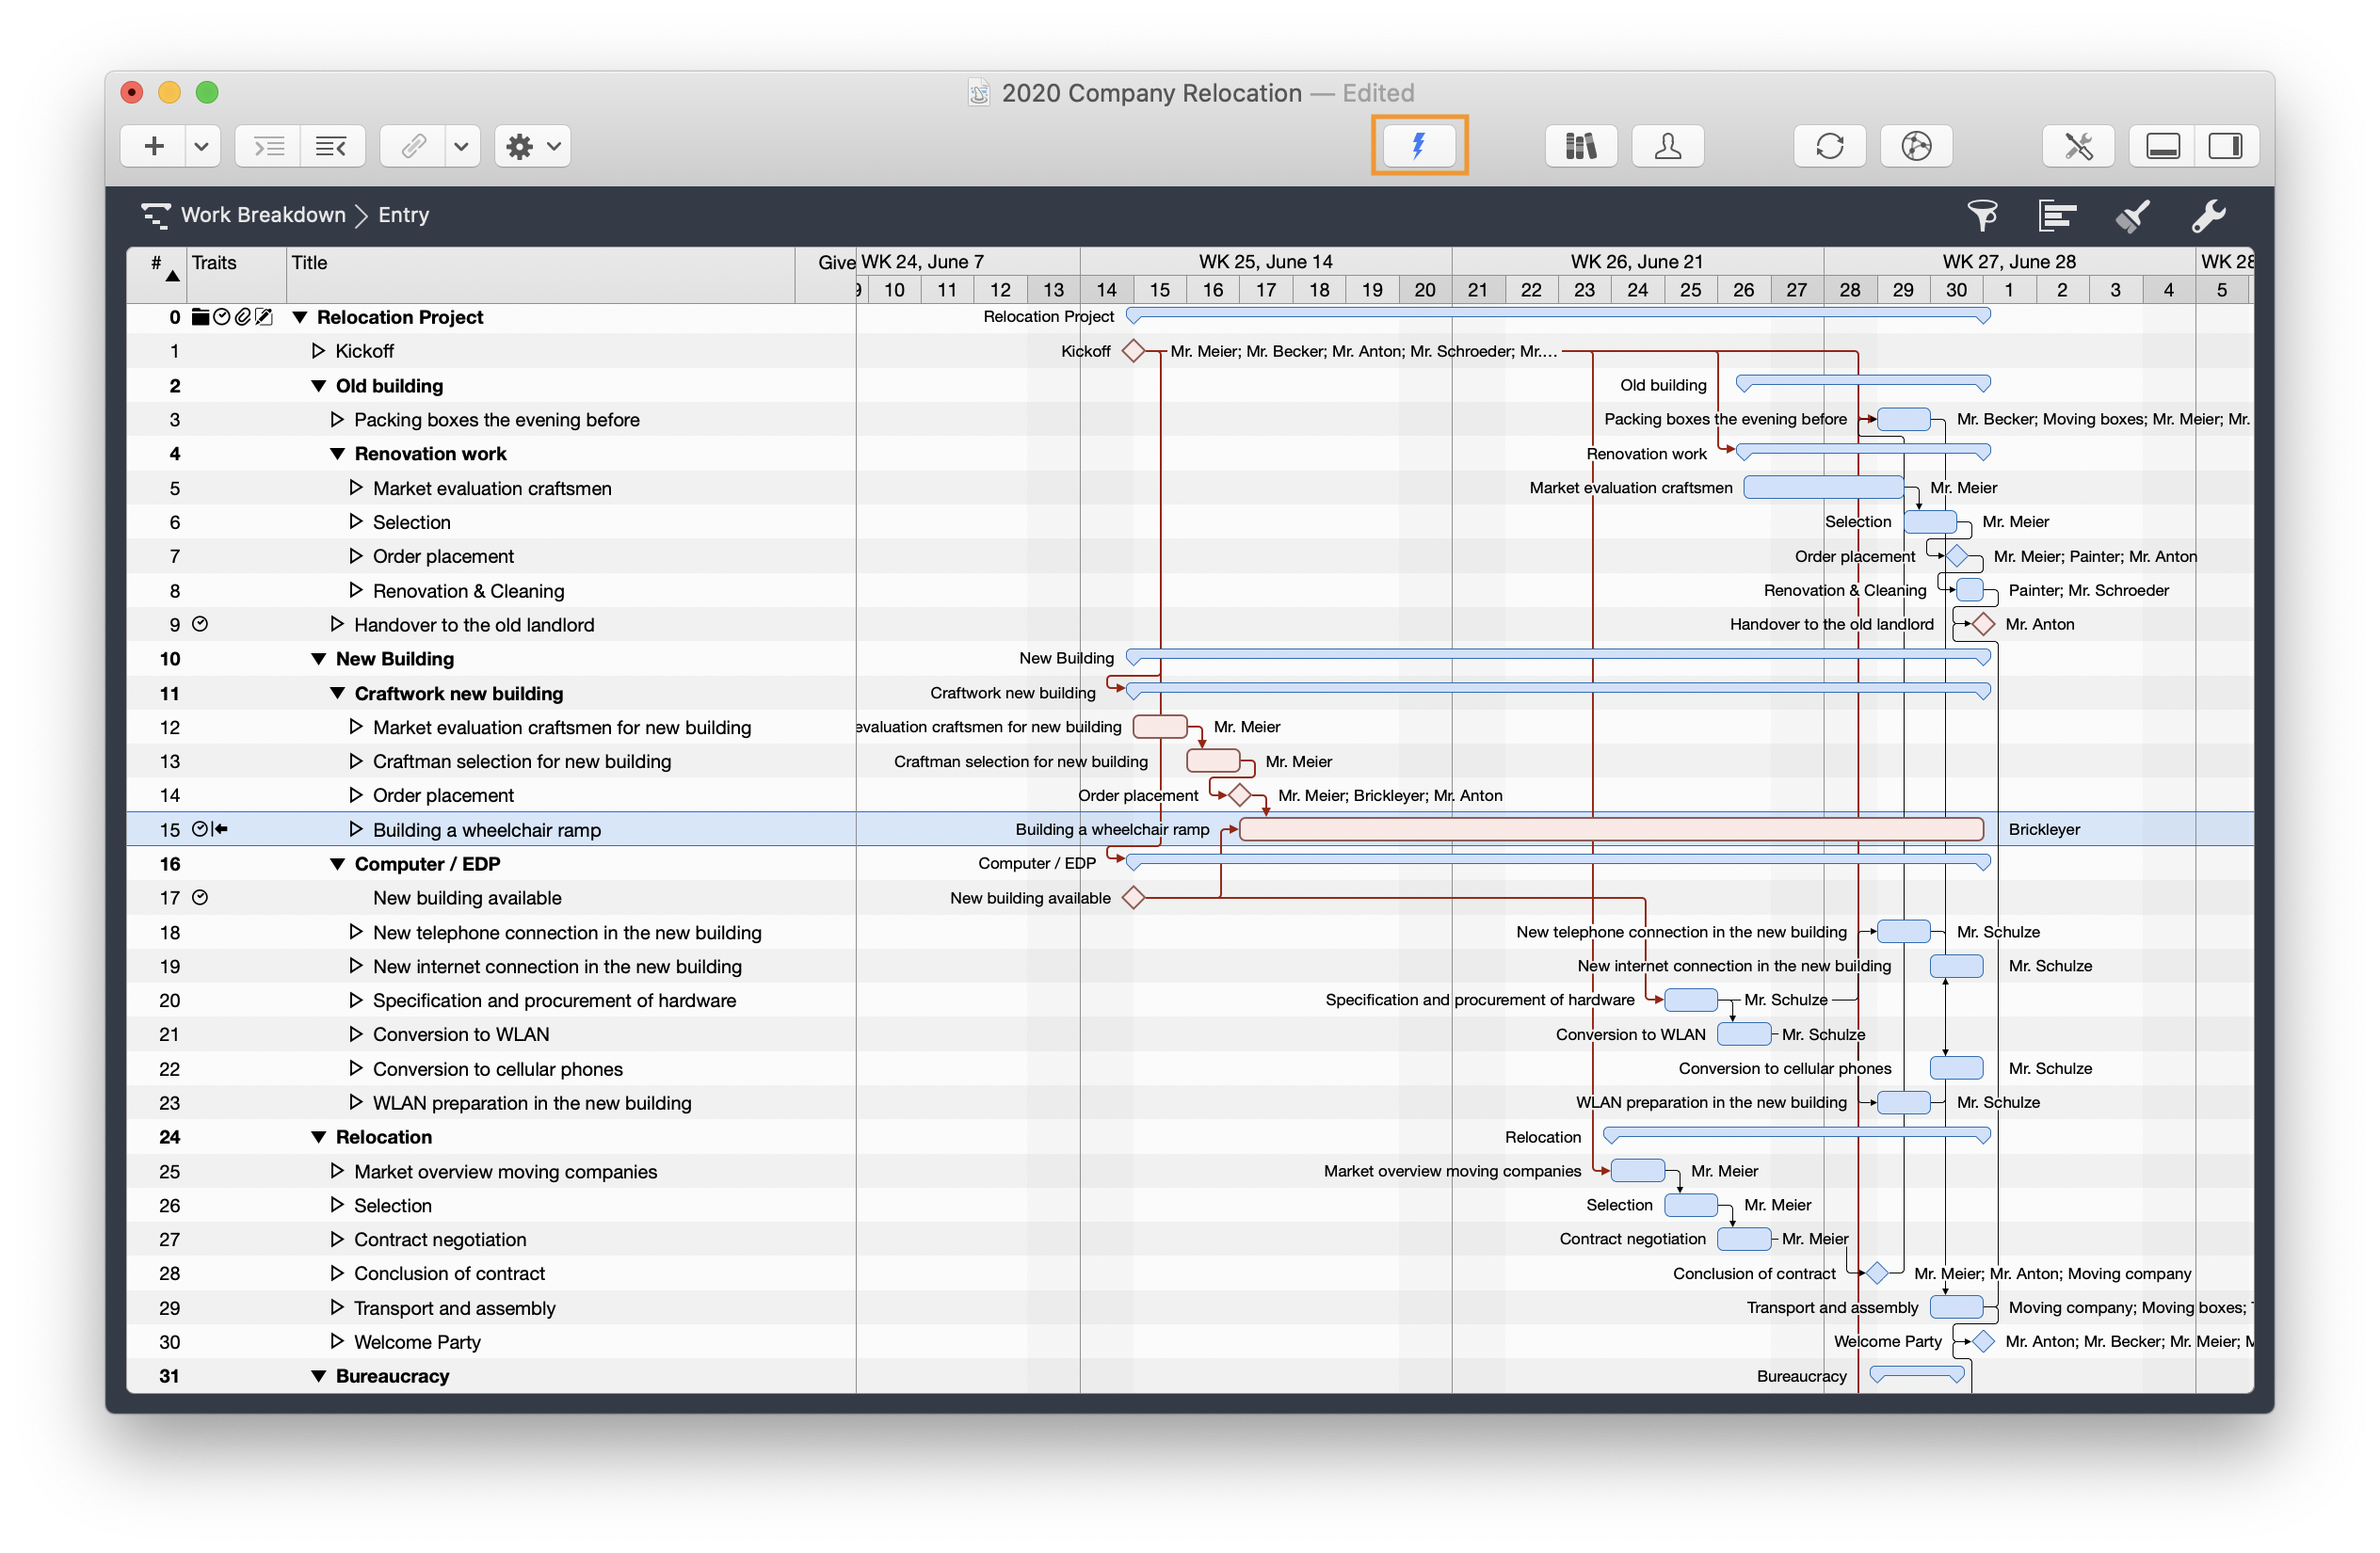
The following figure shows the result of collecting the work packages in the Work Breakdown view:
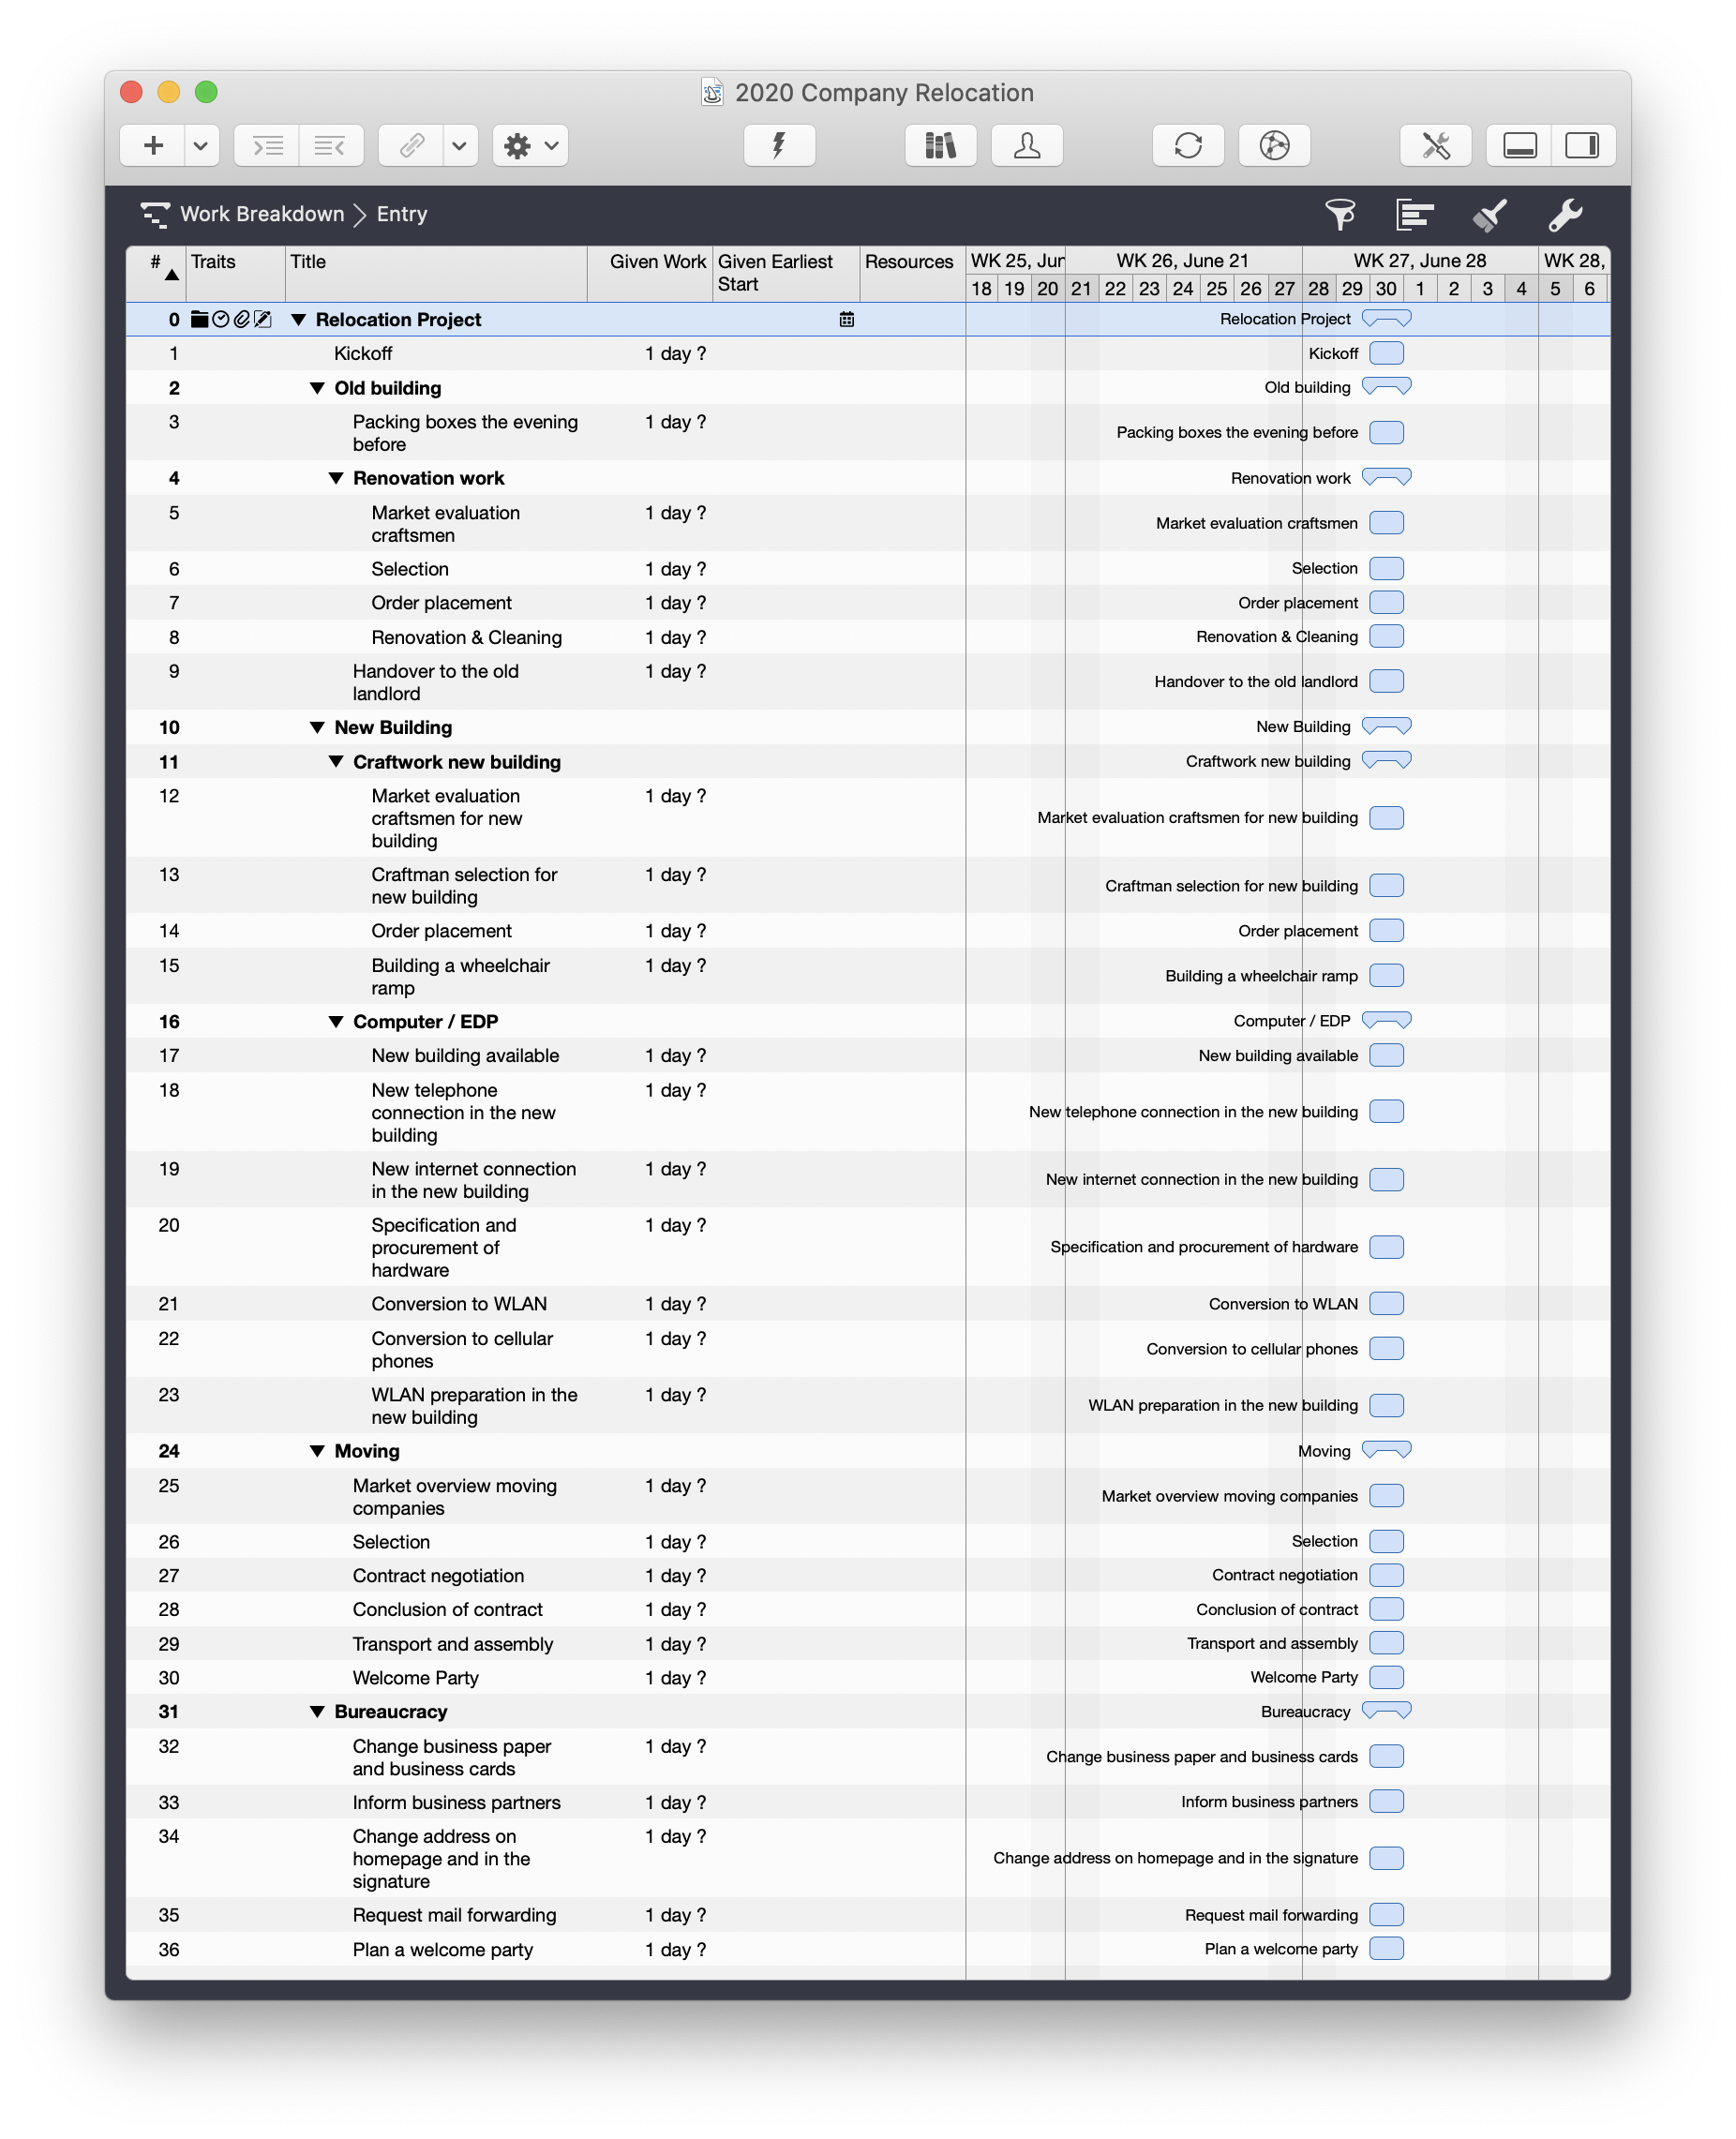
In the figure, the example project shows how the deliverables were further subdivided into work packages and these in turn into processes. A breakdown of the work packages is represented by the indentation of the associated activities and thus the representation of a hierarchy of activities.

You indent tasks either by selecting them and using one of the corresponding buttons (see illustration) or by moving a task with the mouse under the parent task.
If you have many activities, navigation within the activities can be cumbersome. You can 'expand or collapse' all the higher-level activities at once and thus provide a better overview by choosing Structure → Expand → All bzw. Structure → Collapse → All from the menu. Helpful here are also the key combinations ctrl and ⌘ and + or ctrl and ⌘ and - .
Create network diagram
After identifying the activities, Mr. Meier and his colleagues began to identify the dependencies between the individual activities. From the known data it was clear that the time cushion conjured up by Mr. Anton did not exist.
Determining dependencies between activities using networks is one of the central steps in project management. A network visualizes the complexity of a project and reveals connections that would be less obvious with other planning methods. This makes it easier to identify risks, for example. At the same time, the analysis of dependencies also allows you to locate activities that can be parallelized, which can accelerate the course of the project.
There are a number of dependencies in this project, among others:
-
First the WLAN hardware must be ordered before it can be installed. It must be installed before the move takes place.
-
First the new building must be cleared before a move can take place (among other conditions such as the one mentioned above). The move must take place before the craftsmen can start renovating the old building. The old building can only be handed over to the old landlord once the building has been renovated.
-
and many more
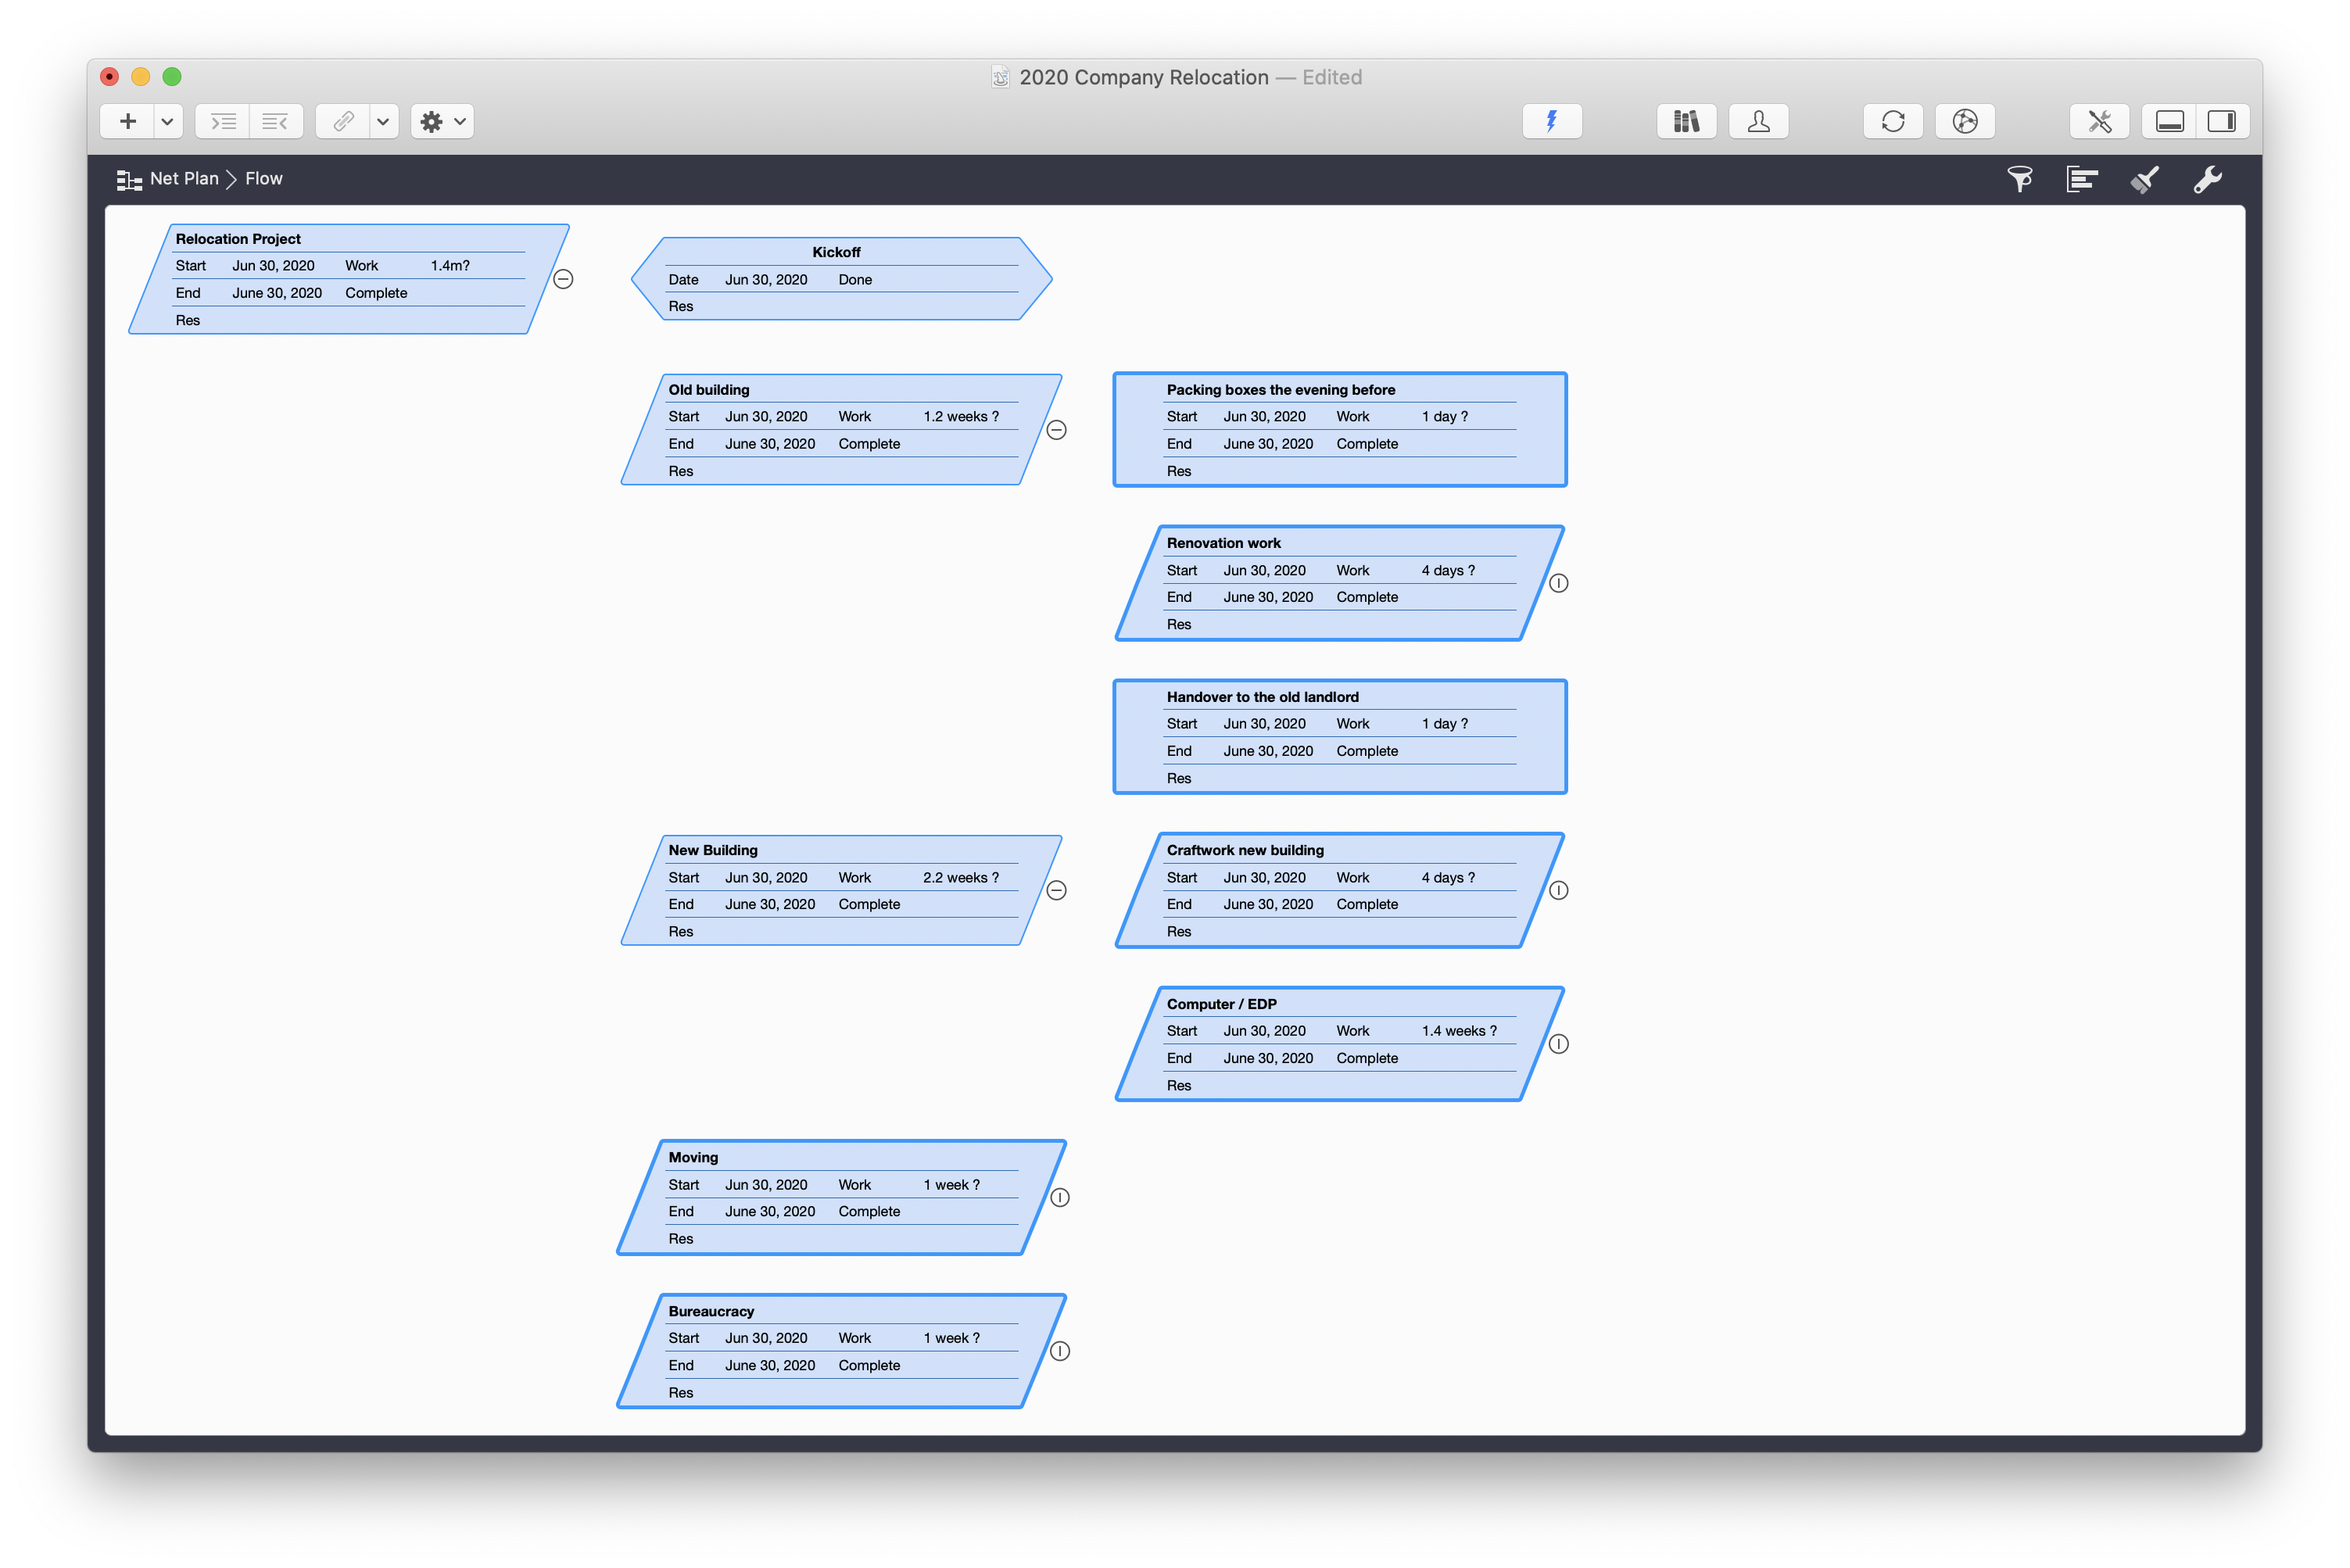
Merlin Project uses the 'Activity on Node' approach, where activities are displayed in nodes and dependencies are indicated by arrows. In the network view, all activities without links to each other are initially displayed. Collective activities are displayed as diamonds, activities as rectangles:
Activities are linked as follows:
-
Point to an activity with the mouse (without pressing the mouse button)
-
Now press the alt key and keep it pressed
-
Press the mouse button and keep it pressed; you will see a point on the right side of the selected activity.
-
Move the mouse to the activity that you want to link to the previous activity; you will see a link line between the two activities
-
Release the mouse button
Repeat these steps for each activity you want to link to another activity.
|
|
You link activities in the same way in the work breakdown view. |
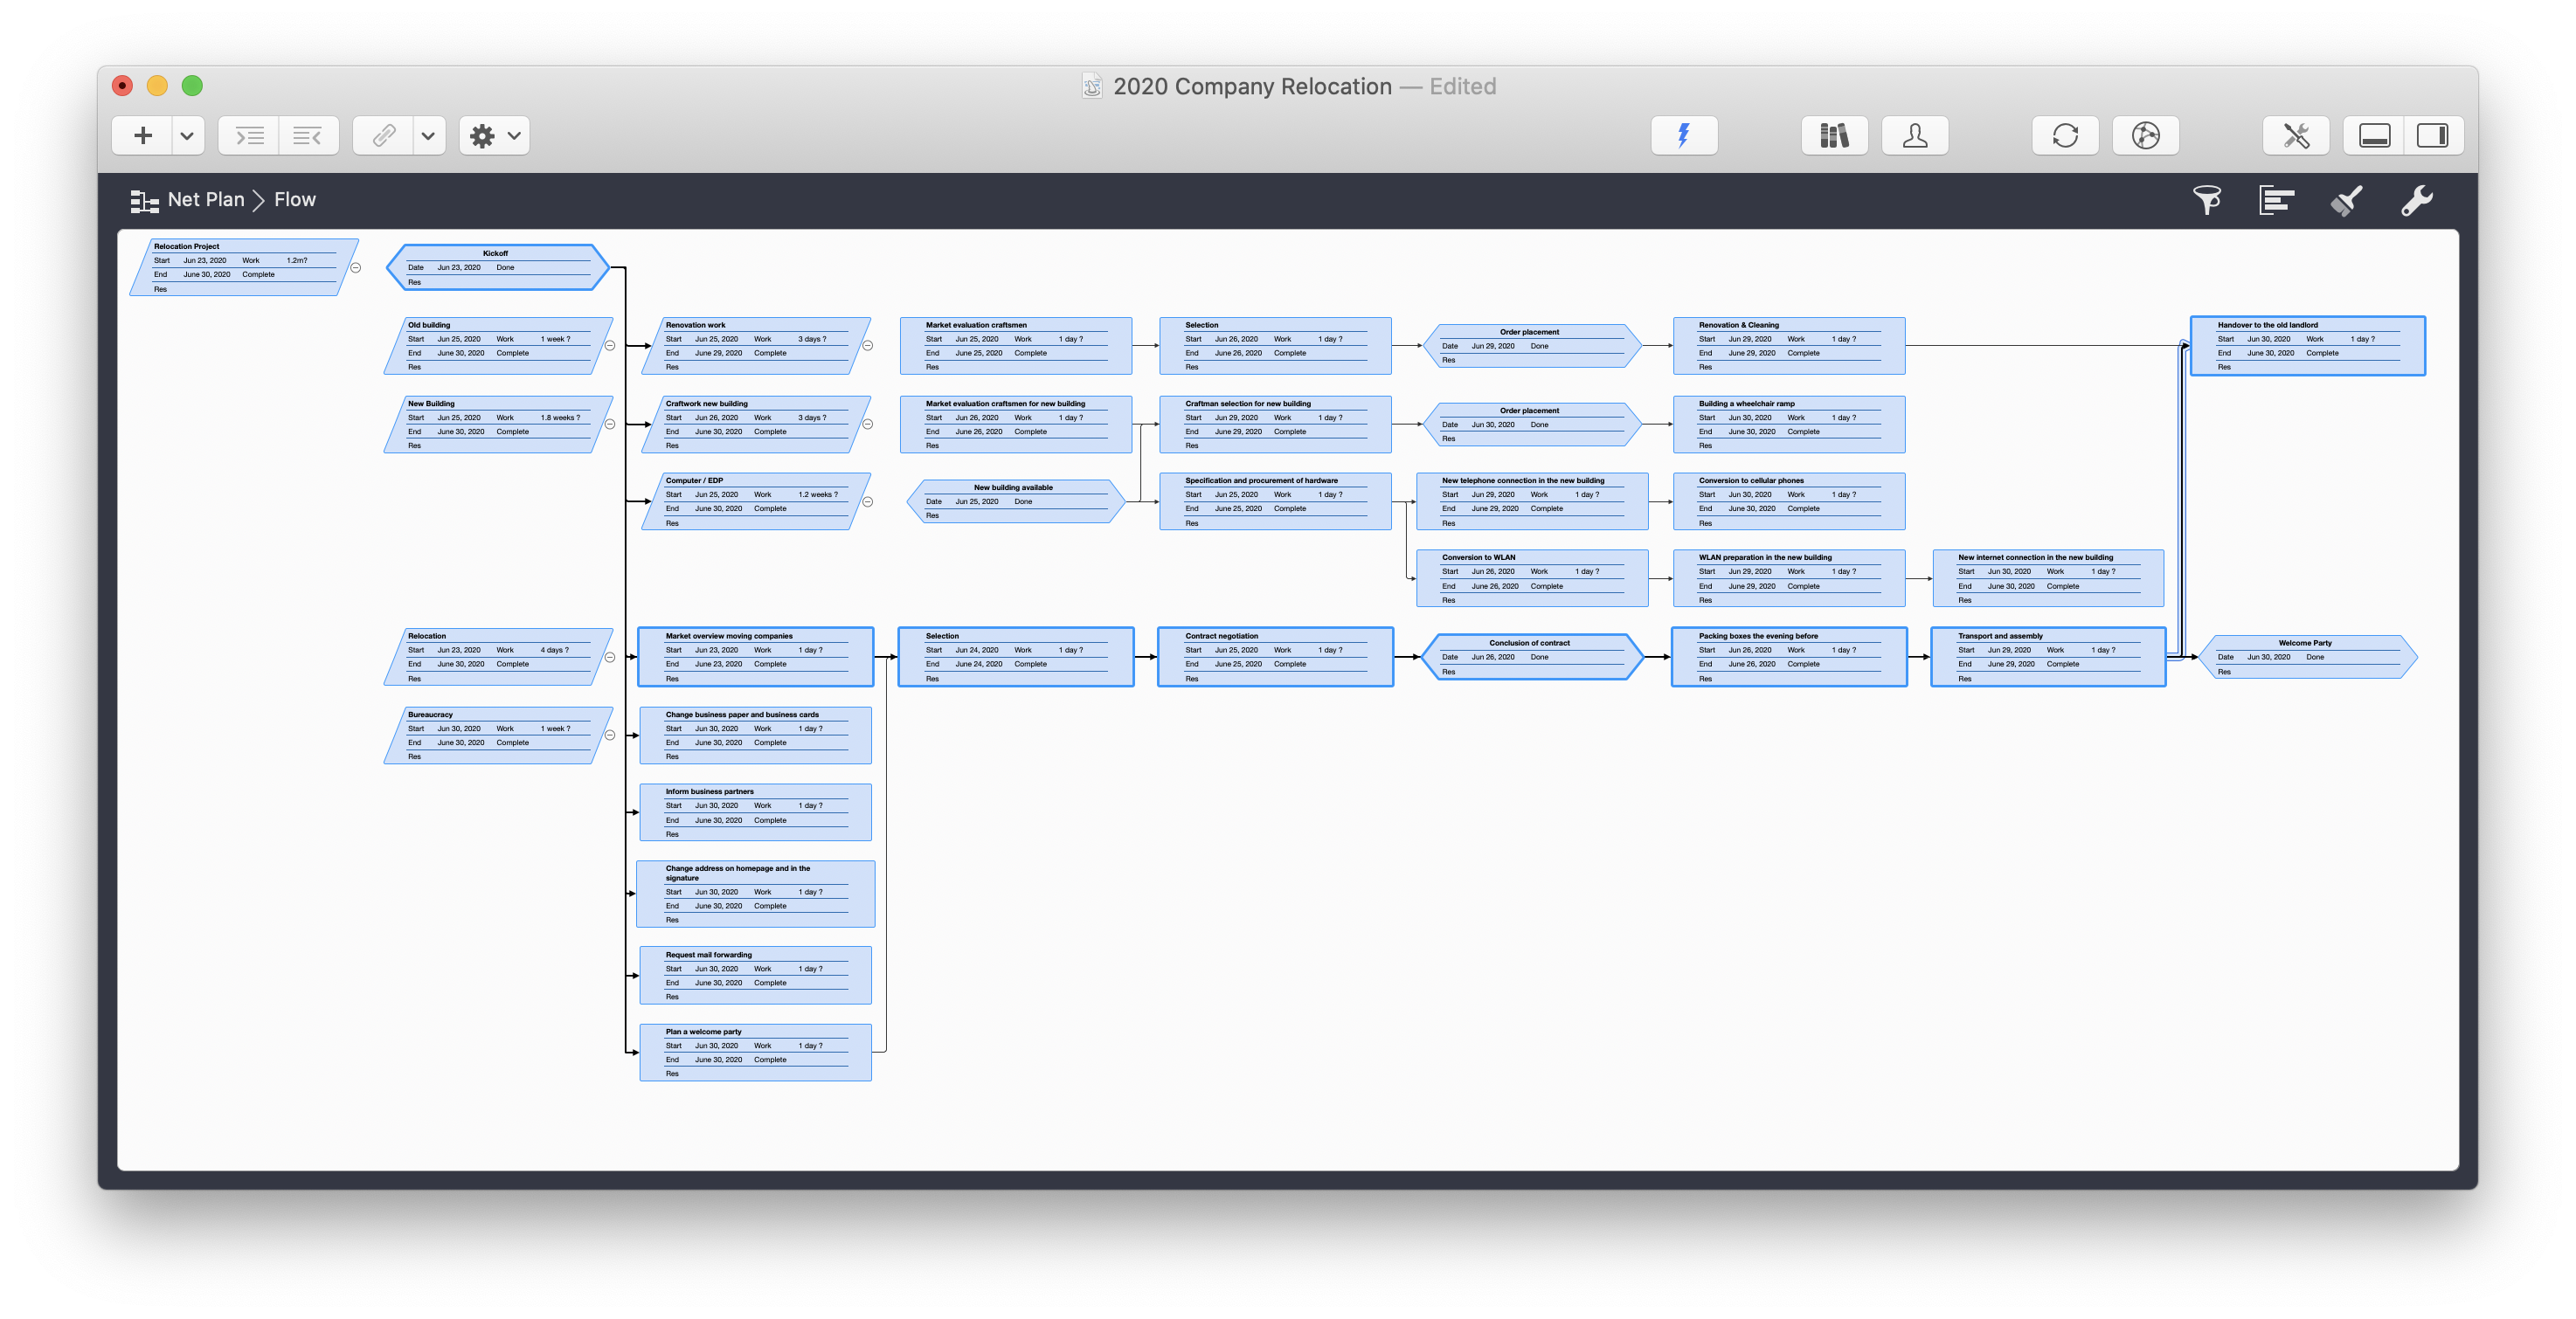
The figure shows a network diagram that represents our example project. In this illustration, the scaling has been changed using View → Zoom to be able to see more activities on the screen.
Another way to reduce the complexity of the display is to reduce all activities within a node to the node itself. To do this, there is a small triangle next to the composite activities in the work breakdown view. Clicking on this triangle 'collapses' all the activities that belong to this activity group. In the network view, the small circle to the right of the diamonds or rectangles has the same function. A small line in the circle indicates whether the activities are collapsed (horizontal line) or expanded (vertical line).
If you have created an incorrect dependency, you can remove it in the Activity Inspector. To do this, click on the activity from which a connection is to be removed and then select the tab for dependencies in the Activity Inspector:

In the list of predecessors or successors, select the activity for which the connection is to be removed and remove it either by selecting`Delete` from the Edit menu or simply by pressing the Delete key.
Estimating Time
The same work under the same conditions will be assessed differently by 10 assessors or differently by one assessor at 10 different times. (Source unknown)
Over the next few days, Mr. Meier obtained many offers - from moving companies, from craftsmen for the renovation, for the installation of cable ducts, for the construction of the ramp and for the hardware specified by Mr. Schulze, which was necessary for the WLAN and the new telephone system. He visited the buildings with the craftsmen to have their expenses estimated and added the data to the plan.
The estimation of effort should be done by the people who actually do the work. Since small activities are to be estimated by the WBS, it can be assumed that these estimates are more accurate than for large work packages. Estimates can be based on historical information ('It took us a week back then.'), on industry standards, or they can simply be guesses.
Methods like the PERT formula are preferable to guessing. The PERT formula involves a weighted value from an optimistic, a probable and a pessimistic estimate.
Time and cost estimates in Merlin Project are entered into the inspector for each activity:
The following fields are available for planning effort:
-
Work: Here you enter the time estimate. You can also enter '2 weeks' instead of '1 day', Merlin Project automatically converts this internally. If you are not sure about the effort, add a '?' after the value. This does not change the calculation, you can use this information as a reminder that this is an estimated value.
-
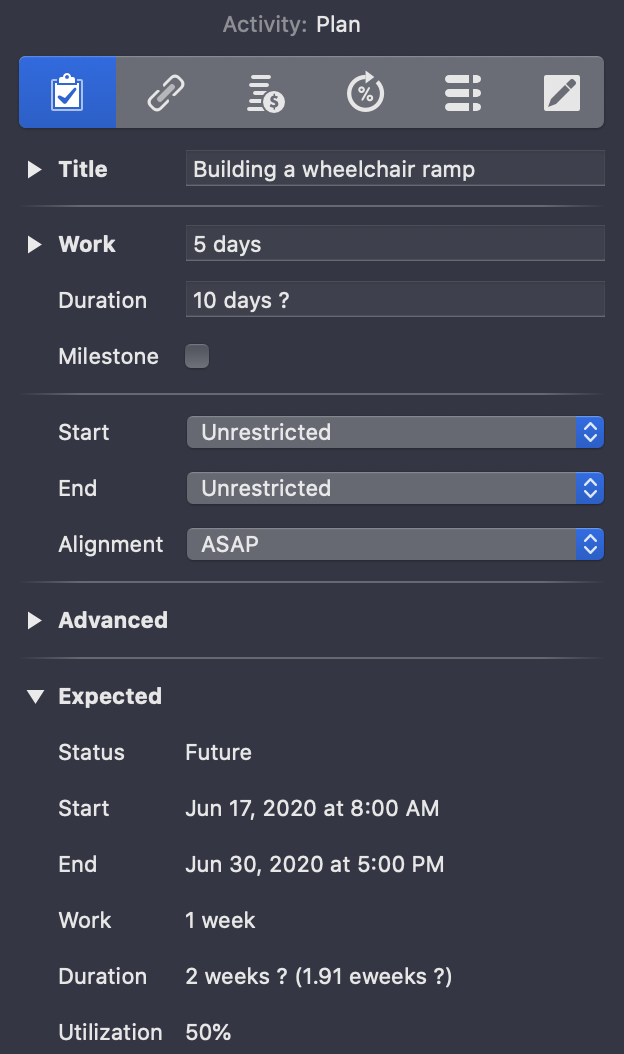
Duration: Activities may take longer than the amount of work that needs to be invested in them. In our example project a ramp for wheelchair users has to be built. The actual working time is 5 days. However, after measuring the conditions on site, material must be ordered. So the whole activity takes about 10 days and is defined as an estimate in the example.
|
|
For the values for the duration, an 'e' can be placed in front of the time measure (day, week, month), which stands for 'elapsed'. Non-working times, such as weekends, are then included in the duration. The 'e' is omitted for activities that only require work that takes place on workdays. An activity that takes 10 days then requires 10 working days. |
-
Milestone: An activity can be a milestone. Milestones usually have a duration of 0 and mark a special event, such as the completion of an important part of the project.
-
Start: Here you can use the drop-down menu to specify when the process should begin:
-
Unrestricted
-
Precise
-
Earliest
-
Latest
-
Between
-
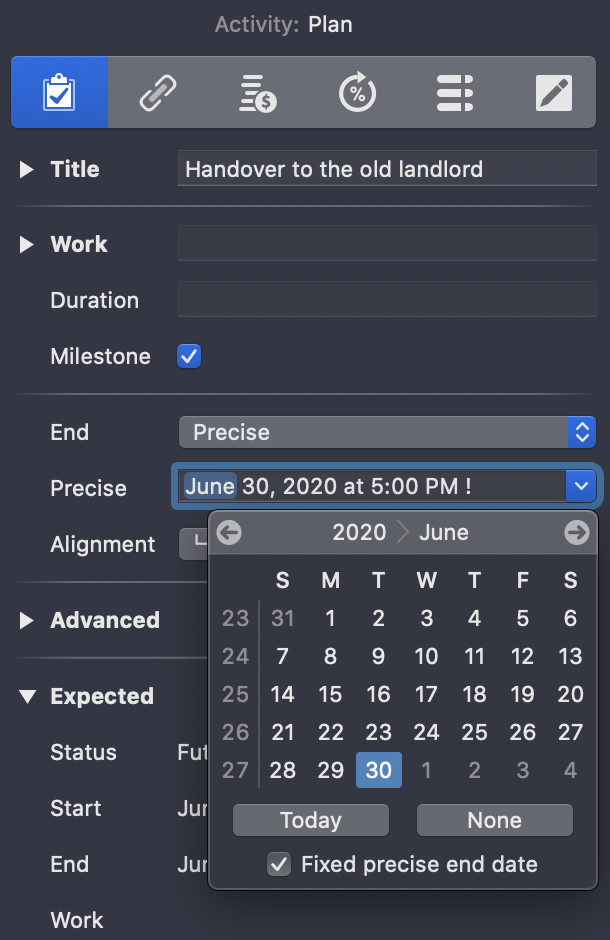
When you define an exact date, you can fix it. If dependent appointments are moved, it is not moved with them. This function is recommended for appointments which cannot be moved. In our example, the date for the handover of the building to the old landlord:
-
End: You can fill in the same fields as for the start - here related to the end.
Below this you can specify the alignment of the activity. The following options are available:
-
ASAP (as soon as possible)
-
ALAP (as late as possible)
-
Long
In the fold-out area 'Advanced' there are further setting options for experienced users.
Estimate Costs
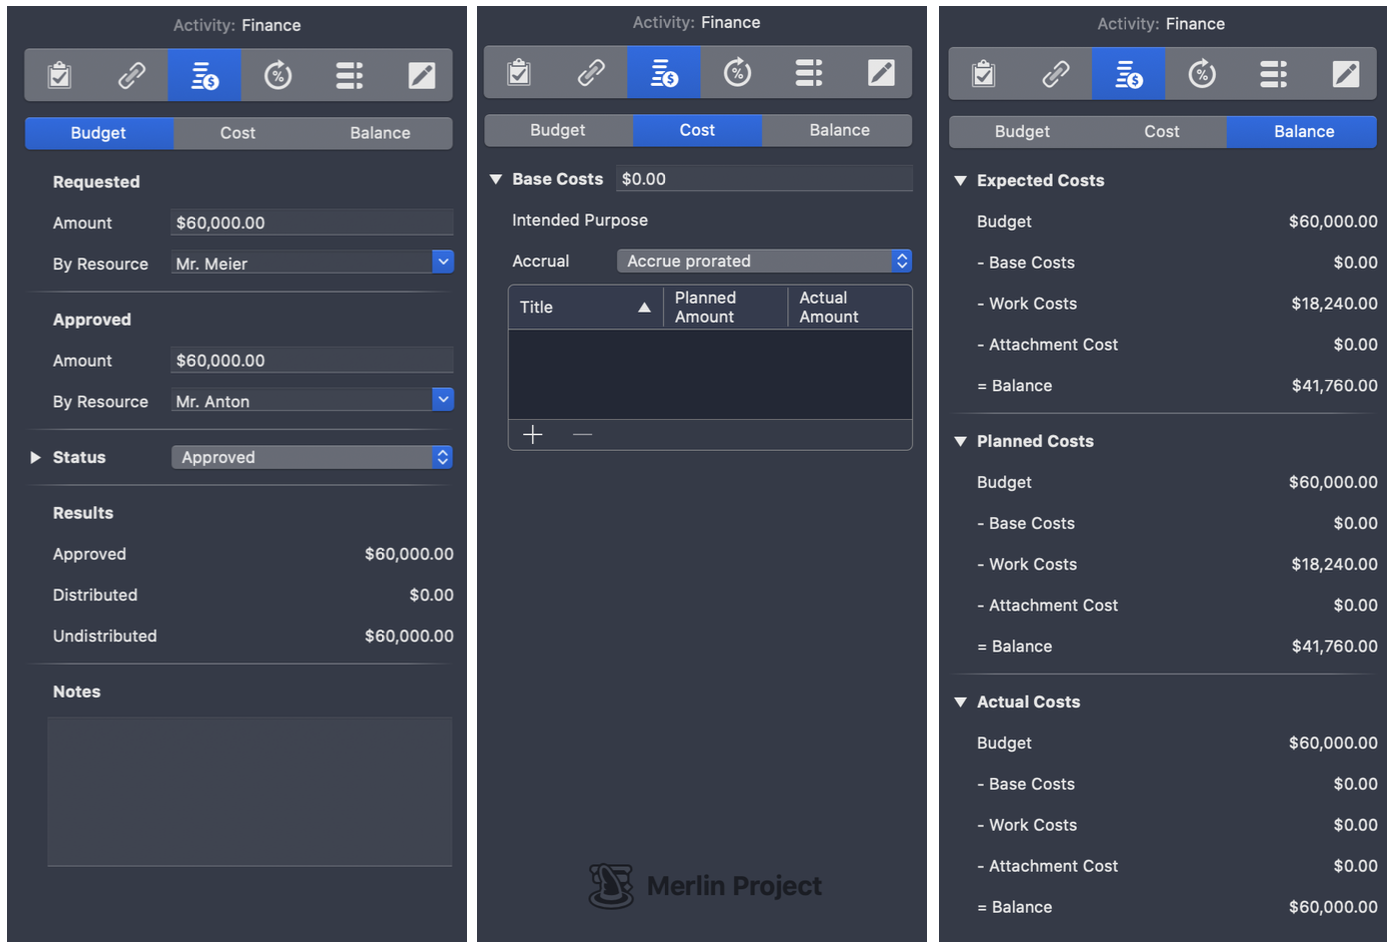
The costs of an activity can be entered in the inspector in the finances tab. To do this, select the desired activity in the main area and then click on the third tab. This in turn is divided into three areas:
-
Budget
-
Cost
-
Balance
The following fields are available on the Budget tab:
-
Requested
-
Amount: The budget you requested.
-
By Resource: Select the person who requested the amount - this is probably you
-
-
Approved
-
Amount: The amount approved
-
By Resource: Select the person who approved the amount - in the example project this is Mr. Anton
-
-
Status:
-
No Budget
-
Requested
-
Approved
-
Rejected
-
In the fold-out area under Status you can also enter the date of the entered status. In addition, there is a field for notes at the bottom.
In the tab Cost you can assign base costs to an activity.
The tab Balance is filled automatically by Merlin Project. Here you can read the following information:
-
Expected Costs
-
Planned Costs
-
Actual Costs
In each case, the breakdown of the costs into budget, base costs, work costs and attachment costs is displayed.
Create Timetable
You can push a fool into committing to an unreasonable deadline, but you cannot push him to keep it. (source unknown)
You have now identified the activities that are necessary to achieve the project goal, determined the dependencies between the activities, and calculated the effort and costs of the activities. Now it is time to display the results of this planning on a calendar.
Once you have set the start and end dates of the project, dependencies, and the duration of each task, the schedule should appear almost magical. Now check in particular the timing of the milestones and, if in doubt, define exact and fixed dates for milestones as described above so that they are not moved.
|
|
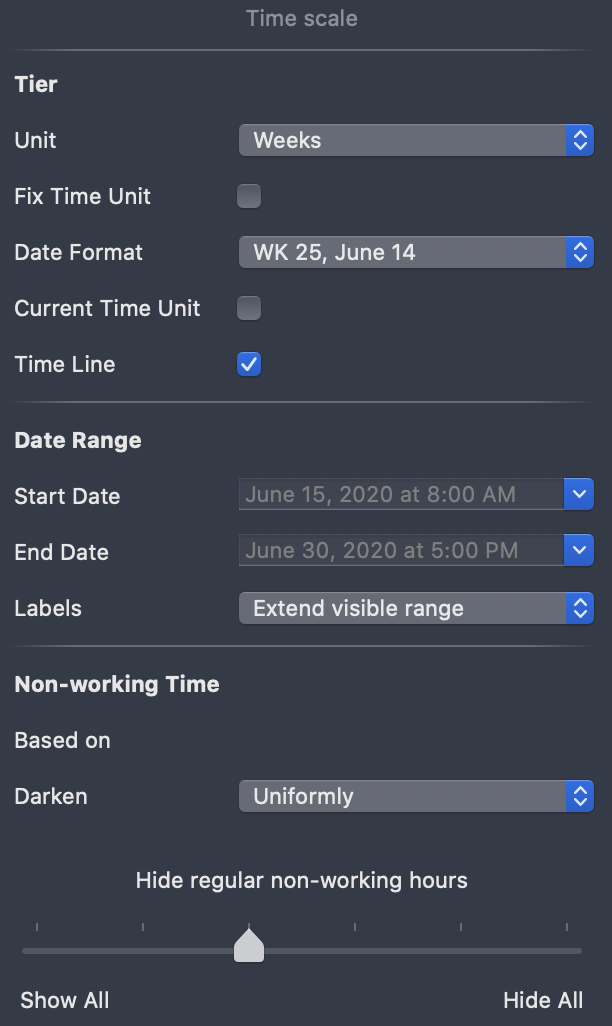
You can display the current day by a time line. A standard click on the time scale calls up the inspector. In the time scale inspector, check the box Time Line. In this way, you can see at a glance which activities are current at the current time. |
In the activity view, the dependencies are represented by lines as in the network view. If you discover a dependency here that you missed before, you can create dependencies using the same mechanism as in the network view. Activities can be moved with the mouse if no date restrictions or dependencies contradict this.
Planning conflicts can already occur at this point. If, for example, an activity requires that it be completed at a time when its predecessors have not yet been completed, a conflict arises, which is displayed in the Window → Show Warnings.
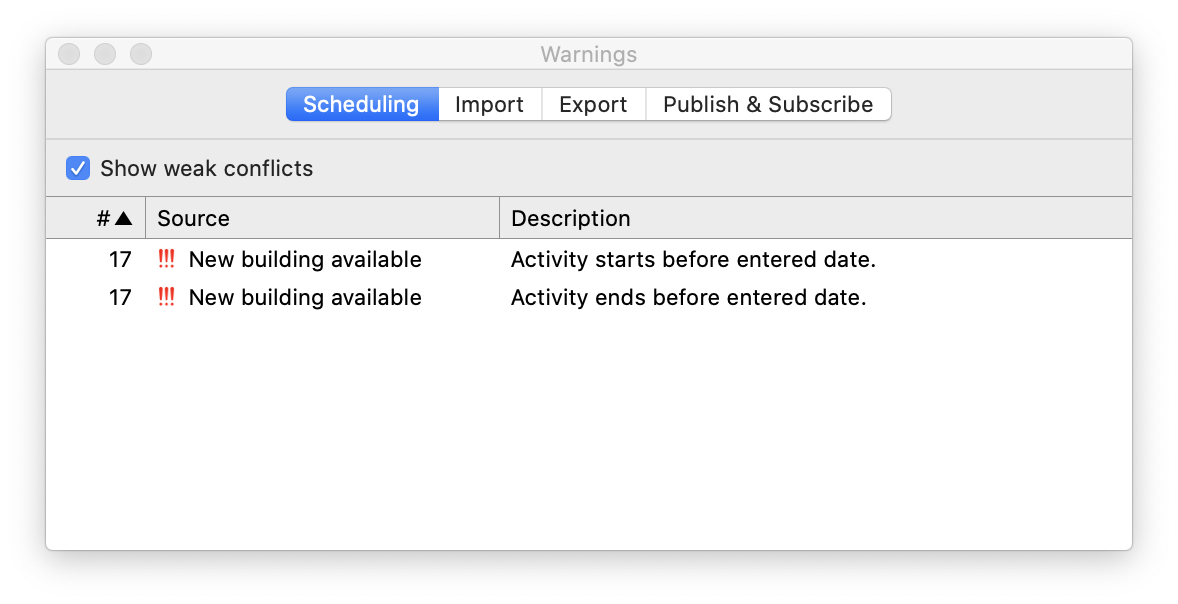
In addition, the affected activities are highlighted in red in the main area. You must eliminate these planning conflicts now at the latest.
You can now assign the resources to the activities in the next step. You do this by dragging the resources with the mouse to the relevant activities. A small triangle appears to the left of the activity: If you click on it, the activity is expanded and you can see the resources involved in the activity.
In the previous section, you identified the dependencies of activities. As a result, activities that can be carried out in parallel became obvious. After allocating the resources, it may now become apparent that parallelism is not possible after all because the same resource is involved in the activity. Merlin Project offers you the view Work Distribution under View → Assignments → Work Distribution to identify such conflicts:
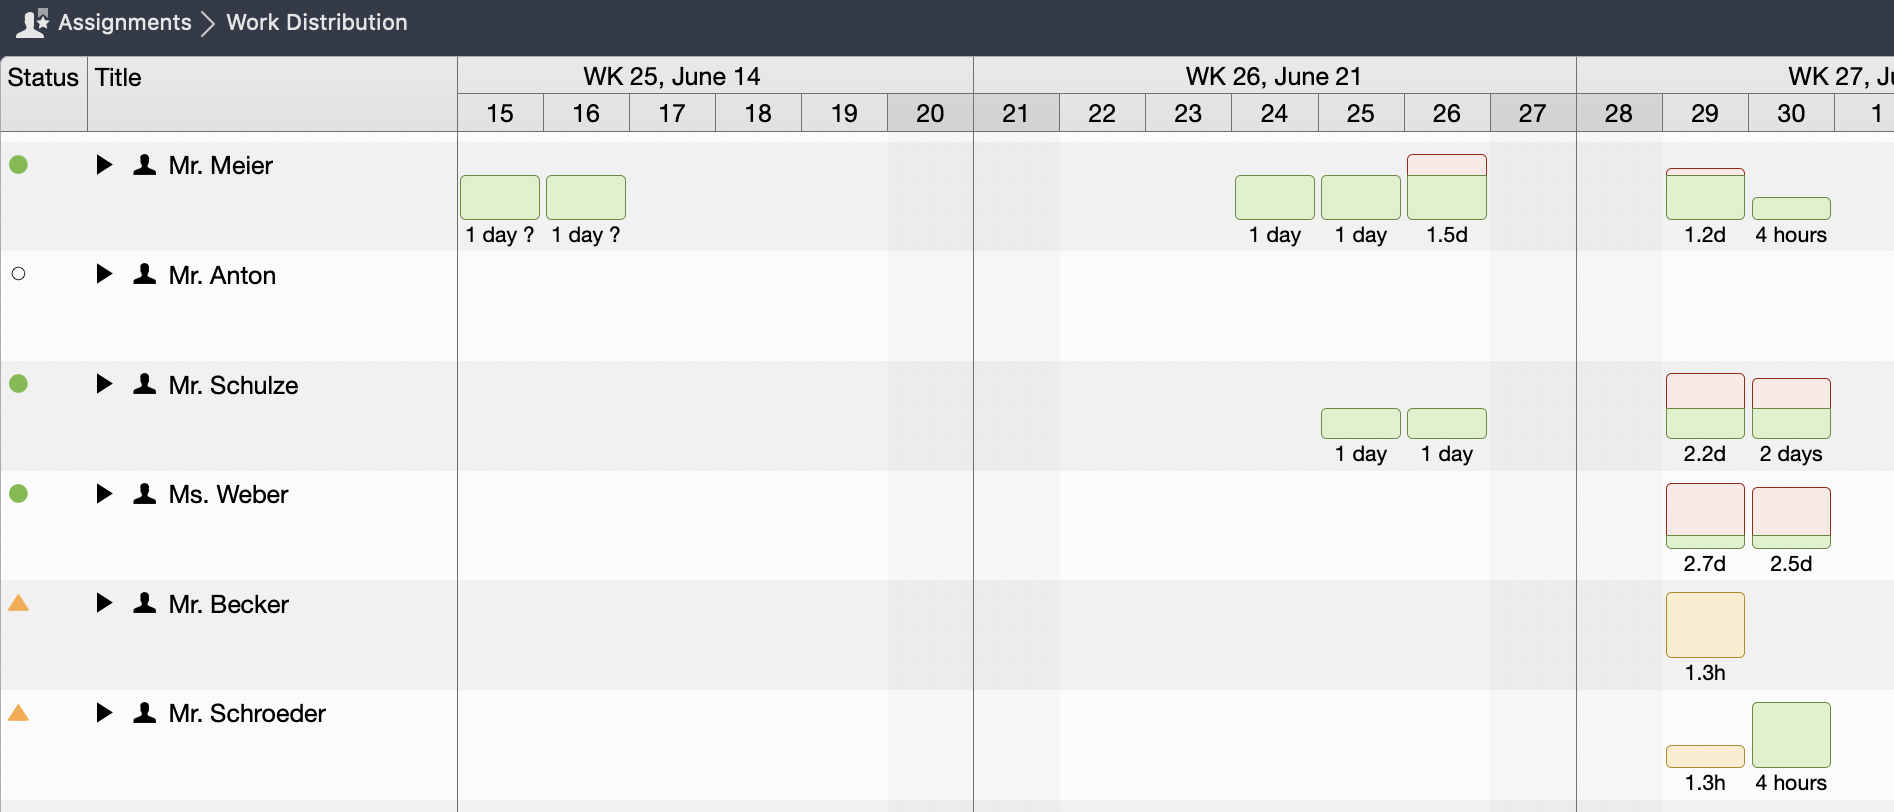
In the histogram display, you can see how many hours per day the corresponding persons are scheduled. To get a quick overview, the histograms are highlighted with colors. The colors have the following meanings:
-
Green: The resource is 100 percent, i.e. optimally utilised
-
Yellow: The resource is less than 100 percent utilized and could possibly be involved in other processes (in our example, this concerns Mr. Becker on 29 June)
-
Red: The resource is more than 100 percent utilized and thus overloaded (in the example this concerns Mr. Schulze and Ms. Weber on June 29 and 30)
An overload conflict can be solved manually: For example, check whether another resource can process the activity. If the activity has sufficient buffer, sequential processing of the activities can also be considered. If the overload is minimal, the overload could also be acceptable. You should check this individually.
In the activity view, there is another helpful function for identifying planning conflicts: the critical path display.
The concept of the critical path in a project is an important tool in project management. A critical path is the longest path in a network plan and thus specifies the shortest possible duration of a project. The critical path is always present when the linked activities influence the end of the project. Every change to one of the linked activities on the critical path influences the end of the project.
Merlin Project supports project managers in identifying the critical path. Activities on the critical path are marked when the corresponding icon is activated in the toolbar:
Since the critical path can change during a project, Merlin Project automatically calculates the consequences on the plan after new data is entered into the plan. Should activities on the critical path cause you sleepless nights, adding reserves can be a good solution. More on this in the next section.
Murphy’s alive! Risk Management in Merlin Project
Risk management is project management for adults. (Tom DeMarco)
Every project is exposed to risks, because if there are no risks, then there are no chances through the project, according to the motto No risk, no fun. Even if the search for risks is sometimes seen as a hobby of notorious sceptics, risks are examined primarily in order to be prepared for them. The fundamental question is what could hinder the project team from being successful. Once the risks are identified, it is necessary to analyse how the risk is dealt with.
In his discussions with the removal companies, it became clear to Mr. Meier that each of them emphasized the need for additional insurance for the computer equipment, as the value was not covered by the regular insurance. GigaProject had to pay for this additional insurance or pay for any damage to the IT equipment itself.
In general, a distinction is made between two different analyses:
-
qualitative Analysis
-
quantitative Analysis
The qualitative risk analysis is a subjective analysis of risks and determines the probability and impact of risks. The quantitative risk analysis is a numerical analysis of the probability and impact of risks.
After the analysis of a risk, a risk management strategy is designed, which is usually selected from the following options:
-
Avoiding the risk by preventing the origin of the risk
-
Reduction of the probability of a risk occurring or the impact on the project
-
Acceptance of the risk
-
Transfer of the risk to another party, for example to an insurance company
For each risk, a responsible person is also appointed to ensure that the risk is monitored and the risk management strategy is followed. Merlin Project allows you to manage risk in an intuitive interface. The risk management methodology implemented in Merlin Project is also described in the book "Risk Management in Projects" (see references).
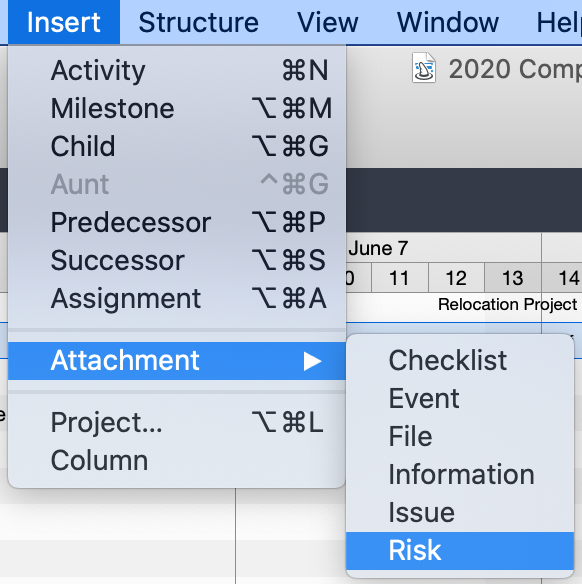
A risk is treated in Merlin Project as an attachment, which can be inserted via the menu Insert → Attachment → Risk. Alternatively, you can add the risk as an attachment to the activity selected in the main area using the toolbar.
Once you have created a risk in the details area and clicked on it, the risk inspector will open, allowing you to enter all the information required for this risk. In the following you will find a few notes on the most important fields:
-
Title: Choose a meaningful title for the risk, as this title is also displayed in reports
-
Creation Date: Document here when the risk was recorded as such
-
Risk Group: Allows risks to be divided into categories; the following risk groups are available:
-
Global
-
Business
-
Employees
-
Financial
-
Technical
-
The risk groups can be extended in the value lists under the project settings.
-
Risk Class: What kind of risk management strategy is being pursued? The following options are available here:
-
Requires Reduction
-
Requires Emergency Plan
-
Accepted
-
-
Probability: How likely is it that this risk will occur?
-
Reported By: Select from the resources stored in the project
-
In charge: Here you can also select from the resources stored in the project
-
Risk Description: Briefly describe the risk so that it is clear what is meant.
-
Impact: Here you can differentiate between the type of effects that can result from the occurrence of a risk. A risk can affect the result of the project or subproject, the costs, or the implementation of the project over time.
-
Scope: Make a choice in the range between
Barely noticeable reductionundProject results unsuitable -
Costs: Estimate the cost increase to be expected when the risk occurs, within the given % values
-
Deadline: Here you can evaluate the expected date shift as a percentage
-
-
Status: The risk factors you have entered, such as probability, scope, costs and deadline, are automatically scored by Merlin Project and summarised into a status value. You can see whether the risk is assessed as low, medium or high.
-
Actions: Here you have the option of storing a concrete risk management strategy
-
Risk Closing: This field is not yet relevant during the risk analysis; we will come back to this later.
In our example project there are some risks. One risk is the transport of the IT equipment, which is not carried by any of the moving companies. If an IT device breaks down due to the move, not only costs for the repair of the device are incurred, but also the loss of work that occurs without the computer.
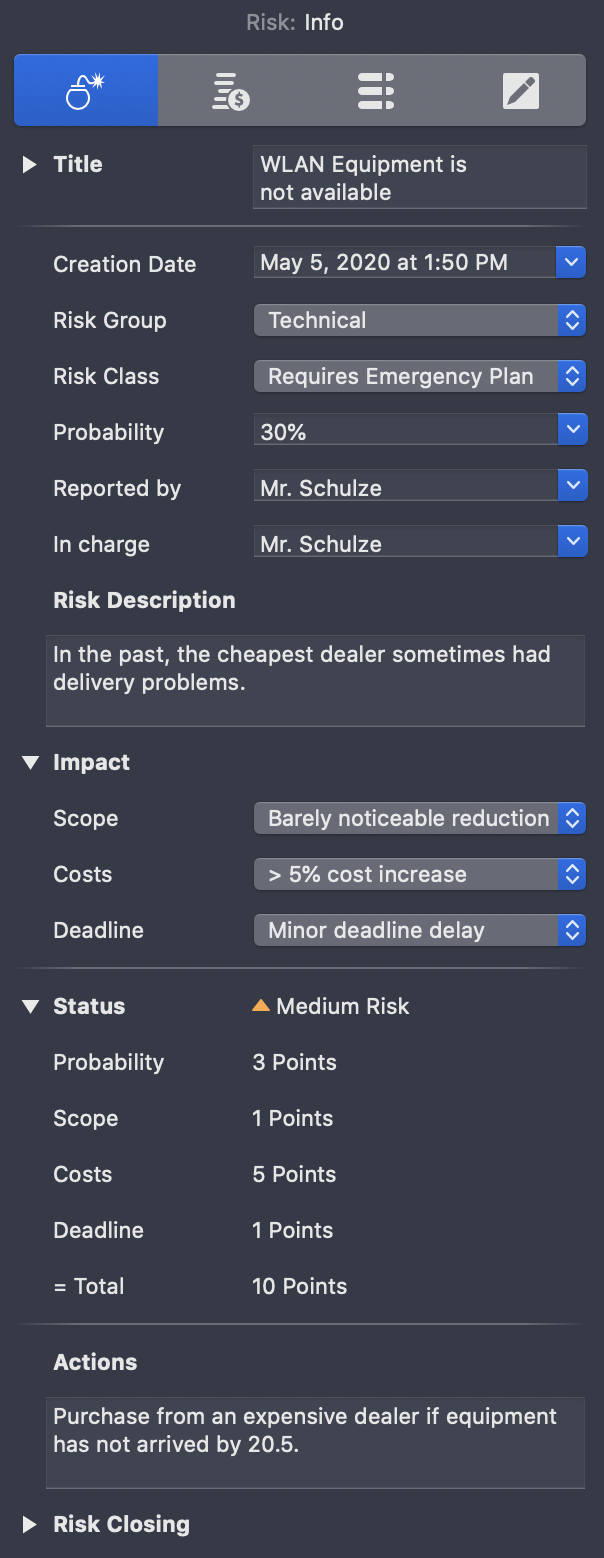
A further risk is the ordering of WLAN equipment. A dealer with very reasonable prices is chosen; however, this dealer was not always reliable in terms of delivery. The hardware has to arrive by a certain time so that the "Conversion to WLAN" process can be completed on time. Since this process is on the critical path, any delay is unacceptable. Mr. Schulze estimates the probability that this risk will occur at 30 percent. Since the order can be cancelled if necessary and given to another, more expensive dealer, the occurrence of the risk has no effect on the project deadline. The occurrence of the risk would also have no effect on the content of the project. However, the situation is different when it comes to costs: The other trader is about 10 percent more expensive, so that an increase in costs of more than 5 % is the result.
The following figure shows the settings mentioned for our example in the corresponding risk inspector:
If the risk has an impact on the budget, a reserve can be planned. This is entered in the cost area (second tab) of the risk inspector. To do this, click on the plus sign, give the cost item a name and enter an amount in the right-hand column.
You can enter the following additional information:
-
Billable
-
Type (for example fees, material, etc.)
-
Account
-
Status (for example requested, approved, etc.)
-
Added by
If the risk is assigned to an activity or resource, this reserve is posted to the attached costs of the activity or resource. This gives you transparency about what the resource itself costs and what the additional costs are due to the risk.
Risk management within a project is not completed by identifying and analysing risks at the beginning of the project. Similar to the progress of a project, the risks and coping strategies must be continuously monitored during the course of the project.
Project Plan Acceptance and Kickoff
It has been a long way from the first conversation with the managing director to the current plans. Although the original goals can be met except for the budget, the required budget exceeds the original sum by a considerable margin. Although the bearers of bad news are no longer beheaded nowadays, it is no easy task to communicate such a deviation from the targets. However, the previously prepared plans (WBS, network plan, schedule, risks) allow for a transparency that is understandable for the management:
In our example project this means for Mr. Meier that he makes an appointment with Mr. Anton as soon as possible to inform him about the changed budget situation. The conversation with Mr. Anton was initially anything but pleasant.
"I can’t believe that it really takes so long and costs so much," Mr. Anton said in annoyance. "I had actually forgotten about the ramp. But is it really cheaper to invest in a radio network than to have the cable ducts installed? Isn’t that another one of our IT spinners?" We’ve compared all the numbers, and it’s a lot cheaper." "And these wireless phones? That’s cheaper too. And there are other advantages: The wireless telephones can always be taken by the employees when they go to another room, so there’s better accessibility." Mr. Anton started to smile. "And why is it taking so long?" "In this bar chart you can see the dependencies of the individual work steps required. We have to move earlier because this building still needs renovations. At the same time we can only move into the new building from June 15th, because the other company won’t move out earlier. So we only have a small time window, which we absolutely have to meet. So that it goes quickly, we should also refrain from drawing up new seating plans. We should move 1:1, because we won’t have time to put up new walls and tear down old walls." "Sure, I agree with you entirely! But what is the cost of insurance?" "We have a lot of IT equipment and none of the movers can cover it with existing insurance. So we can either take the risk of paying for damaged equipment ourselves - or we invest in insurance." "What would you recommend? "I would take the insurance." "Well, that doesn’t matter anymore." "Mr. Anton, we have another problem. Our janitor won’t have an apartment in the new building …" "Well, he’s retiring!" Mr. Anton interrupted. "Yes. Two months after we moved." Mr. Anton was speechless. "I think you should speak to Mr. Schroeder. I’ve brought you some real estate offers with matching apartments for him. "I’m sure you’d pay him the brokerage."
Mr. Anton approved the budget and Mrs. Weber as well as Mr. Schulz, Mr. Becker and Mr. Meier met on the same day for the kick-off of the project. The work packages were distributed and the project team decided to meet weekly now to discuss the progress of the project.
Budget approval can be documented in Merlin Project in the activity inspector (see section 'Estimate Costs' in this document). You should document the approval in any case, because not only Murphy but also forgetfulness are constant companions of a project.
Once the budget has been approved, there is usually nothing standing in the way of the project start and the end of the initial planning phase can be heralded. The time for the kickoff has come. A kickoff takes place at the end of a planning phase, usually just before work on the work packages begins. The kick-off meeting is usually attended by all parties. All parties are presented with the details of the project and its planning. It is helpful for project staff to obtain a printout of the project planning documents.
In the past, printing a network plan or a Gantt chart required an enormous frustration tolerance from project managers, because only by trial and error was it possible to find out what the printed plan would look like and how much tinkering would be required to glue multi-page plans together. That’s why Merlin Project invested a lot of brainpower in intelligent printing functionality, so that you can print plans quickly and easily with Merlin Project.
After you have called up the dialog box for printing either by pressing the key combination ⌘ and P or by selecting the command File → Print, you can specify the data for printing.
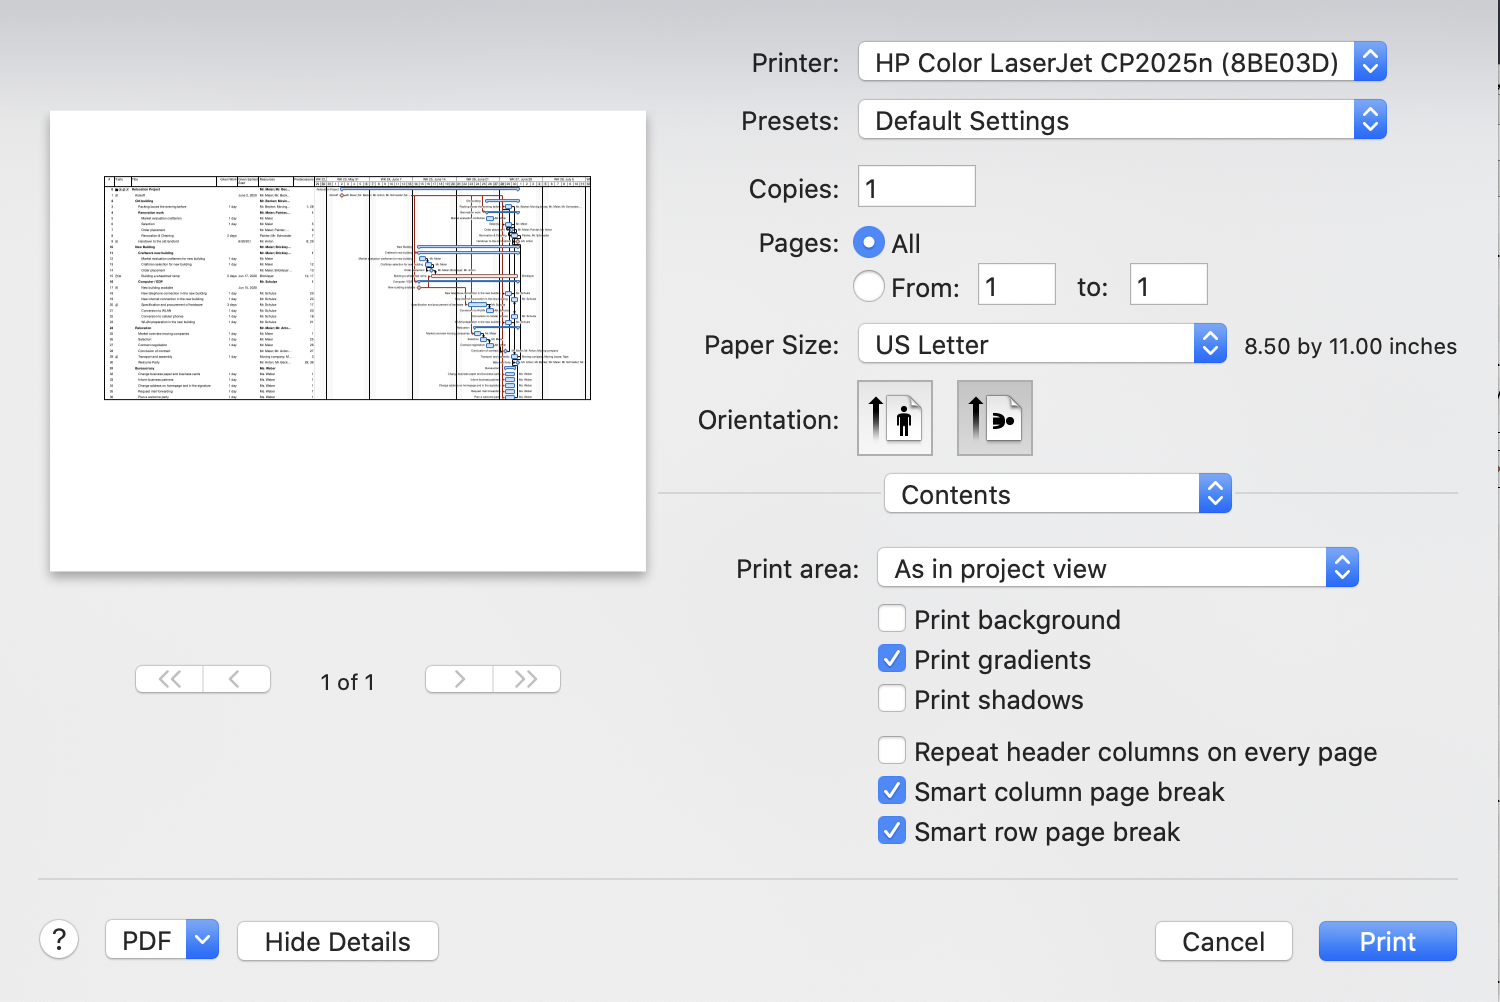
A special feature of the print functionality is the live preview of the printout. You can 'play' with the values in the print dialog to get the best possible printout. Among other things, it is possible to determine the number of pages on which the plan is printed; your plan will be scaled according to your specifications.
In addition to the dimensions of your printout, you can also define the labeling of the header and footer. For both lines, the following information is available for printing, which is automatically generated by Merlin Project:
-
Title
-
Page Number
-
Page Count
-
Print Date
Further information can be entered manually for printing in the header and footer. For some purposes, it is also helpful to be able to decide which content to print. Sometimes the outline area is sufficient, sometimes you need outline and Gantt for the illustration. Merlin Project offers many configuration options and thus the possibility to create differently designed printouts from one file.
|
|
You can store your company logo as a watermark in the print dialog for printing. |
Project Execution
Where do we stand? Monitoring project progress
The first 90 percent of a process takes 90 percent of the time, the last 10 percent of the process takes the other 90 percent of the time. (Source unknown)
The first weeks of the project went almost according to plan. Mr. Schulze had ordered the WLAN adapters and also received them on time. Ms. Weber had started to announce the change of address and to have entries in directories changed. Only Mr. Meier himself was a little behind, as he hardly found time to take care of the market overview of the moving companies, apart from project management. Since this process was not on the critical path, this delay was acceptable.
Merlin Project offers you various functionalities to continuously compare the project plan with reality and thus to record the actual project progress in the plan. This allows you to take corrective action if the project goals are at risk. Deviations in the schedule or budget often occur. The earlier this is discovered, the more likely it is that corrective measures will be successful. Incidentally, deviations from the plan are not the exception, but rather the rule: the job of project manager is not for people with weak nerves. If the work on an activity can only start later, or if it simply takes longer than planned, the first question for the project manager is what consequences this has for the project. Is there an effect on the schedule? Is there an effect on the budget? And, if so, can these effects still be avoided?
To answer all these questions, Merlin Project uses three different planning values:
-
planned values
-
expected values
-
actual values
The planned values are those entered in the original plan. Obviously, the expected values are initially the same as the planned values. However, as soon as a value changes, for example, because a previously completed activity is delayed so that the next activity can only start later, the expected values no longer match the planned values. However, you may find a way to speed up the delayed activity by adding more resources, so that the costs increase (more resources on an activity), but at least the deadline can be met. If you then enter the actual values, the expected values are recalculated. At any time you have an overview of where your project should actually be and where it actually is.
Entering actual data in Merlin Project immediately calculates the consequences for deadlines and budget. Real data is entered in the fourth tab 'Actual values' of the activity inspector:
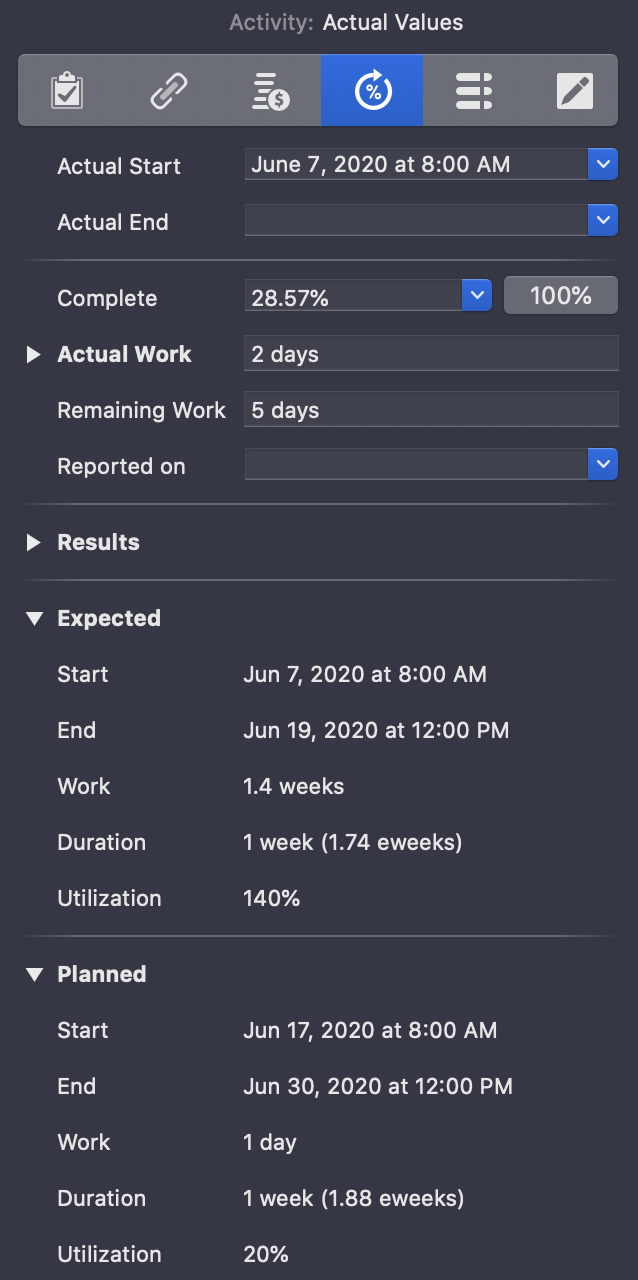
In this example, the start of the activity was planned for June 17. In fact, it was already started on June 7. But, the activity is much more complex than originally planned. Two days have been worked on the activity so far, 5 days are still outstanding. In the example, the information entered in the inspector under the items Actual Work and Remaining Work has also been entered. Merlin Project shows you the new, expected end for this task under 'Expected'.
|
|
If you can persuade the project team to work more to make up for any delays, you can make a note of this in the 'Actual Overtime' field (located in the fold-out area under Actual Work). Merlin Project will then calculate the duration of the task accordingly shorter. |
Merlin Project can display the consequence of a deviation from the original planning in the activity view in the Gantt chart. To do this, choose the setting 'Secondary' under View → View Options:
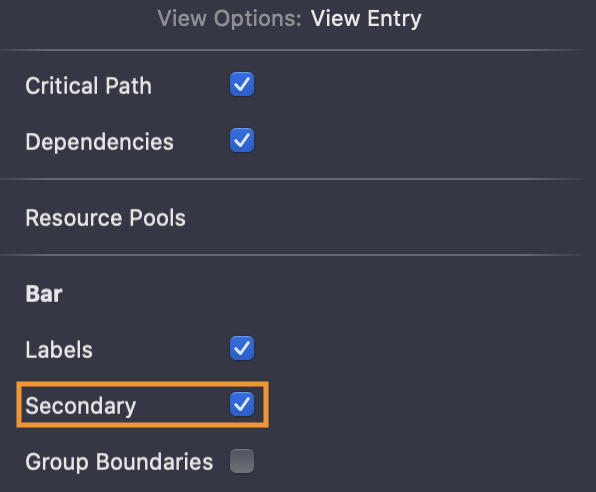
The planned times of the activity are then marked in grey bars, the actual and expected times are shown with coloured bars:

Merlin Project calculates this data not only for the current activity, but also for subsequent activities. This makes it immediately clear whether the project goal of a fixed end date is at risk.
With this function you can also 'play' a little: What happens when a resource is withdrawn or when material is delivered too late? It also allows you to create alternative scenarios quickly without having to create a second version of the plan.
In our example project, this delay has no effect because the activity is not on the critical path. If it were on the critical path, this would mean that the end date of the project would be acutely endangered. It should be noted here that the delay of an activity can make the path on which this activity lies critical. Deviations in the schedule can also mean deviations in the costs, especially if an activity takes longer than planned and the resource working on it has to be paid for the additional work. Cost variances can also occur when materials cost more than expected.
The following figure shows an example of the effects of such a deviation:
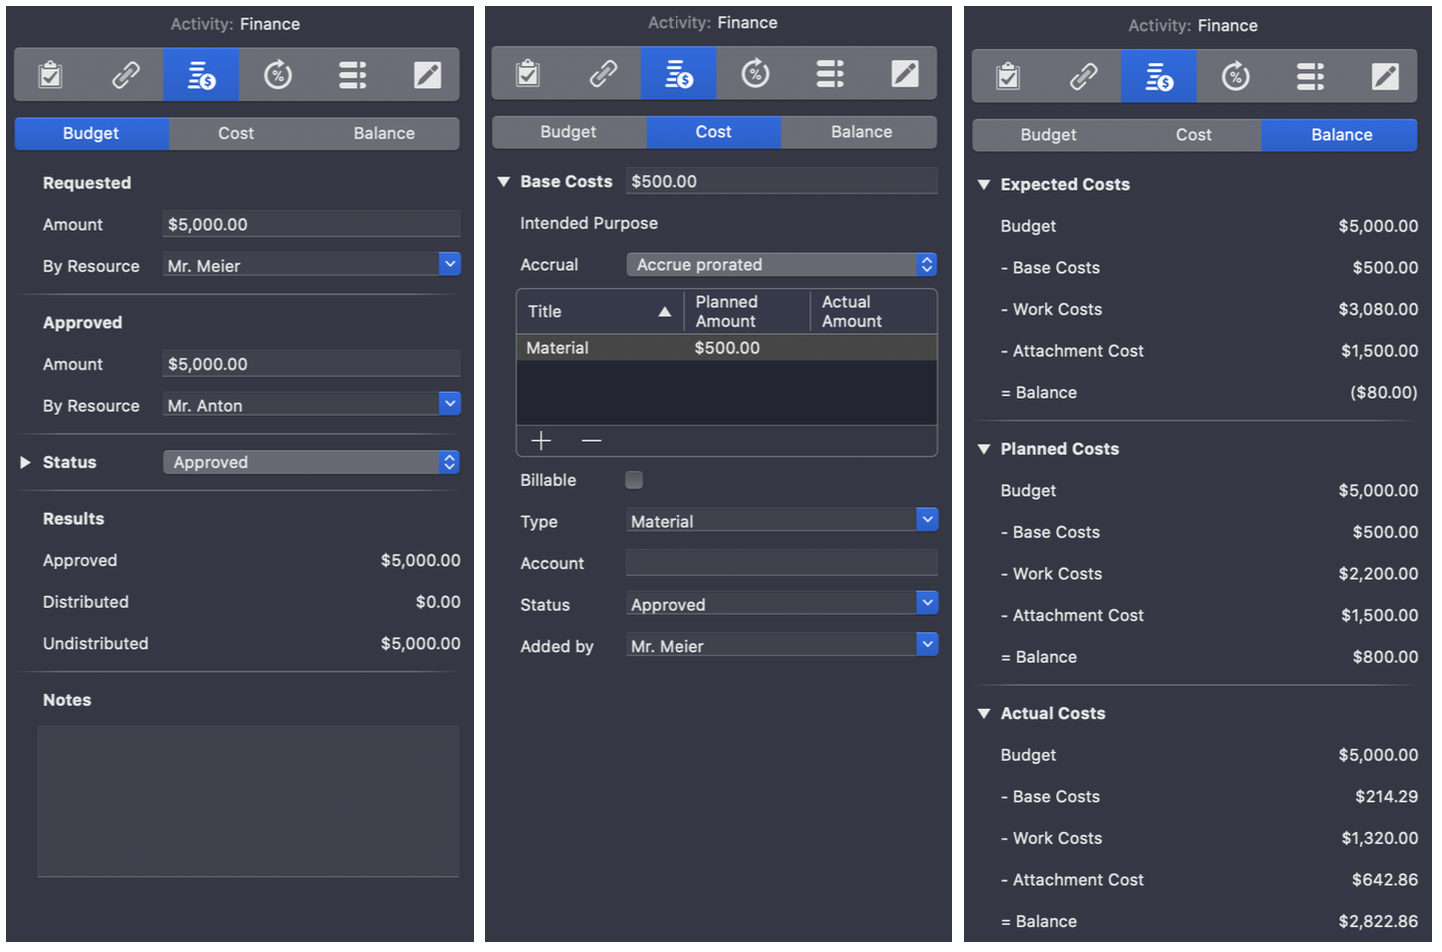
An activity should cost 5 days of work and $500 material. The employee who is to process the activity costs $55 per hour, which means $2,200 for five days' work. Since there is a risk that the material will cost more, not only the resources work and material have been assigned to the activity, but also a risk that the attached costs will be $1,500. The resources labor and material together cost $2,700 in planning, so the appendages for the risk are $1,500 in planning. Together, this results in $4,200 planned costs, which is $800 less than the planned budget of $5,000. In reality, however, the activity takes 7 days, which means that the work now costs $3,080 and the total resource cost is $3,580. Together with the attachment costs, this makes $5,080, which is already $80 over budget.
This is an example of a single activity; Merlin Project adds up the totals of each activity so that you can check the overall budget and its current values in the Project Inspector.
This was not agreed! Changes in the project scope
What do 'Frozen requirements' and 'the snowman' habe in common? Both will melt if enough heat is applied. (Source unknown)
Changes in the scope of a project are not the exception, but the rule. Some change requests can be prevented, others cannot and should not. This is especially true when the economic environment has changed and the project content must therefore be adapted. Our example project is also affected by changes.
At the end of May, Mr. Meier happened to meet Mr. Schulze at the drinks machine. "We will have to revise your plan." Mr. Schulze greeted his colleague. "Why is that?" "You know a new customer order came in yesterday, don’t you? It’s going to be tight schedule now." Mr. Meier didn’t know it yet. In the interview it turned out that Mr. Schulze had to work on another project at least one day a week for the next few months. Could it get worse? It could. "Good morning, Mr. Meier!" whispered Ms. Weber, "May I speak to you right away, please?" "Of course, Ms. Weber!" said Mr. Meier and followed Ms. Weber to her secretarial office. "Mr. Meier, I saw that the seating plan provides that the new premises of Mr. Anton and me have no window to the park at all, but only to the parking lot of the building. This is surely an oversight, could you please change that?" Mr. Meier was confused. "Mr. Anton approved this only yesterday. He said there shouldn’t be extra costs. We’d have to have extra walls built, and he wanted to avoid the expense." "I know. He’s changed his mind." "Can I see him for a minute? "No, you can’t. Ms. Weber made it clear to Mr. Meier that he should leave now.
Mr. Meier calculated how the change affected the project plan. It could still be done, but if Mr. Schulze fell ill, there would be no chance of the project still going ahead. The risk was too high for Mr. Meier to ignore, so he discussed with Mr. Schulze that it would be sensible to hire temporary help. After the presentation of the changed plans, Mr. Anton agreed. And at the same time he denied that he would have liked an office with a view of the park. Mr. Meier was relieved.
In our example project there are two change requests, one of which is actually implemented. The vanities of the management assistant can be prevented. In this case, the subsequent requesting of requirements, also known as scope creep, jeopardizes the project and does not benefit him or most of his stakeholders. On the other hand, the receipt of a new order is positive; apart from that, it is unlikely that the use of project resources for the order could be prevented.
In our example, the change means that a resource can work less on the activities than planned. Since the activities are on the critical path, there are only a few ways to solve this conflict:
-
The relocation could be postponed until the resource problem is solved (unacceptable).
-
The project scope could be changed so that the resource conflict is resolved (in this case probably not feasible, as this would have resulted in some employees not having access to the Internet after the move).
-
Another resource is used; since in our example no other resource is available, an additional resource must be engaged.
The only available solution means additional costs (assuming that a consultant costs more than Mr. Schulze). The change should be documented in a change request so that the deviation from the baseline can be tracked at a later date. We recommend that you save the project under a different name here, so that you can enter the new budget data.
Reports with Merlin Project
True communication takes place only among like-minded, like-minded people. (Novalis)
Some project managers claim that one cannot communicate enough, and this becomes particularly clear when looking at the project status. Merlin Project offers an innovative concept that allows reports to be created in just a few steps, making it possible to illustrate the project status to everyone involved.
To do this, open the Details area in the lower main window via the toolbar. Select the view Report there. The following report types are then available:
-
Attachments
-
Budget/Costs-Overview
-
Documentation
-
Earned Value
-
Milestones
-
Personal Tasks this Week
-
Status
-
Status Compact
|
|
You can use the 'Edit…' option to create new report types at any time and thus create reports according to your individual project requirements. Helpful tips for creating new reports can be found in the quick guide on the ProjectWizards website. |
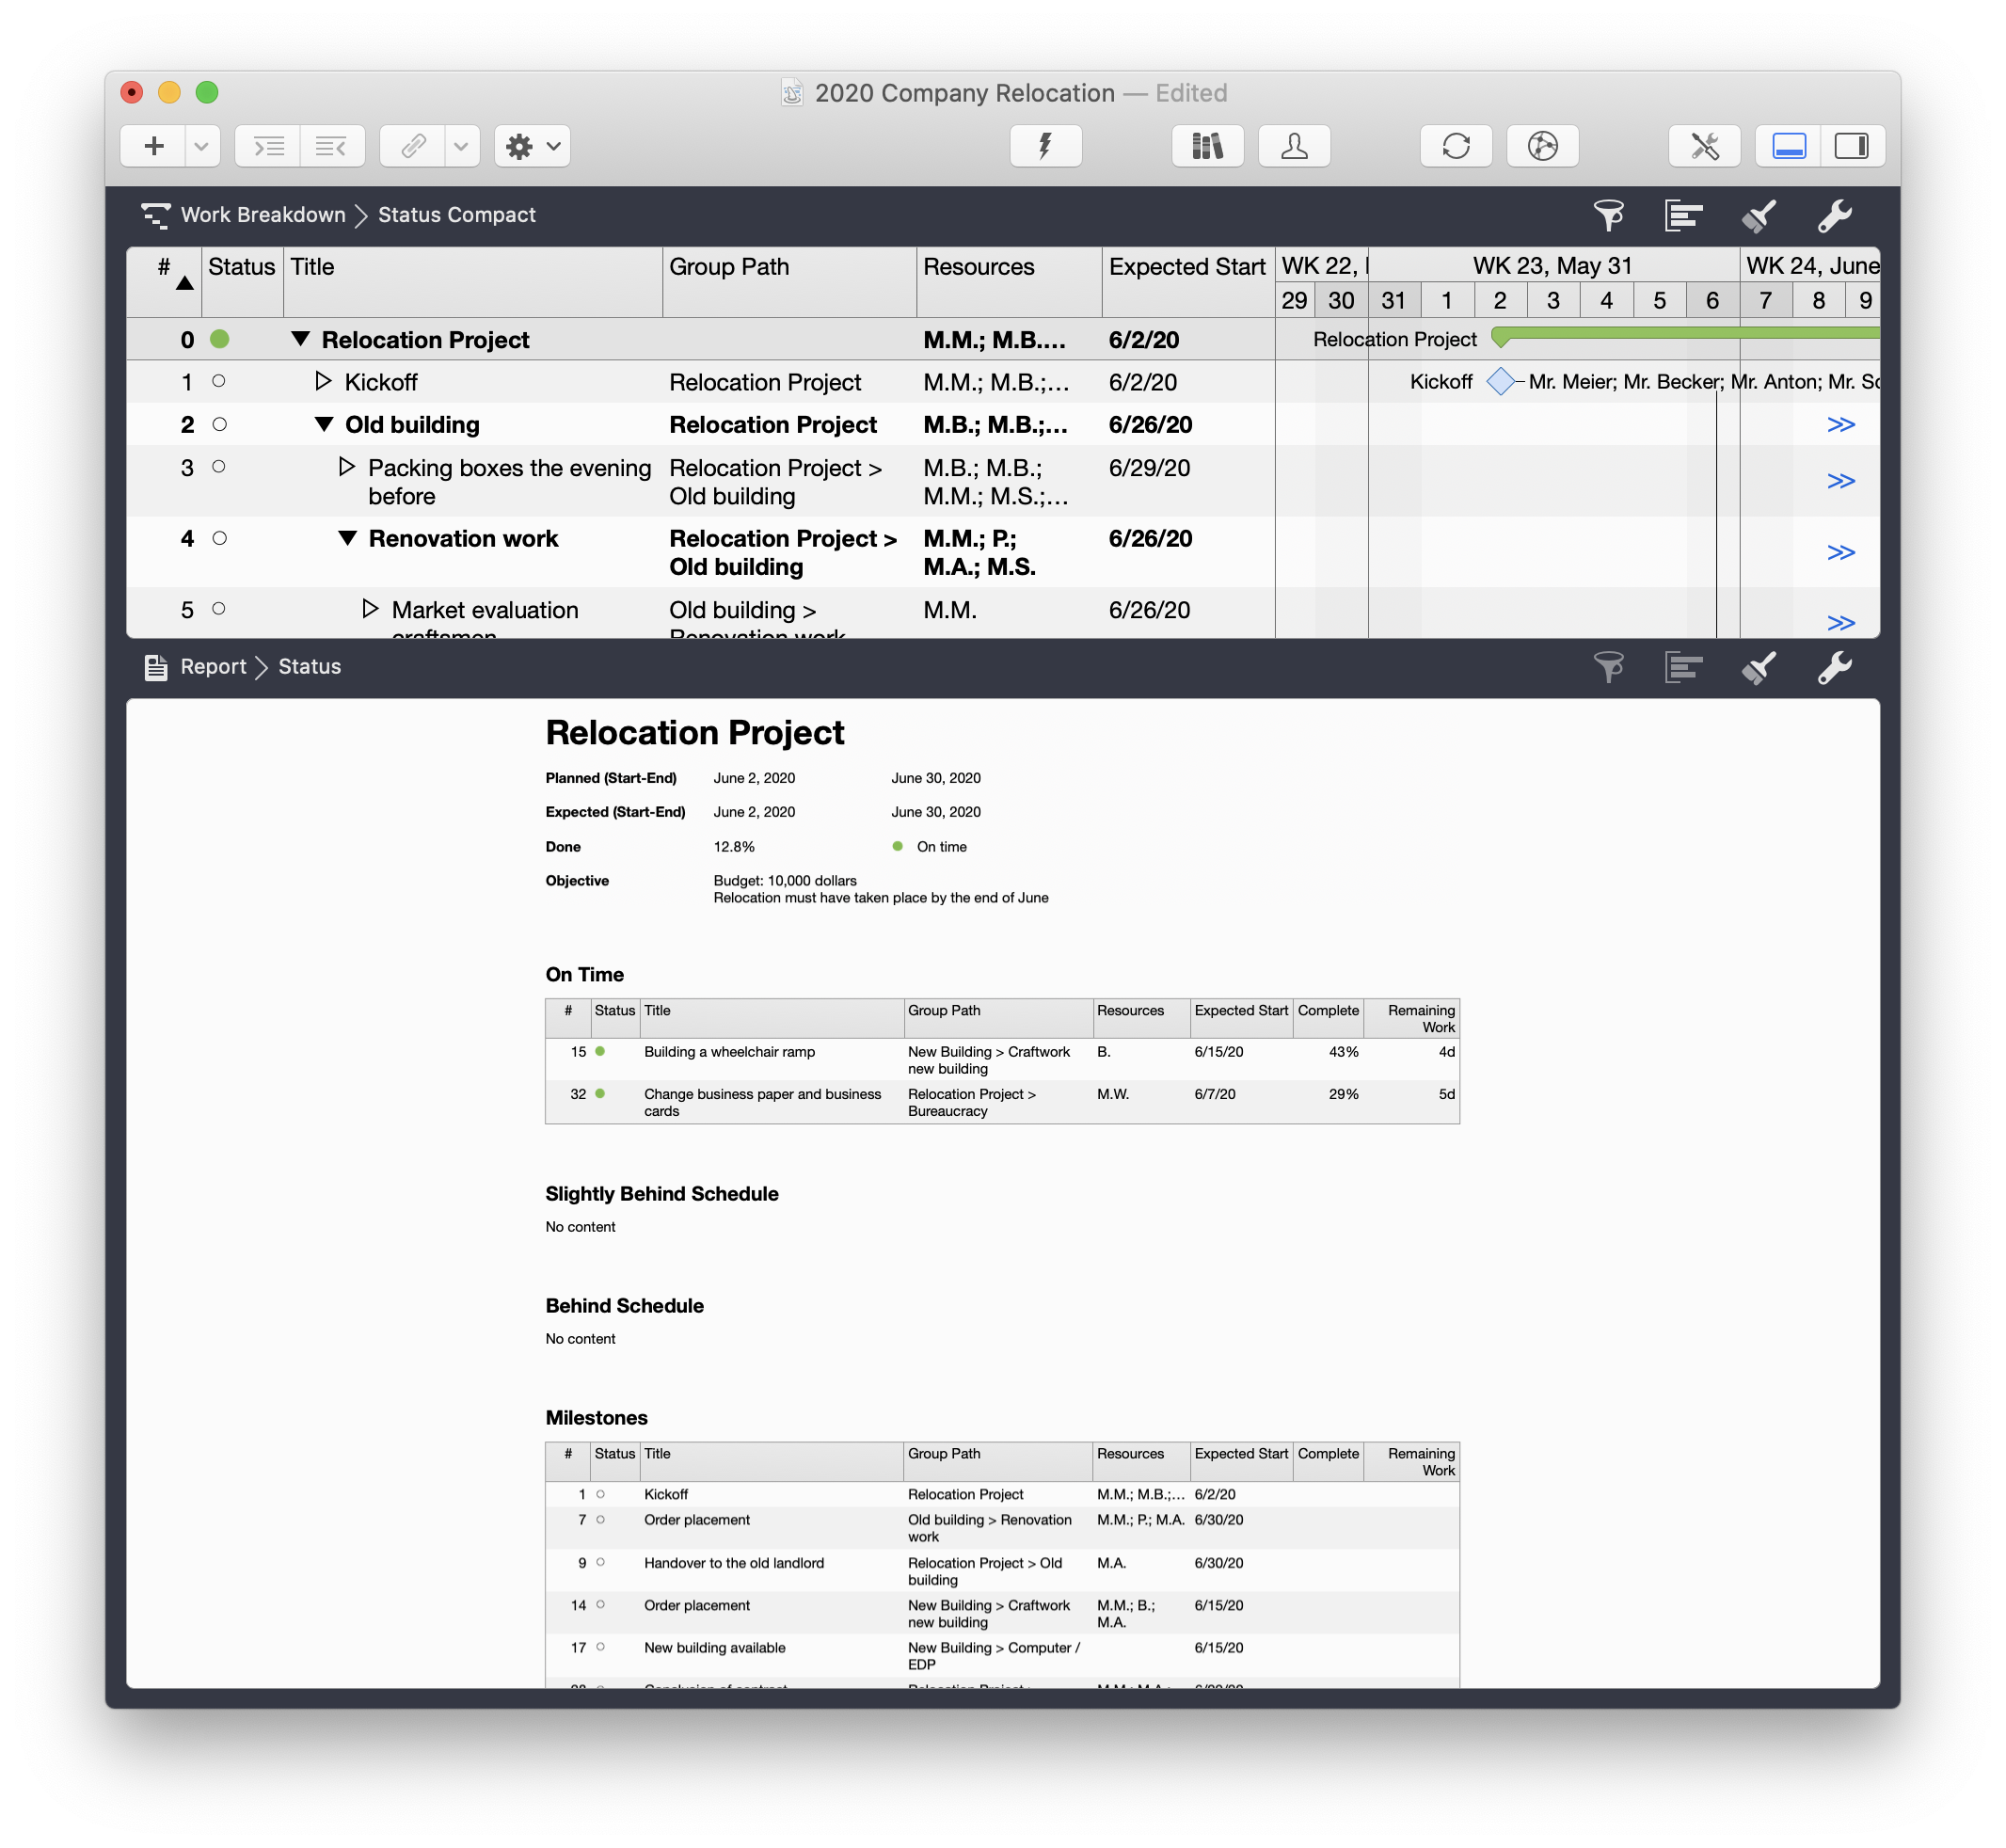
Let’s look at the status report first. It contains the following information as standard:
-
Planned and expected time frame for the project
-
Percentage of completed activities and status
-
Objectives (notes are displayed here if they are stored in the top level of the activity inspector)
-
Activities in plan
-
Activities slightly behind schedule
-
Activities behind schedule
-
Milestones (from the main table)
-
Upcoming events for this week
The contents are generated from the view Work Breakdown → Status Compact. If you want to make changes to the displayed columns, you can do so in the view:
The report on your screen will certainly not be enough for you, instead you want to distribute it further. Open the print menu to set up printing according to your individual requirements. In the following example, an image, which could be your company logo, has been added as a watermark:
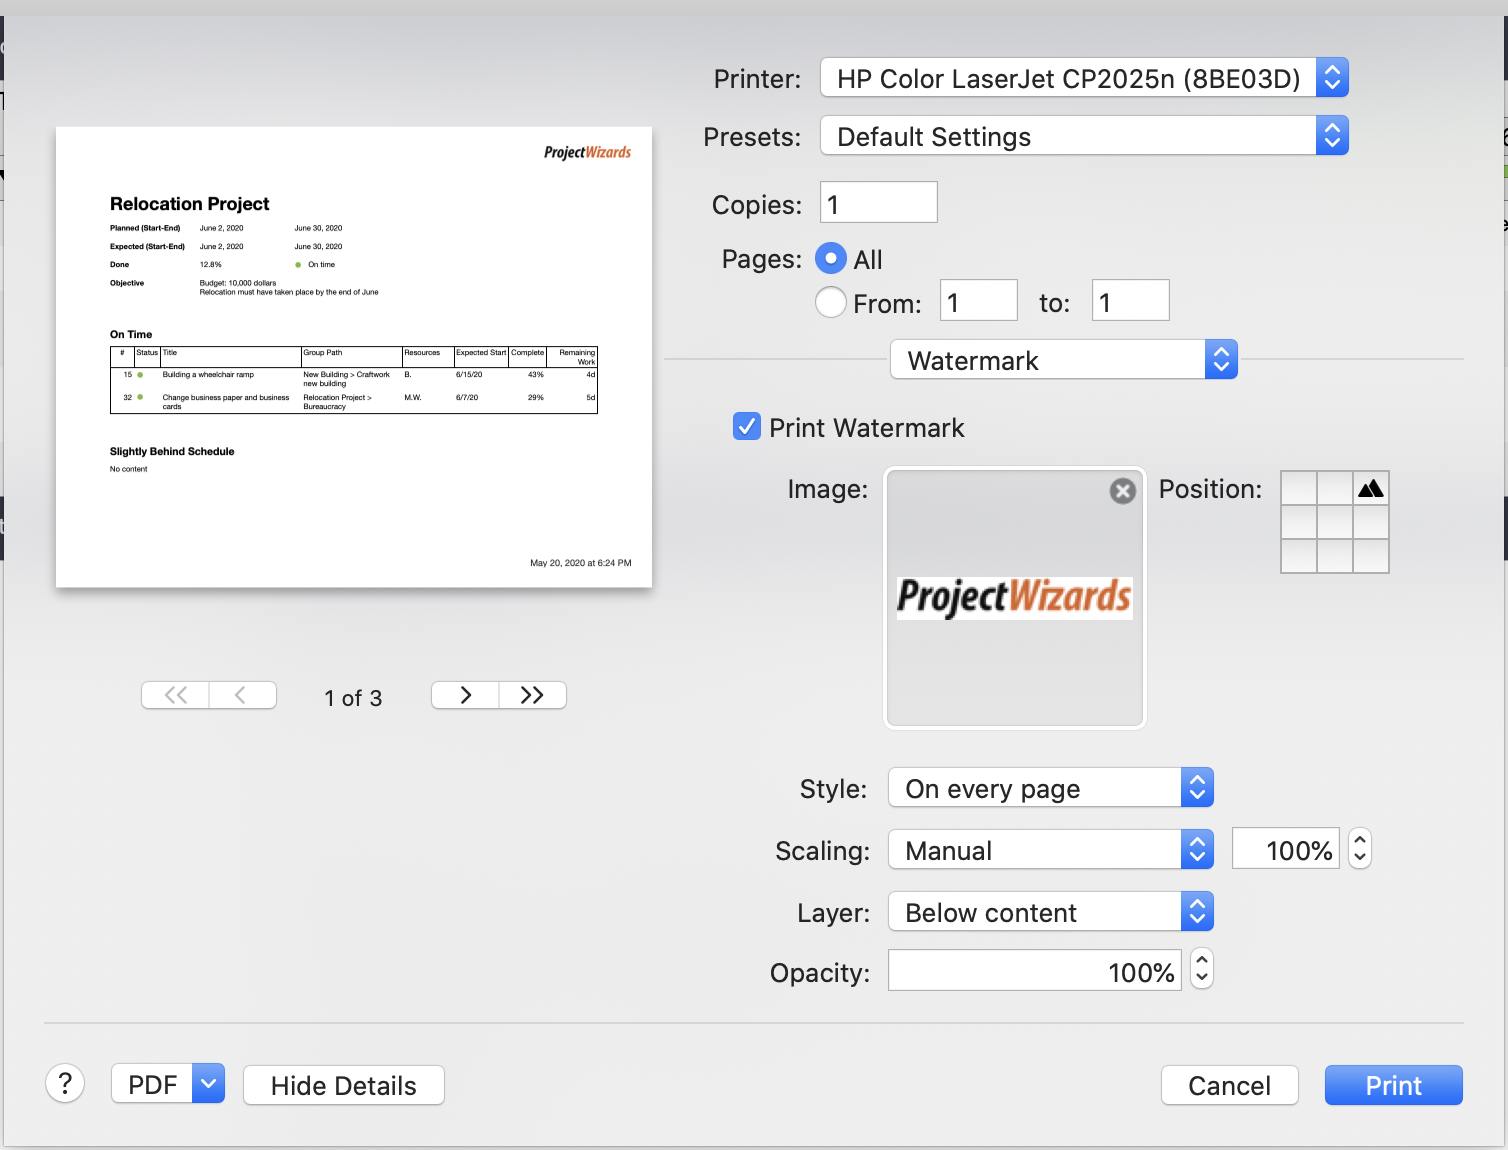
You can print the report or save it as a PDF.
Finding the needle in the haystack
Merlin Project offers a sophisticated system for searching and finding information that you have stored in a project. First of all, you can differentiate your search between the general data and the attachments; in both areas you have a search field that you open by pressing the key combination ⌘ and F. When you click on the triangle next to the magnifying glass in the search field, further options are displayed to narrow down your search. You will also see a list of recent searches, which you can delete if necessary.
Main and sub-projects
Projects are often part of another, larger project, where the project part, sometimes called subproject, can be managed by another project manager. In our example, the IT department could, for example, appoint its own project manager for the parts of the project which are managed by this department.
Merlin Project supports this approach by allowing you to combine multiple project files into one project file. To do this, simply drag and drop the project files together from the Finder onto the Merlin Project icon in the Dock or select File → Combine Documents. The projects will then be displayed as summary tasks in a new master project.
The highlight, however, is that after the combination, changes in the subproject files are also automatically updated in the master project. So if the manager of a subproject makes changes in his project and then gives you the updated file, you don’t have to maintain these changes. They are displayed automatically updated.
Project Completion
The Big Day
The move went without major problems. The evening before, all colleagues packed their boxes, including those of colleagues who were on holiday or ill. During the night the boxes, furniture and computers were loaded by the moving company and unloaded in front of the new building. With the help of the stickers on all items everything could be assigned to the right rooms and set up. Only one box with dishes fell roughly to the ground, so that there were some broken pieces. A very old desktop computer wouldn’t start the next morning. The plan to equip all computers with WLAN worked out. After unpacking his boxes, every employee could start up again immediately. All colleagues were able to get back to work around noon.
In the evening the welcome party took place. There were fried sausages and drinks, and the staff was obviously in a good mood. "Well done!" said Mr. Anton and patted Mr. Meier on the shoulder. "Nothing was broken and productivity hardly suffered." Mr. Meier was happy about the praise, but then Mr. Anton looked at him seriously. "But I was right: This expensive insurance was absolutely useless. We could’ve saved the money." Mr. Meyer looked at his boss. "Just kidding!" Mr. Anton added and went on laughing. In his hand he held the beer that Mr. Meier had just fetched fresh from the bar.
The week after the move, Mr. Meier went to the old building to check the renovation work. Everything went according to plan. Even the handover to the former landlord at the end of the week went without problems.
Lessons Learned
However, the project was not yet completed. The following week Mr. Schulze, Mr. Becker and Mr. Meier met to discuss what they would do differently if they had to carry out the same project again, but with today’s knowledge. Mr. Anton could not be persuaded to attend the meeting; for him the move was complete. Mr. Meier documented the experiences discussed in the meeting in a Lessons Learned document and added it to the project documents. He then checked once again that his project documentation was complete, burned all the data onto a DVD and also created a folder with all the printouts. The next project manager should have it better.
Often project participants are just happy that their project work is done, especially when time was running out before the deadline. Accordingly, the motivation to carry out an intensive review afterwards may not be very high. In order to be able to benefit for the future from the sometimes painfully gained experiences, the experiences are discussed together and documented in writing. The document in which these experiences are recorded is often called Lessons Learned. In the Lessons Learned, Merlin Project once again demonstrates its advantages, because in the post-event review, a positive veil is often drawn over what has happened (after all, you made it despite all the problems). Merlin Project, however, keeps all information at hand (provided that it has been entered, which Merlin Project virtually invites you to do through its functionalities).
For example, Merlin Project provides a field for closing risks in the Risk Inspector. If a risk has occurred, the financial and time implications are entered, as well as the lesson learned. For future projects, documentation of this information is very valuable (remembering the beginning of our example project, for example).
The project manager is asked in this phase not to reopen wounds that have arisen and to connect the review with positive questions: What would you do differently if you could start the project again with today’s knowledge?
The following questions are just a few that can be discussed in the context of a Lesson Learned document:
-
What was done right?
-
What was done wrong?
-
What would we do differently next time?
-
What risks have occurred?
-
Were the measures taken to deal with the risks appropriate?
-
What were the technical aspects of the project and how were they managed?
-
What was the project management like? Did the WBS contain all important activities?
-
Did the communication run smoothly?
-
If another project manager was to receive such a project, what advice would you want to give him?
If possible, the lessons learned document should be distributed within the company and stored in a lessons learned database to allow other project managers to access it. Only when the lessons learned document has been created after the project work has been completed is the project actually completed.
For your work with Merlin Project, the completion of a project means that you can check your data entered in Merlin Project for missing information and update it if necessary. This means that if you are assigned a similar project in the future, you can access your own historical data.
Customize Merlin Project to Your Own Needs
Preferences
Merlin Project allows three different types of settings:
-
Settings that affect Merlin Project in general
-
Settings that only affect the project that is currently open
-
The adaptation of working environments, either globally or just for one project
Preferences Valid in General
The generally valid settings can be accessed via the menu 'Merlin Project → Preferences'. In the appearing window you have access to five areas, which you can reach by clicking on the corresponding button:
-
General
-
Templates
-
Library
-
Accounts
-
Access to Folders
|
|
If you work with two monitors, you can display the inspector in a separate window and thus use one monitor completely for displaying the main window. |
Project Specific Settings
You can access the project-specific settings either via the icon in the toolbar or via File → Project Settings:
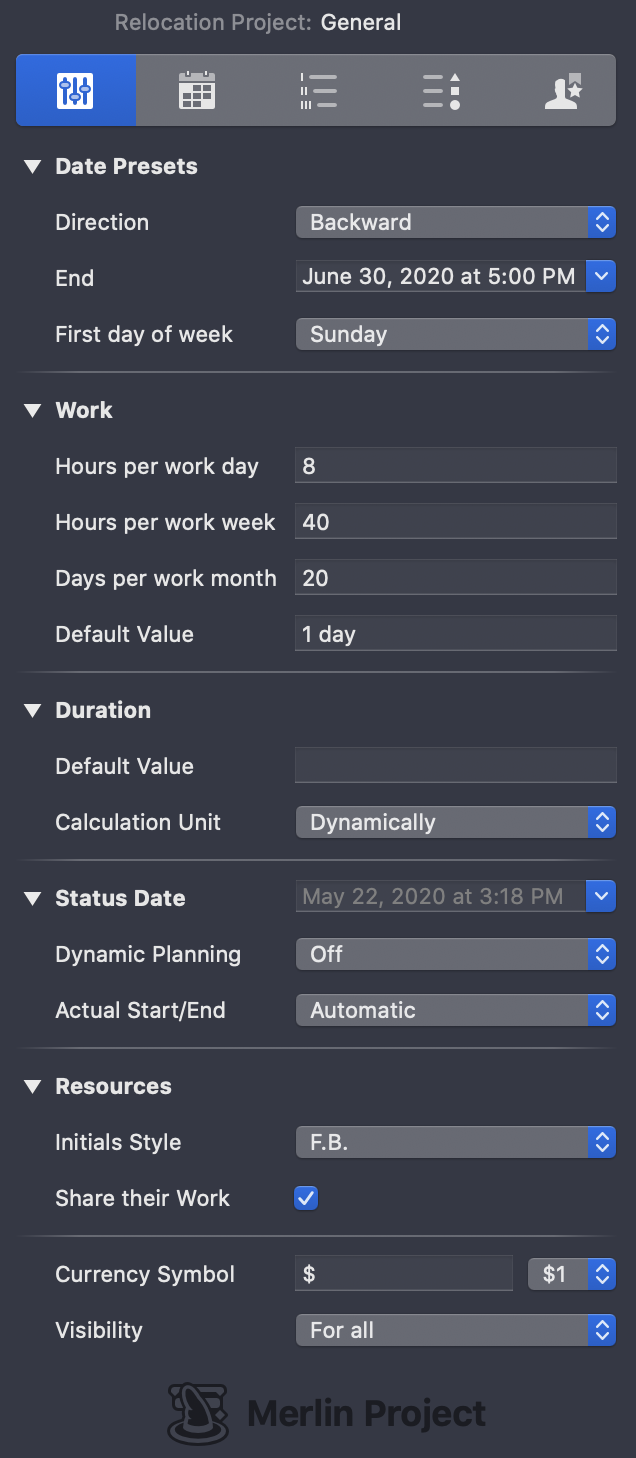
For more information on the available settings, refer to the Project Settings Quick Guide.
At this point the project calendar should be mentioned explicitly. The button Calendar provides access to the configuration options of the calendar. A common calendar is defined for working in a team. This can still be adjusted, for example to enter holidays. You also have the option of creating your own calendars. Normally the standard calendar will be sufficient. Here you can enter holidays such as Christmas and Thanks Giving, but also deviating working hours such as half a working day for New Year’s Eve. The calendar is 'inherited' by the resources, so that a holiday entered here also applies to the resources. Since exceptions confirm the rule, you can make changes to a resource’s calendar without affecting the project calendar. This is important, for example, if one of your resources is on vacation or if part of your team works in another state where other holidays apply.
By the way, you select more than one day at a time and change the working time regulations for these days by moving the mouse over the days while holding down the mouse button:
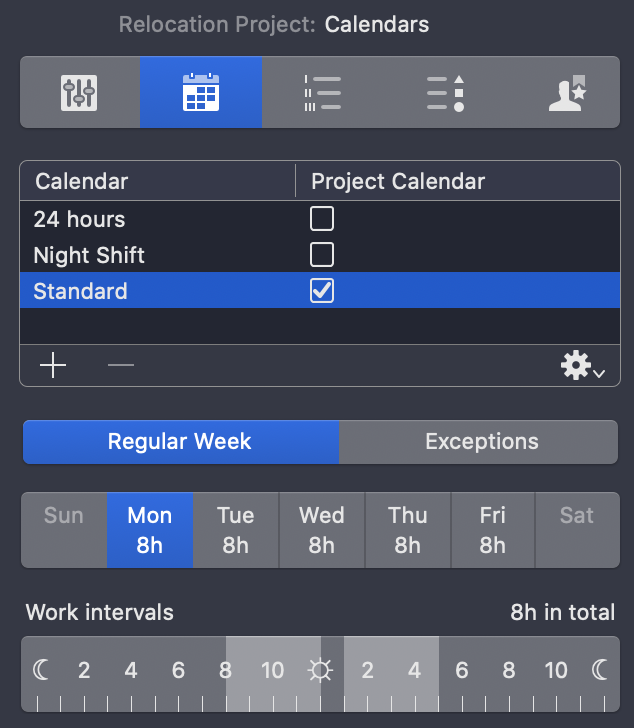
Calendars can also be imported and exported. If you have entered the holidays in a project calendar, you do not have to repeat this for a second project. Instead, you export the maintained calendar of the first project and then import it into the second project.
|
|
Import .ics files and easily reproduce calendars maintained in other programs in your project. |
Working Environments
Merlin Project offers extensive customization options for the user interface. You can save these customizations so that you can use a customized view for other projects or quickly switch between different views within a project. You can choose to make a working environment available only for a specific project or globally for all projects. This functionality can save you time by using custom views to speed up frequently recurring processes and switch when you need another view.
These options are available under the menu item Window → Window Configuration:
In addition, you can save the configuration of the view in the main area if you have made changes to columns there that differ from the standard. To do this, click on the active view in the main area, e.g. Work Breakdown → Status Compact . Under 'Edit…' you will find the option to save the current view.
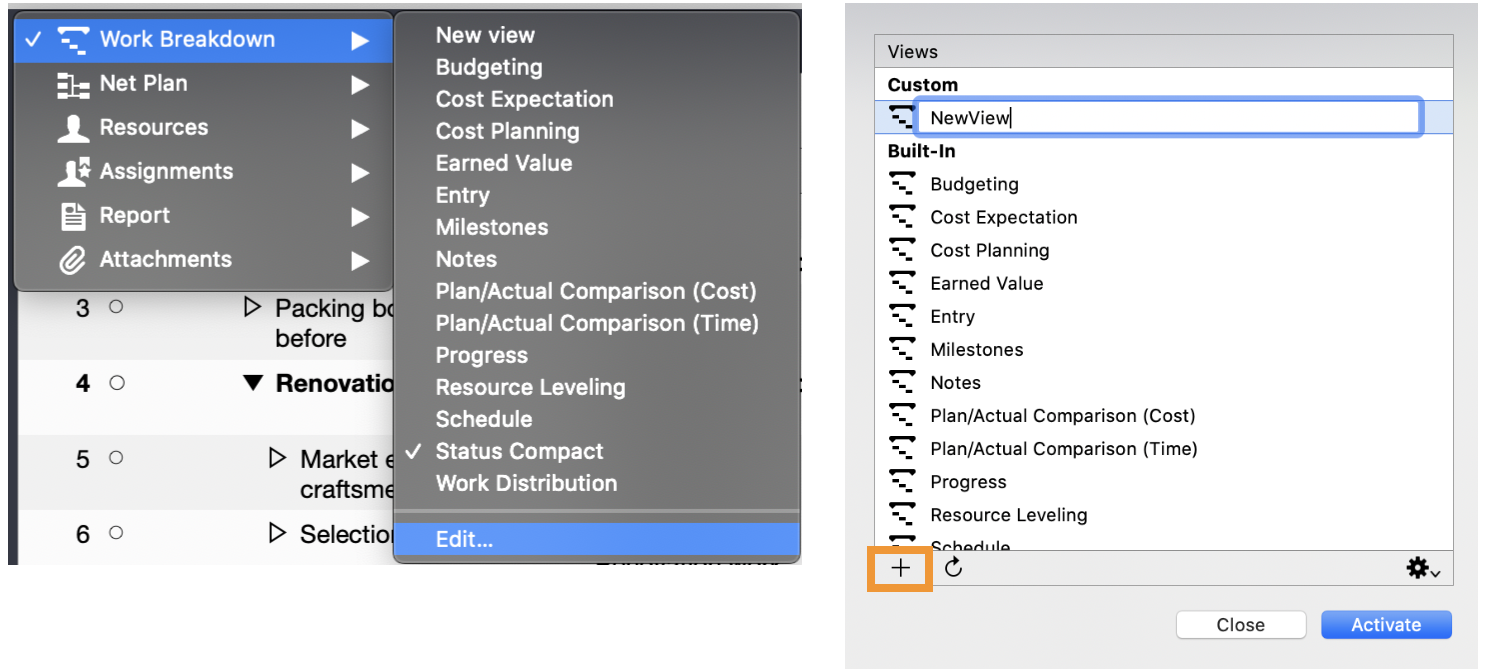
Further Project Management Literature
-
A Guide to the Project Management Body of Knowledge. Project Management Institute, 2004.
-
Waltzing With Bears: Managing Risk on Software Projects. DeMarco, Tom und Timothy Lister. Dorset House, 2003.
-
The Deadline: A Novel About Project Management. DeMarco, Tom. München: Dorset House, 1997.
-
Project Management. A Systems Approach to Planning, Scheduling and Controlling. Eigth Edition. Kerzner, Harold.
-
Projektmanagement von Online-Projekten. Felix Koch. Hamburg: LA RED Edition, 2015.
-
Risikomanagement in Projekten. Harrant, Horst und Angela Hemmrich. München: Hanser, 2004.
-
Risk Management: Tricks of the Trade for Project Managers: A Course in a Book. Mulcahy, Rita. Minneapolis: RMC Pubns Inc, 2003.
-
Slack: Getting Past Burnout, Busywork, and the Myth of Total Efficiency. DeMarco, Tom. Broadway Books, 2001.
-
Controlling Software Projects: Management, Measurement, and Estimates DeMarco, Tom. Pearson Education, 1982.
-
Why Does Software Cost So Much?: And Other Puzzles of the Information Age. DeMarco, Tom. Dorset House Publishing Company, Incorporated, 1995.
-
Peopleware: Productive Projects and Teams. DeMarco, Tom und Timothy Lister. Addison-Wesley Professional: 2013.
-
Überleben im Projekt. 10 Projektfallen und wie man sie umschifft. Tumuscheit, Klaus D. Zurich: Orell Fussli, 2000.
Glossary
- Activity
-
A part of the work to be worked on.
- Activity Code
-
Usually a numerical code that uniquely identifies an activity.
- Activity Description
-
Description of an activity, usually in conjunction with an activity code/identifier to distinguish the activity from other activities.
- Activity Sequencing
-
Determining the sequence of activities
- Assumptions
-
One aspect of a plan is assumed to be true without having provided evidence.
- Backward Pass
-
Starting from the planned end of the project, the system calculates in the direction of the present, resulting in the latest start and end times for activities.
- Baseline
-
The approved plan on the basis of which project progress and costs are controlled
- Bar Chart
-
Graphical representation of a project schedule; activities are displayed as bars on a calendar. Bar charts are also called Gantt charts because of their inventor Henry Gantt.
- Change Control
-
Management of changes to the basic plan of a project.
- Change Request
-
Request to change parameters of the project, for example regarding the scope or the duration of the project.
- Constraint
-
A restriction that reduces the options of the project team. e.g. a pre-defined project end date
- Contingency
-
See Reserve
- Cost
-
The monetary value of an activity, which is made up of labour costs and/or other costs.
- Crashing
-
A technique of schedule compression in which the duration of individual activities is shortened, for example by using additional resources.
- Critical Path
-
The longest path in a project, which determines the shortest possible duration of the project.
- Decomposition
-
A planning technique in which project scope and deliverables are broken down into smaller and easier to manage components.
- Deliverable
-
A unique and verifiable product or result that is necessary for the project.
- Fast Tracking
-
A method of Schedule Compression in which the network is changed in order to perform the following activities in parallel.
- Finish-to-Finish
-
Logical connection, in which the successor activity cannot be terminated before the predecessor activity.
- Finish-to-Start
-
Logical connection, where the start of the successor activity depends on the termination of the predecessor activity.
- Float
-
Also called slack; see also total float and free float
- Forward Pass
-
The calculation of early start and early end dates for all unfinished parts of network activities.
- Free Float
-
The time a schedule activity can be delayed without jeopardizing the early start of the following activities
- Gantt Chart
-
see Bar Chart
- Gantt Diagram
-
see Bar Chart
- Hammock Activity
-
see Summary Activity
- Historical Information
-
Documents and data from previous projects, for example folders, correspondence, contracts, etc.
- Late Finish Date
-
The latest possible time in the Critical Path Method at which a scheduled activity must be completed so that the project end date is not compromised.
- Late Start Date
-
The latest possible time in the Critical Path Method when a scheduled activity must be started in order for the project end time to be completed.
- Lessons Learned
-
Collected experience gathered during a project; also refers to a database of documented experience from several projects
- Milestone
-
A special point in the project schedule at which an important deliverable is completed; a milestone has a duration of zero.
- Network
-
called Net Plan in the English user interface.
- PDM
-
see Precedence Diagramming Method
- Planned Finish Date
-
planned end date
- Planned Start Date
-
planned date for beginning
- Planned Value
-
The authorized budget for a scheduled activity
- PMBOK
-
Abbreviation for Project Management Body of Knowledge, the standard of the Project Management Institute (PMI)
- Precedence Diagramming Method / PDM
-
A schedule networking diagramming technique in which schedule activities are represented by boxes.
- Predecessor Activity
-
The scheduled activity, which determines when the logically following scheduled activity can start.
- Project Charter
-
A document that formally authorizes the existence of the project and provides the project manager with the necessary authority to use the resources of the executing organization for scheduled activities.
- Project Network Diagram
-
see Project Schedule Network Diagram
- Project Schedule
-
The planned dates for the activities and scheduled milestones
- Project Schedule Network Diagram
-
Schematic representation of the logical dependencies between the scheduled activities; the schedule activities are displayed from left to right to reflect the chronology within the project.
- Project Scope
-
Project content and scope
- Qualitative Risk Analysis
-
The process of prioritizing risks with regard to the probability of a risk occurring.
- Quantitative Risk Analysis
-
The process of analyzing risks with regard to the impact of a risk on the project if the risk occurs.
- Reserve
-
A supplement to reduce financial or scheduling risks.
- Resource
-
Means to manage the project, be it human resources, materials, services, etc.
- Risk
-
An event of which it is uncertain whether it will occur and which has a positive or negative impact on the achievement of the project objectives.
- Risk Acceptance
-
A method of dealing with risks; with this method, the project team cannot or does not want to change the project plan to address a risk.
- Risk Avoidance
-
A method of dealing with risks; the risk is eliminated by generally weighing up objectives, for example quality objectives.
- Risk Category
-
Potential causes of risk, grouped into categories such as technology or weather.
- Risk Mitigation
-
A method of dealing with risks, in which case the probability of occurrence or the impact of the occurrence of a risk is reduced.
- Risk Register
-
Document containing all identified risks and related information such as the management strategy.
- Risk Response Planning
-
Developing options to reduce the vulnerability of the project.
- Risk Transference
-
A method of dealing with risks; the impact of a risk and the risk management strategy is outsourced to a third party (e.g. an insurance company)
- Schedule Activity
-
A component of the work to be performed for a project that is planned in the schedule.
- Schedule Compression
-
Shorten the duration of the schedule without reducing the project scope; see also crashing and fast-tracking.
- Schedule Milestone
-
see Milestone
- Schedule Network Analysis
-
The technique of identifying early and late start dates.
- Scope (content and scope)
-
The sum of products, services and/or results created by a project
- Scope Change
-
Change of the content or scope
- Scope Creep
-
Gradual increase in the content and scope of a project
- Scope Verification
-
The formal process of acceptance of the deliverables created within the project.
- Slack
-
see Total Float snd Free Float
- Sponsor
-
The person or organisation providing the financial resources for the project
- Stakeholder
-
Individuals or organisations that are either actively involved in the project or have an interest in the outcome of the project, whether positive or negative.
- Statement of Work
-
A detailed description of the products, services or results to be created within the project.
- Summary Activity
-
A group of related scheduled activities that are grouped together as one scheduled-activity
- WBS
-
see Work Breakdown Structure
- Work Breakdown Structure / WBS
-
A hierarchical decomposition / breakdown of the work that must be done by the project team to achieve the project goals. A WBS is usually deliverable-oriented, but it can also be phase-oriented.
- Work Package
-
A deliverable at the lowest level of a WBS; a work package contains the schedule activities and schedule milestones.