Welcome to the Merlin Project documentation for iPad.
|
|
For the iPhone Merlin Project documentation tap here. |
30 Days Free Trial
Merlin Project is available on a subscription basis.
You may however start a trial before subscribing. You have 30 days to test the app in full function. If you don’t start a subscription, the trial expires or you cancel a running subscription, the app runs in read-only mode.
Any documents created up to that point can be opened but not edited anymore.
Subscription
Use the Merlin Project app on your iPad to start a subscription.
Your subscription will be billed through Apple and linked to the Apple ID you’ve used upon downloading the app from the App Store. By an active subscription, the app allows you to create new files, open and edit existing ones.
For cancelation and further information on managing subscriptions please follow the Apple workflow: https://support.apple.com/en-us/HT202039
|
|
You can cancel a running subscription at any time and start a new again whenever needed. |
Storage Locations
Merlin Project on iPad supports the iOS Files app and its storage locations.
You can open Merlin Project files from following locations:
|
|
Other kind of files like PDF, mpp, MS Project XML files, etc can be accessed from any given storage location. |
On My iPad
Use the storage location On My iPad to create files which are to be saved locally on your iOS device. These files will not be synchronized among other iOS devices you might use by the same Apple ID.
The documents are located within the Merlin Project folder of the On My iPad storage location.
New Local Projects
To create new local project files on your iPad:
-
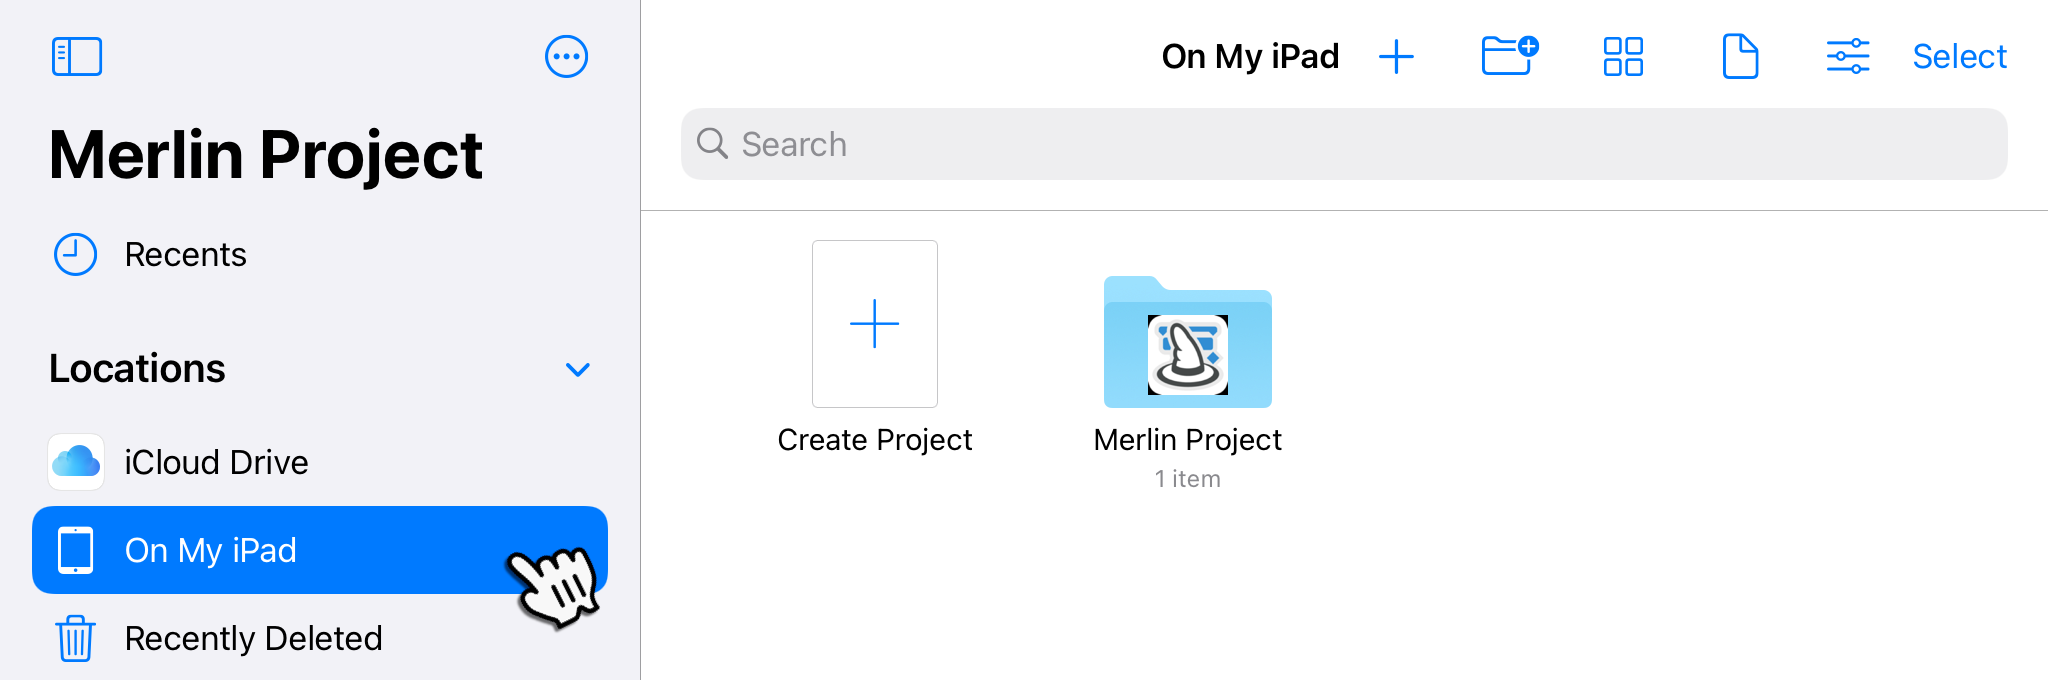
Browse the file locations
-
Tap the "On My iPad" location
-
and then "Merlin Project".
-
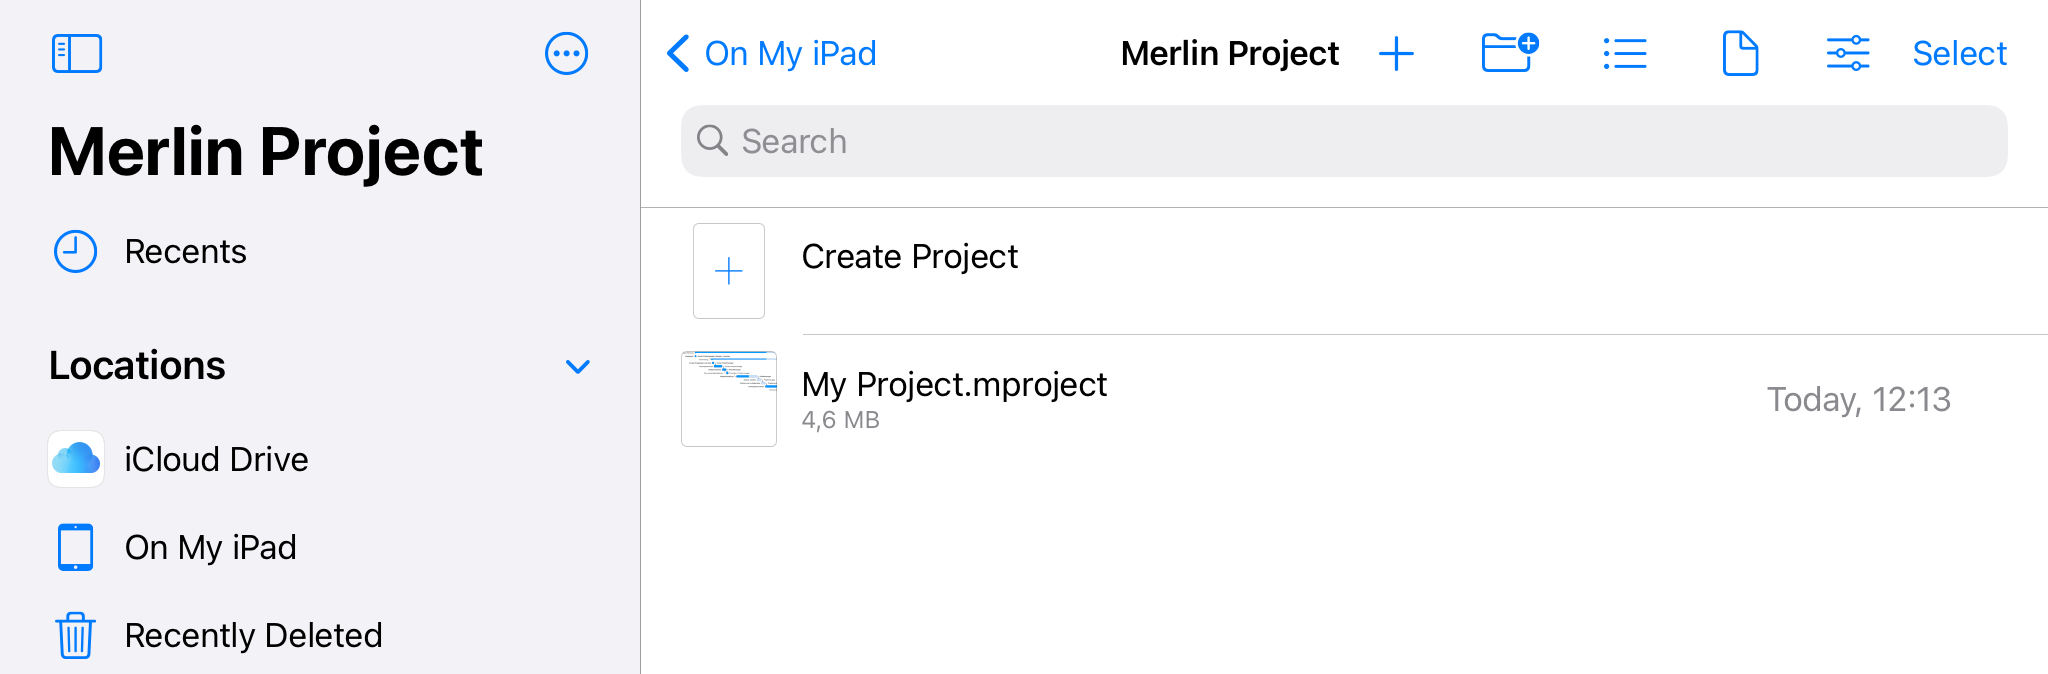
Tap "+ Create project"
-
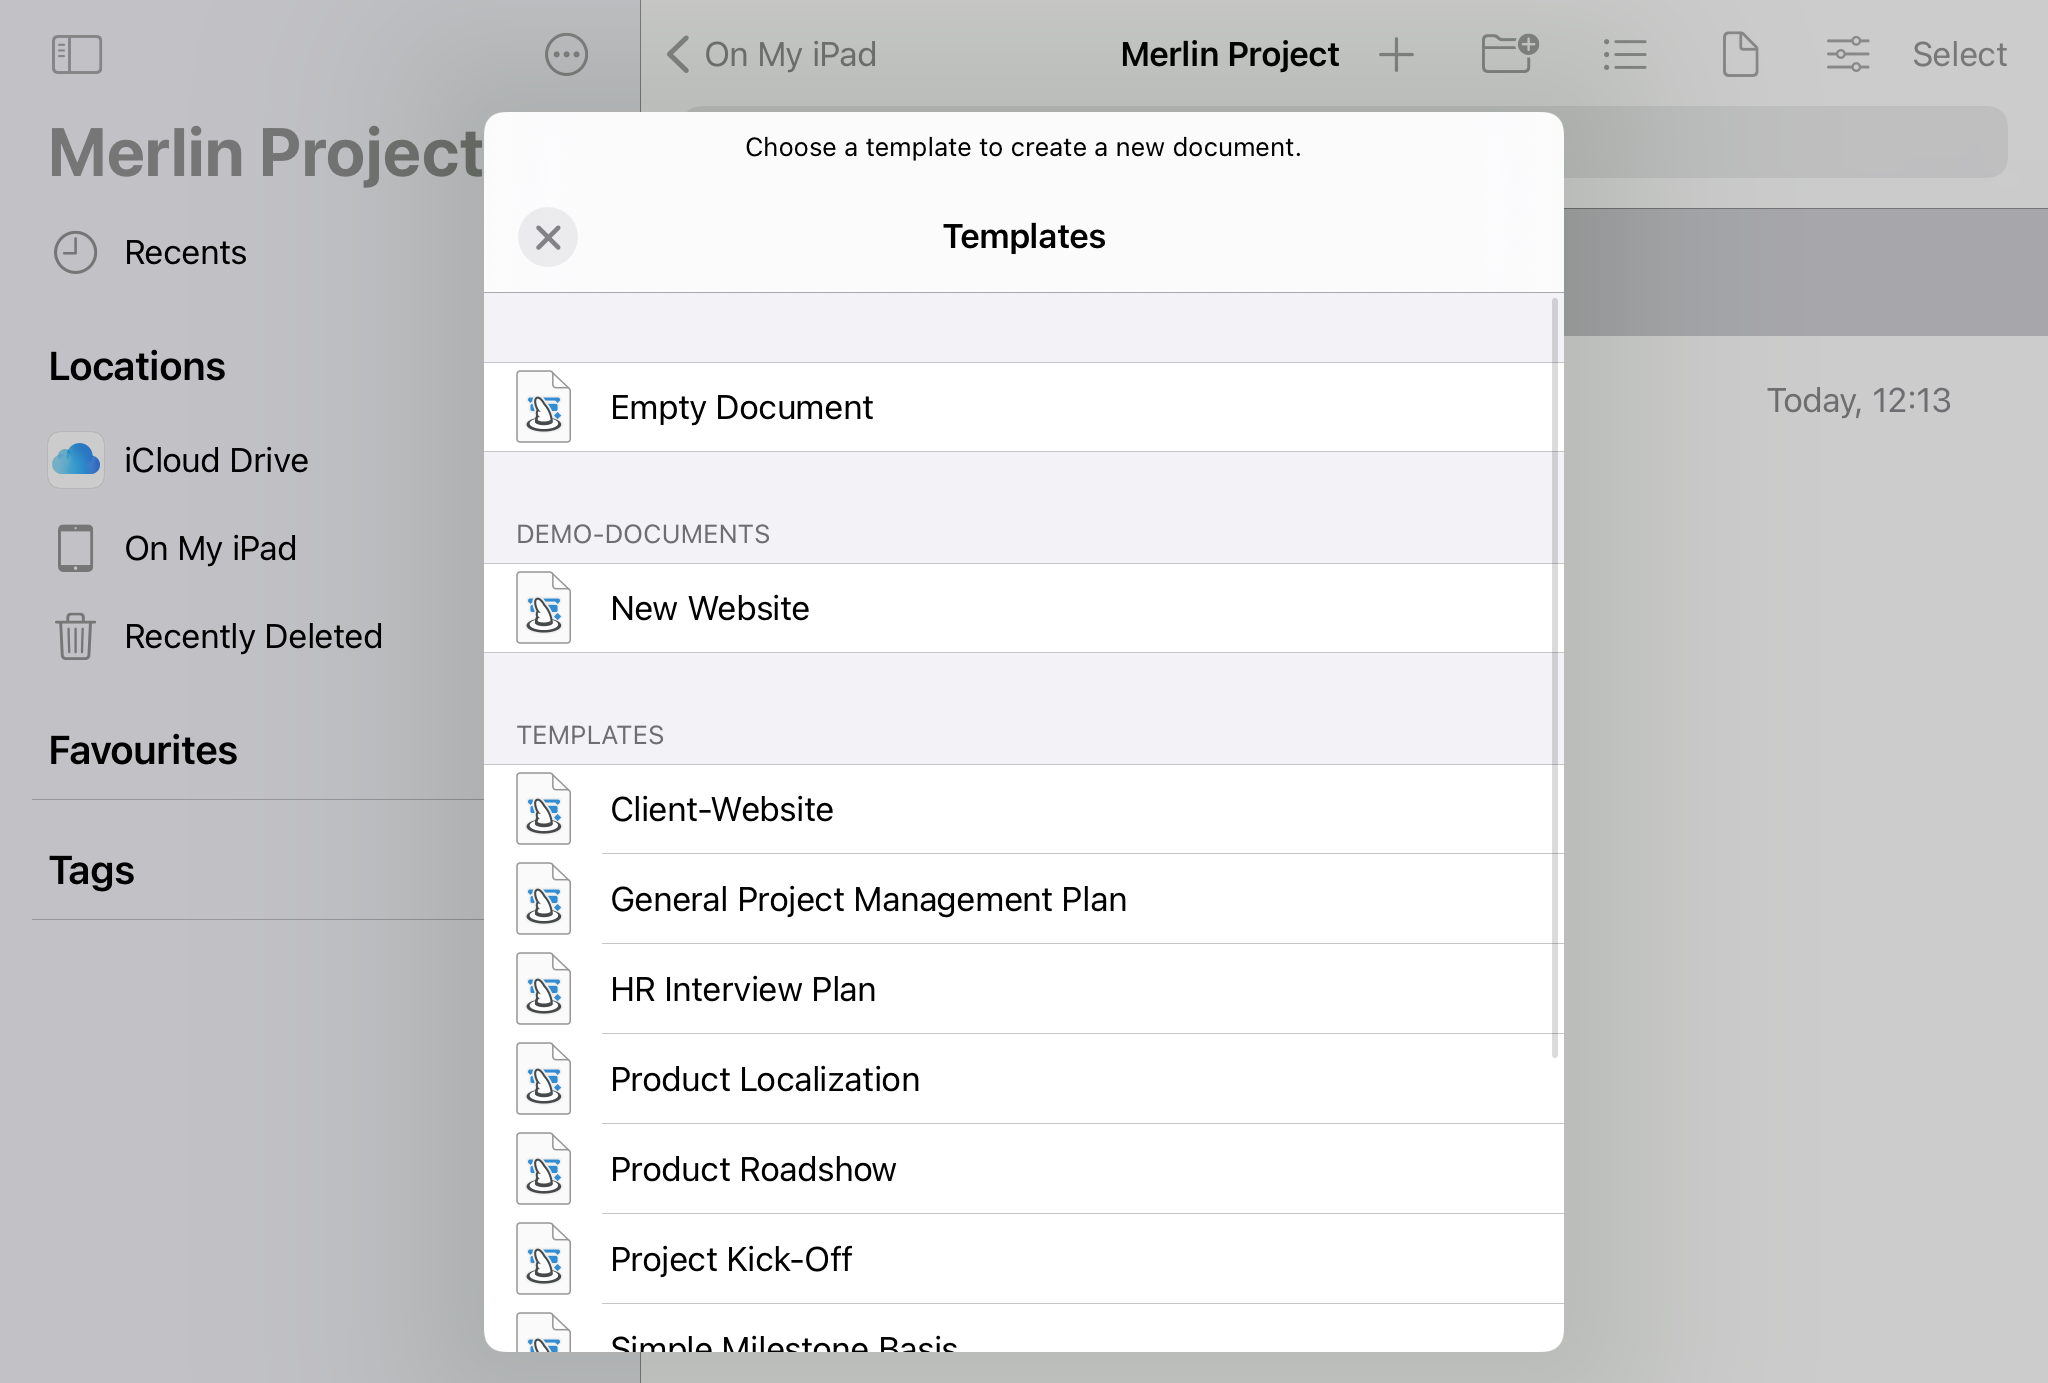
Choose a template or start a new empty document.
Open Local Projects
To open existing local project files from your iPhone:
-
Tap the "On My iPad" location
-
and then "Merlin Project".
-
Tap any given project file.

|
|
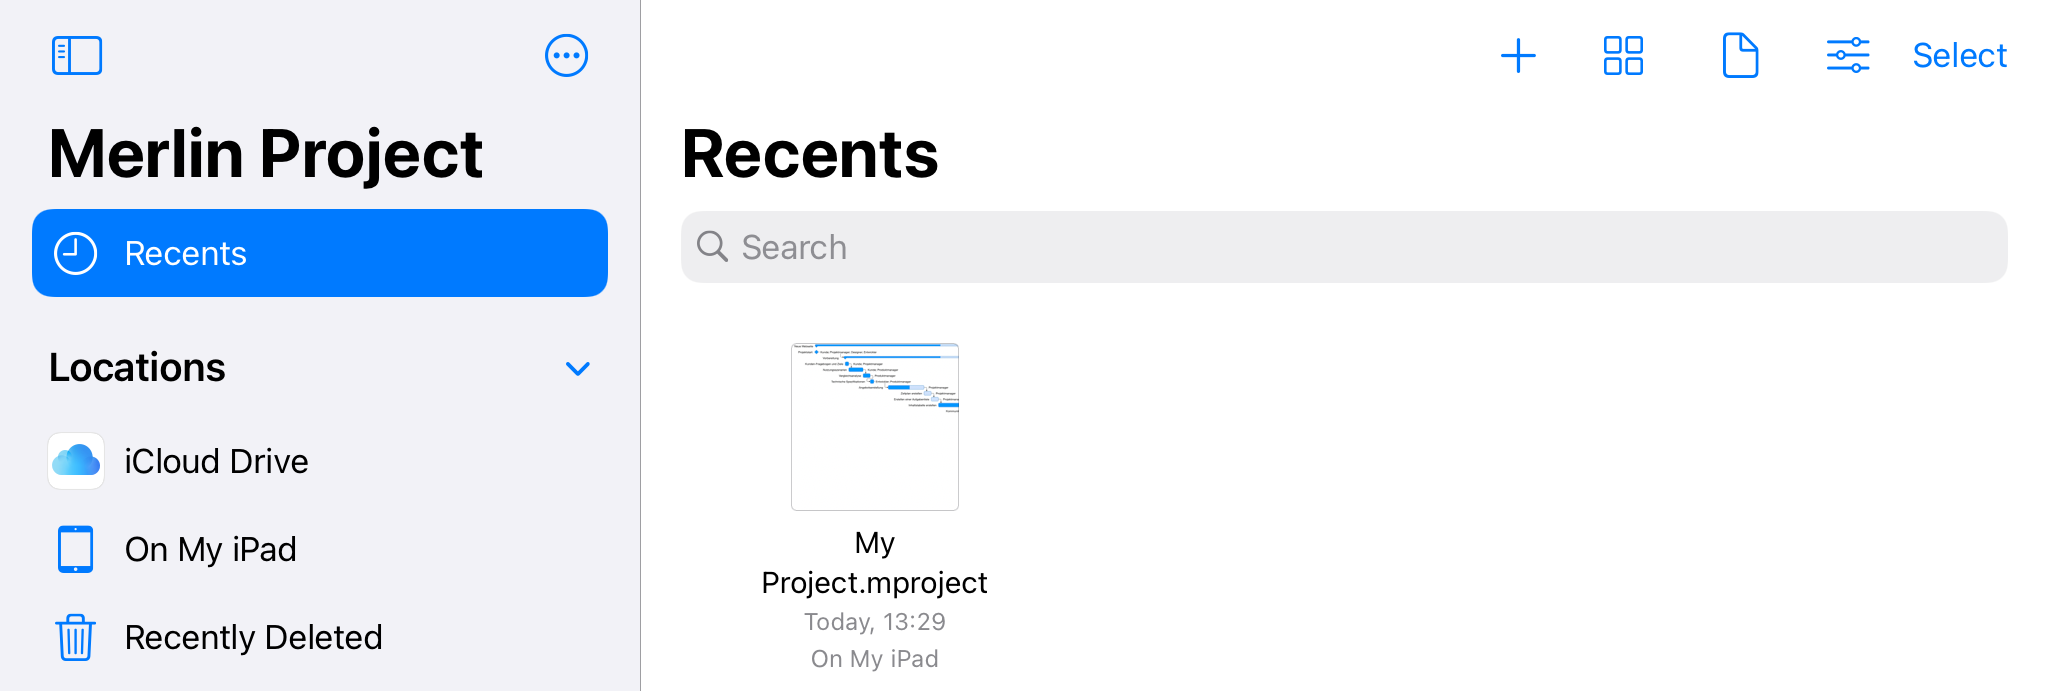
Once you opened a file, it also appears in the 'Recents'. |
Share Local Projects
To share local project files with other users:
-
Tap the "On My iPad" location
-
and then "Merlin Project".
-
Tap and hold any given project file.
-
Use the 'Move' option to select another location.

Or
-
Use 'share', to be able to send it via AirDrop, Mail, etc…
iCloud Drive
Merlin Project also supports iCloud Drive. Project files on Apple’s iCloud Drive will be synchronized by the cloud service with other Apple devices that are logged in with the same Apple ID.
Enable iCloud Drive
Set up iCloud Drive on your devices as explained here by Apple.
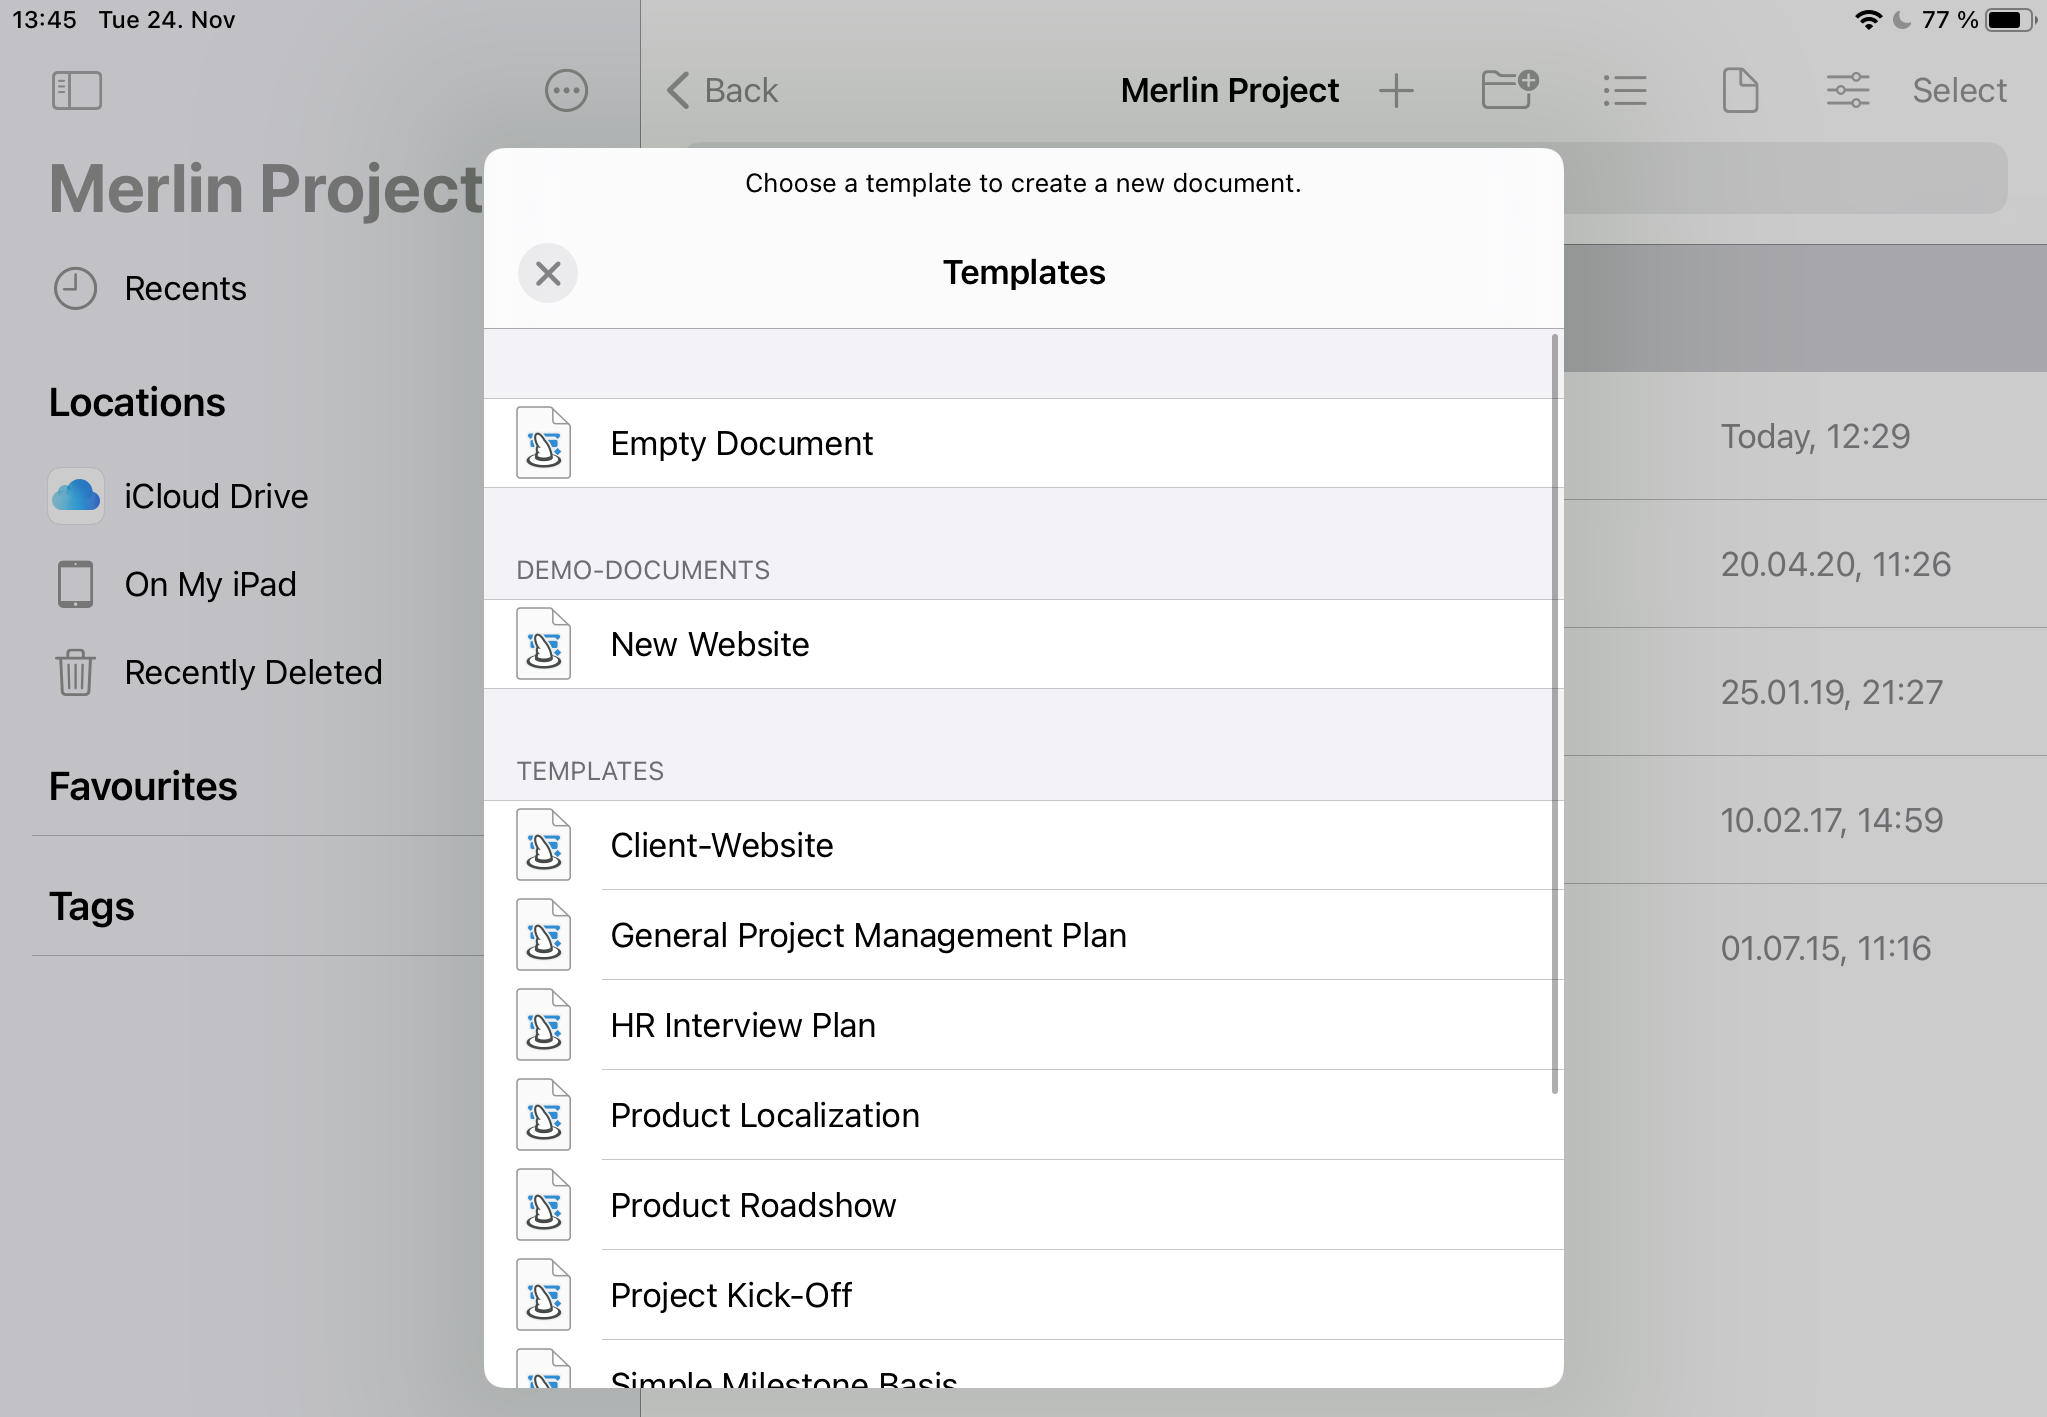
New Projects on iCloud Drive
To create new project files on your iCloud Drive:
-
Browse the file locations
-
Tap the "iCloud Drive" location
-
Tap "+ Create project"
-
Choose a template or start a new empty document.
|
|
You are free to store your projects in any iCloud Drive folder you like. |
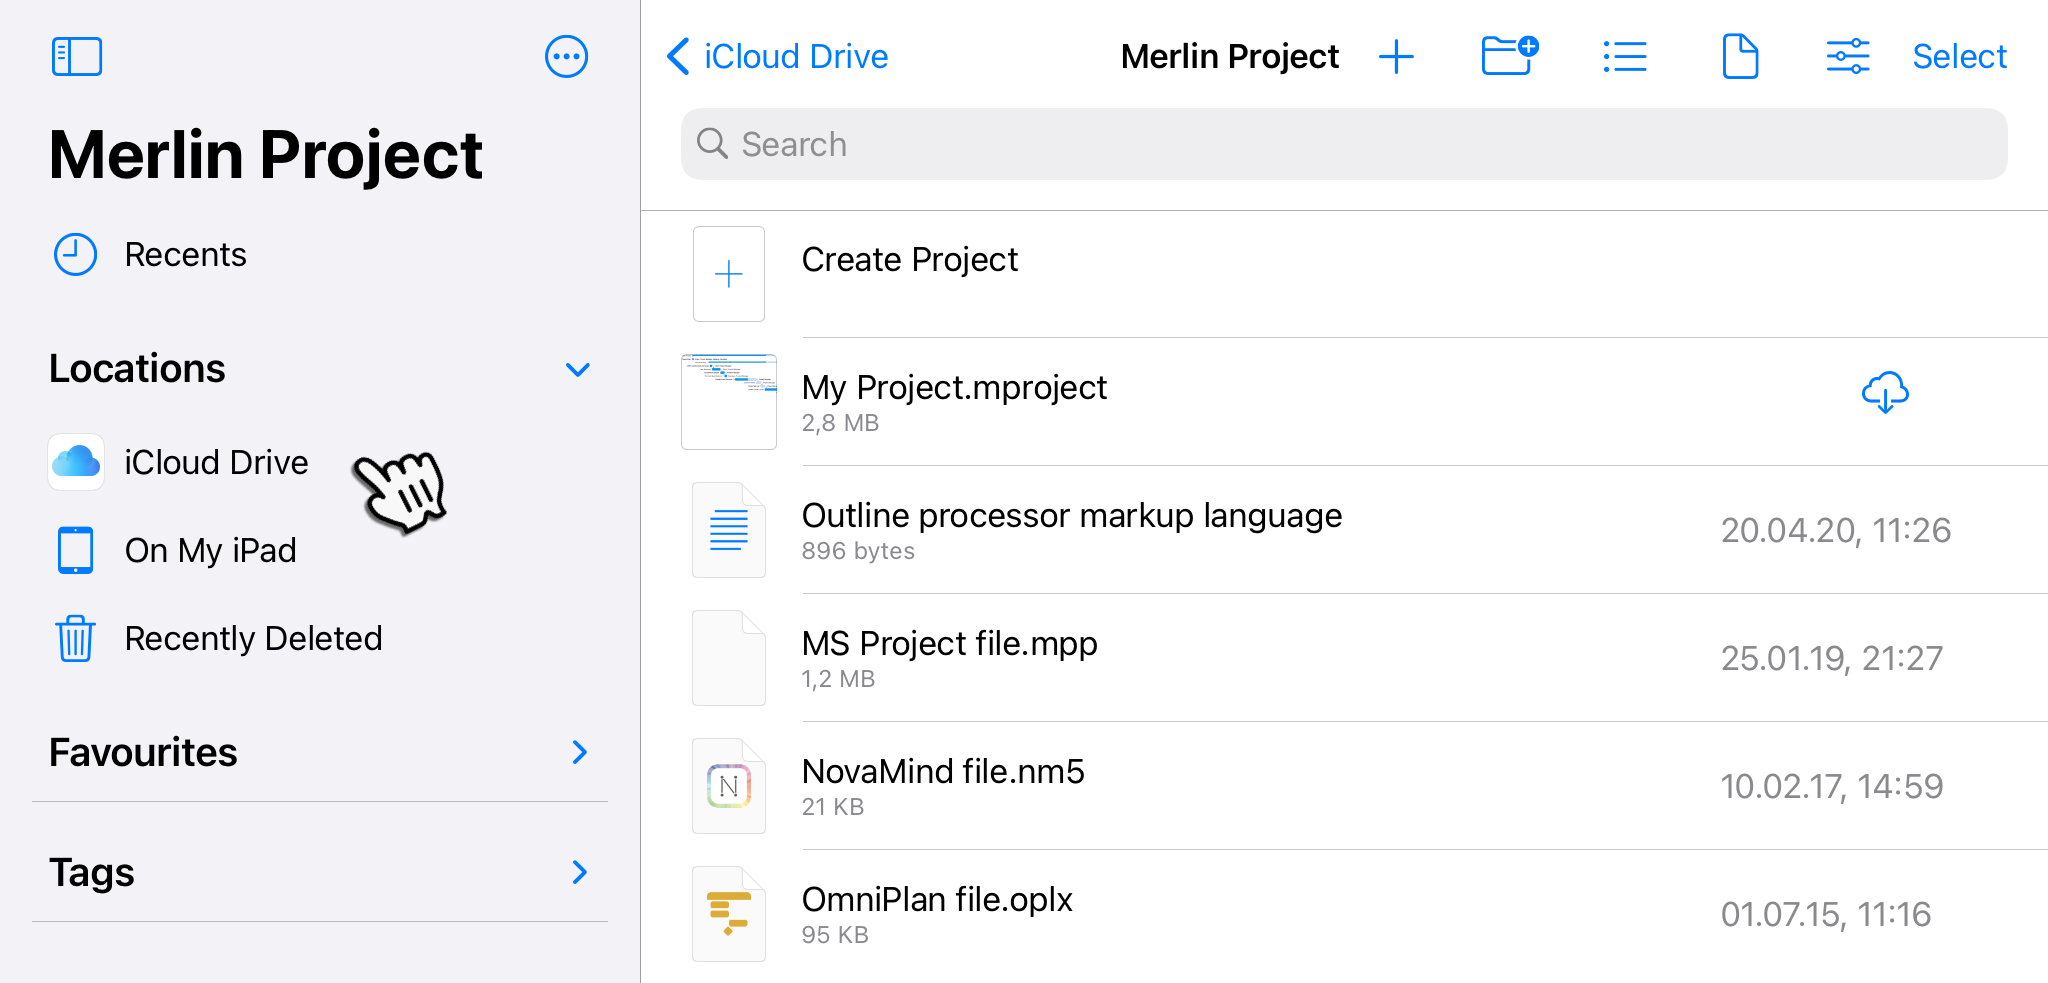
Open Projects from iCloud Drive
To open existing project files from your iCloud Drive:
-
Browse the file locations
-
Tap the "iCloud Drive" location
-
Tap any given project file.
|
|
Files with a cloud symbol, indicate that the iCloud Drive hadn’t yet completed syncing that file on your device. |
Import
Tap files from third party applications, to import their data into new Merlin Project documents.
Merlin Project on iPad supports following formats:
-
Microsoft Project (.mpp, .xml)
-
Omniplan
-
Mind manager
-
Freemind
-
Novamind
-
OPML
-
CSV
-
Merlin 2
-
Merlin Project XML
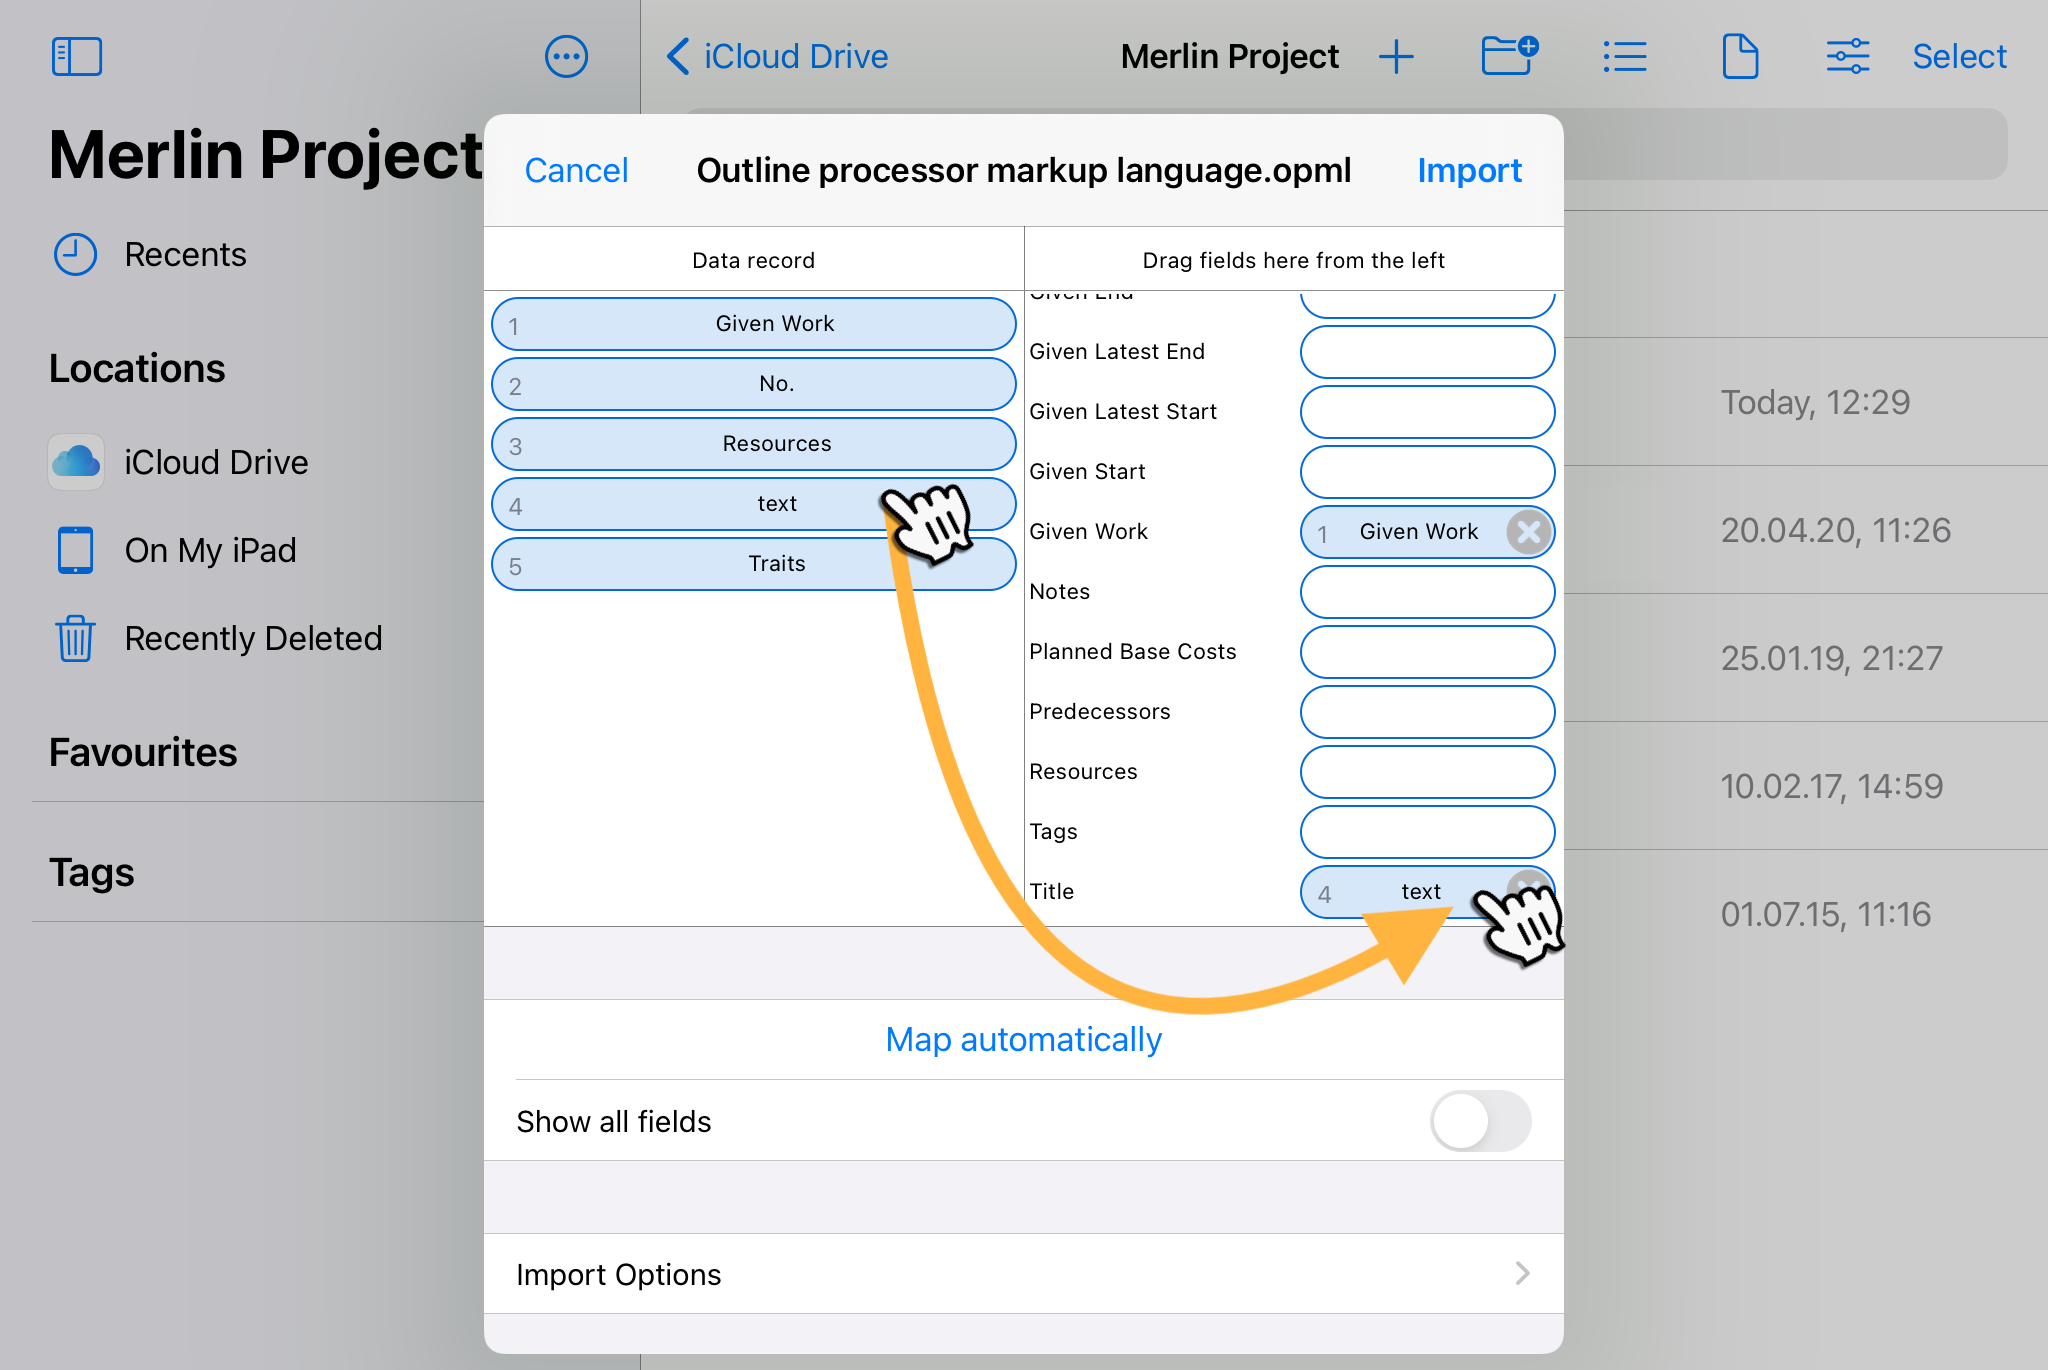
|
|
When opening CSV and OPML files a dialogue will come, with which you can map data records from the output document to the fields of Merlin Project on iPad. |
Projects
With Merlin Project on iPad you can also use Dropbox to synchronize project files among your iOS and mac devices.
The standard Dropbox location however, indicated by the blue "Dropbox" icon, does not support Merlin Project document bundles.
You’ll need to setup in Merlin Project on iPad a Dropbox account before you can create new projects or access existing ones.
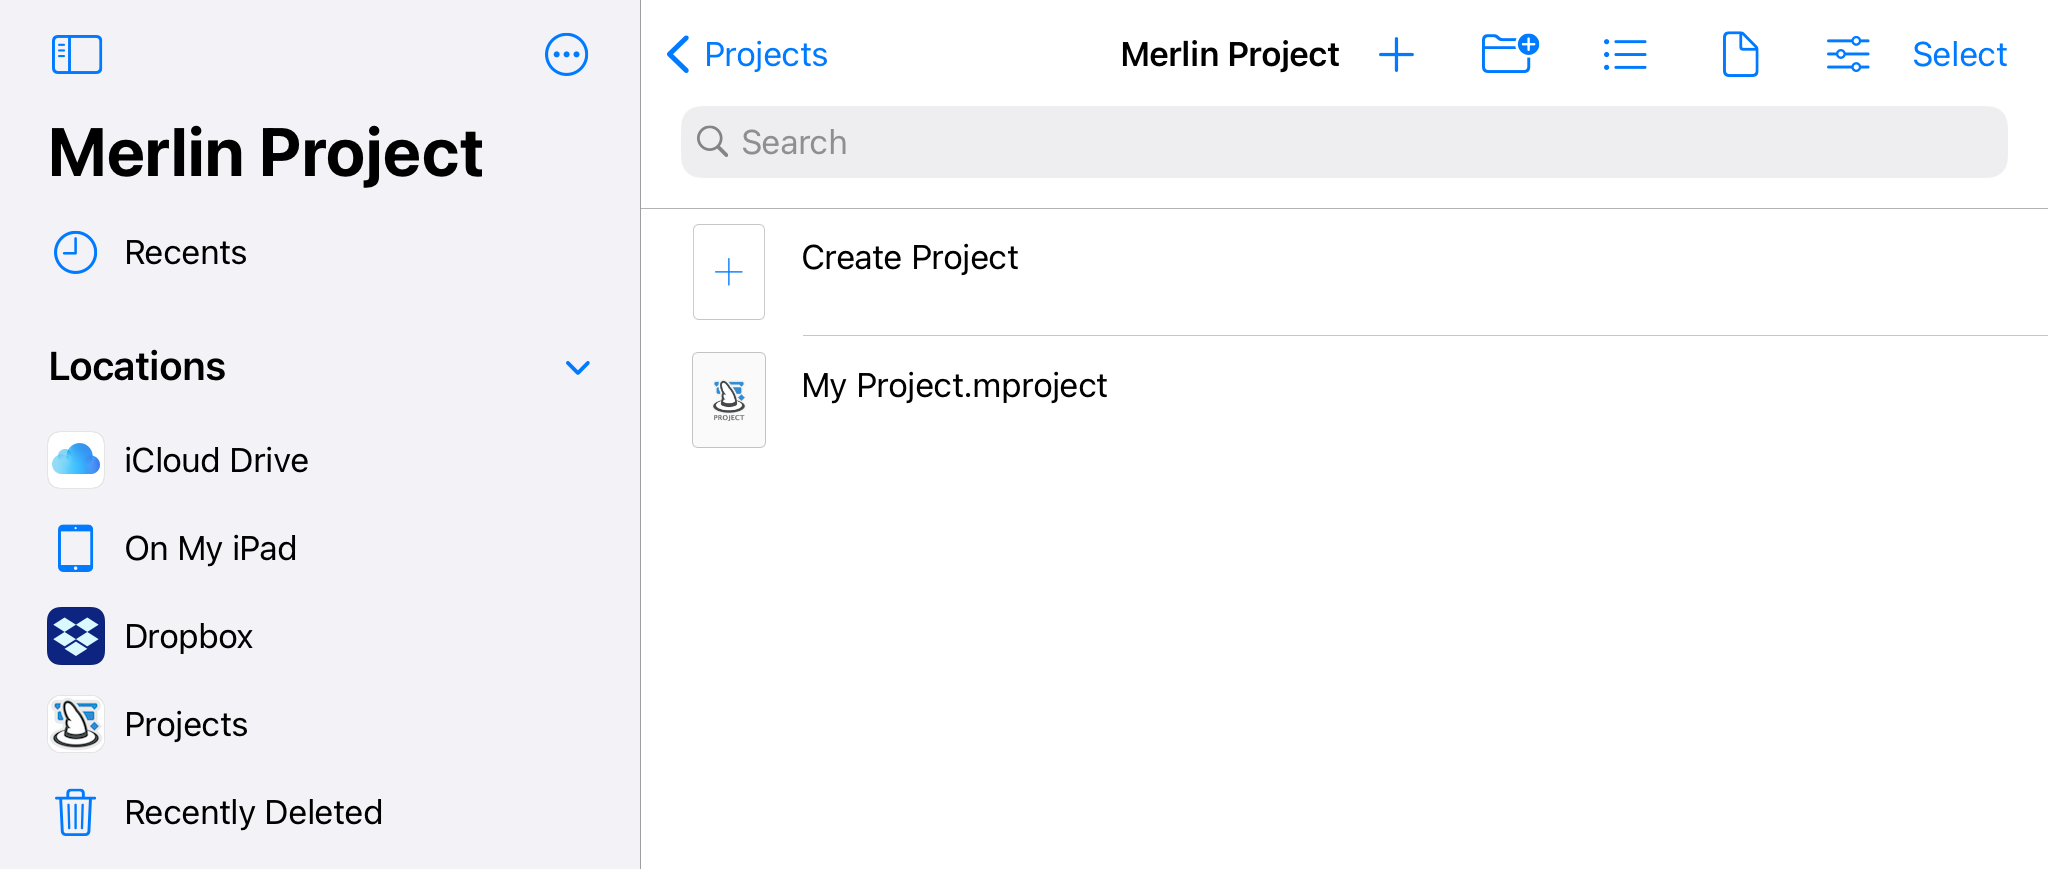
Setup 'Projects'
To setup the Projects location and access thus your Merlin Project files from your Dropbox personal account:
-
Browse the file locations
-
Tap the "Projects" location

|
|
If Projects location isn’t currently listed, please tap the (…) symbol and then on "Edit Siderbar" and enable the missing Projects location. |
-
Tap "Merlin Projects on Dropbox".
Merlin Project on iPad will inform you that you need to "Allow access to Dropbox".

-
Tap "Allow access to Dropbox" and proceed according to the instructions.
|
|
If after that, the iOS jumps temporarily to another storage location, that’s fine. Simply tap again the Projects location to list its contents. |
New Projects on Dropbox
To create new project files on your Dropbox account with Merlin Project on iPad, use the Projects storage location:
-
Browse the file locations
-
Tap the "Projects" location
-
Tap "+ Create project"
-
Choose a template or start a new empty document.

Open Projects from Dropbox
To open existing project files from Dropbox account with Merlin Project on iPad, use the Projects storage location:
-
Browse the file locations
-
Tap the "Projects" location
-
Tap any given project file.
Work on Projects
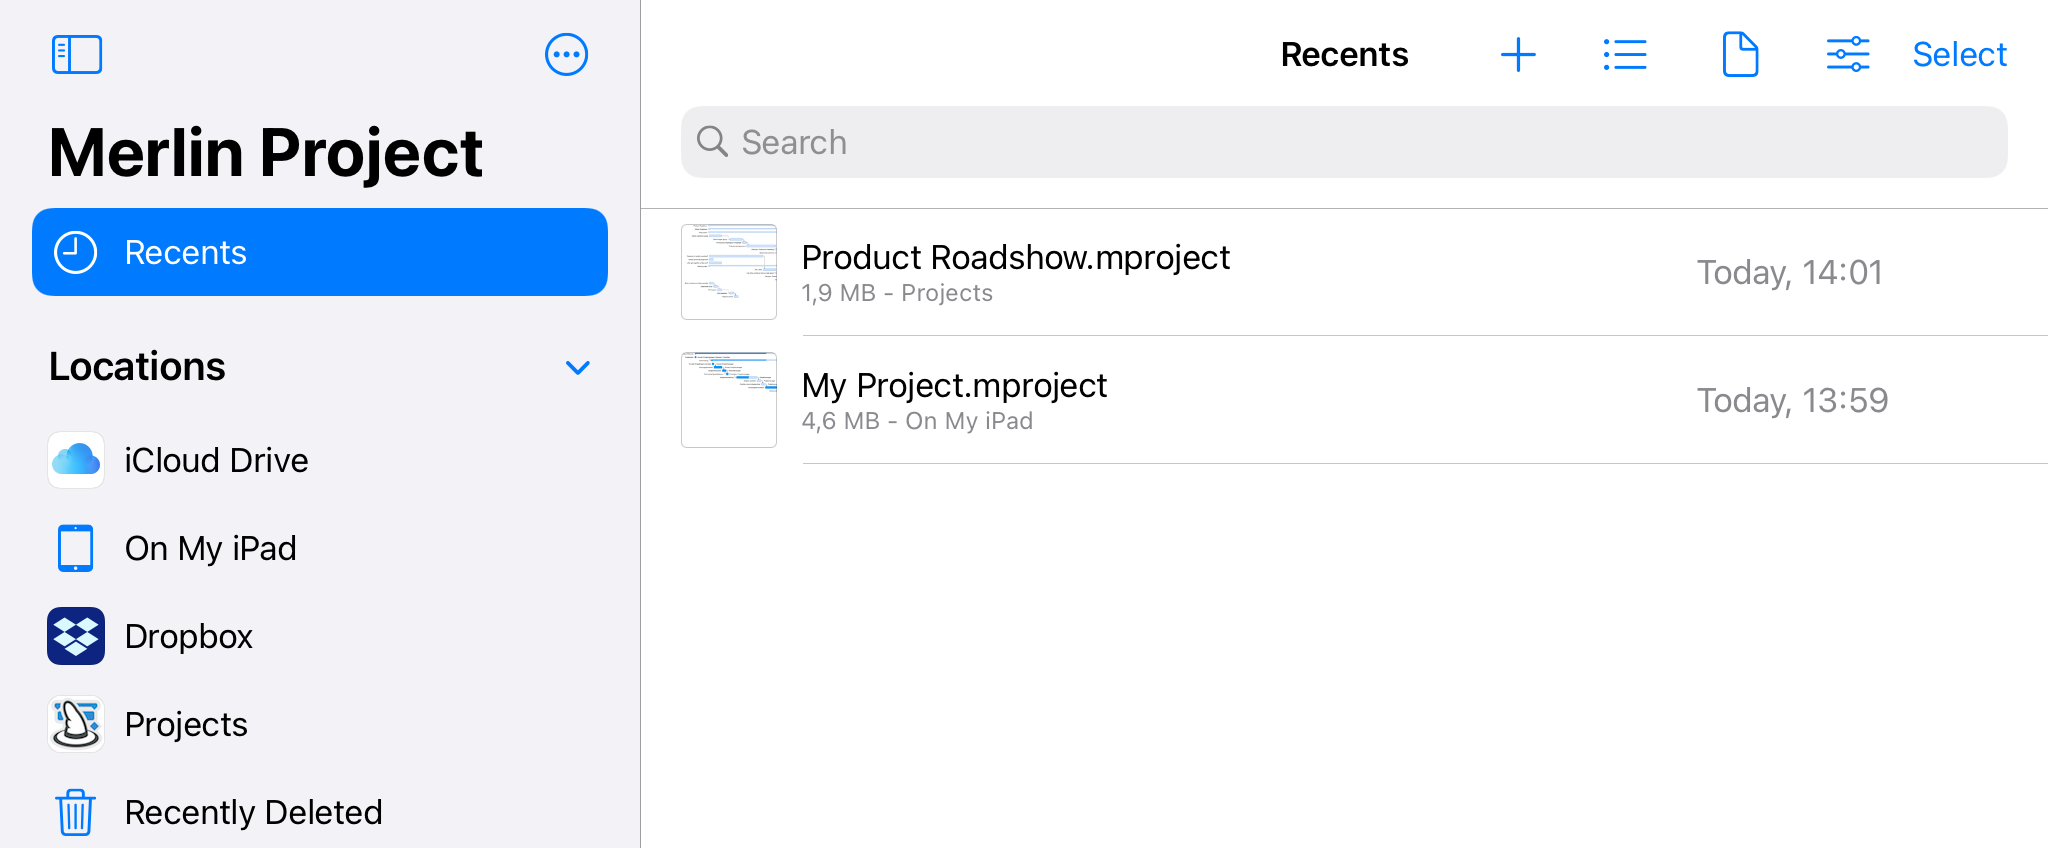
Once you have opened a project or created a new one, it will appear in the 'Recents'.
Select a document to work on it. It will open in the same view you’ve used on your last edit.
|
|
Tap on 'Work Breakdown' to see the structure of your project, or switch to any of the other various project viewsincluded in any project. |
Switch Documents
To switch to another document, tap the 'Documents' symbol on the top left and select the document out of its storage location or the recents.

Handling
Merlin Project on iPad is completely adapted to gestures.
Rows in the Outline
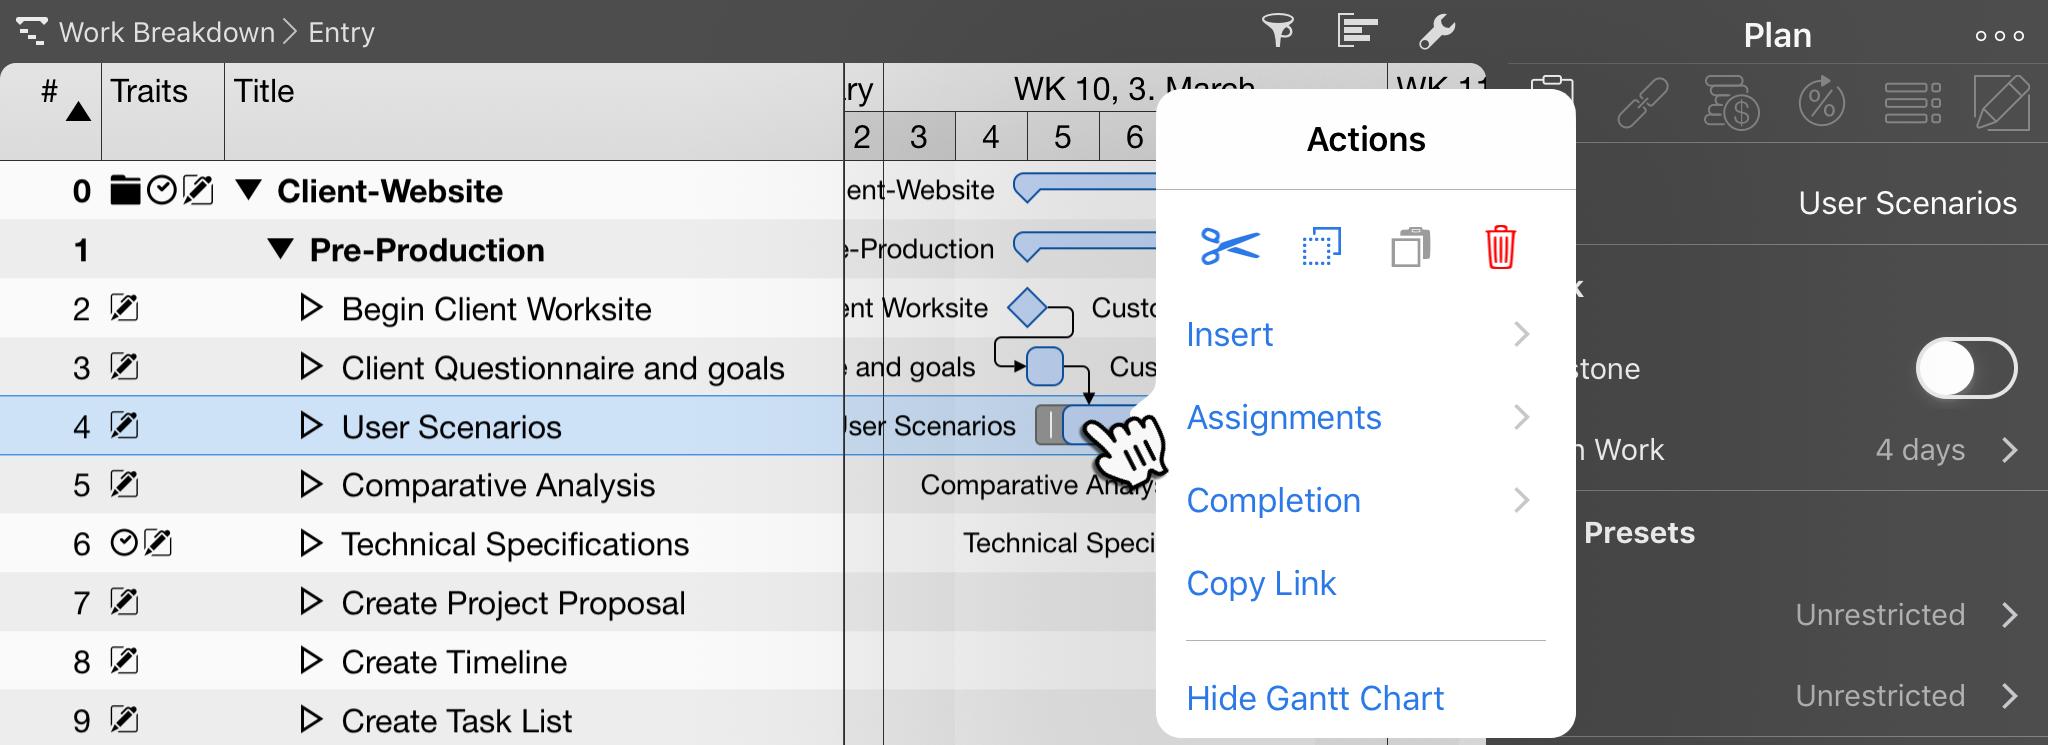
To select a row, tap it once.
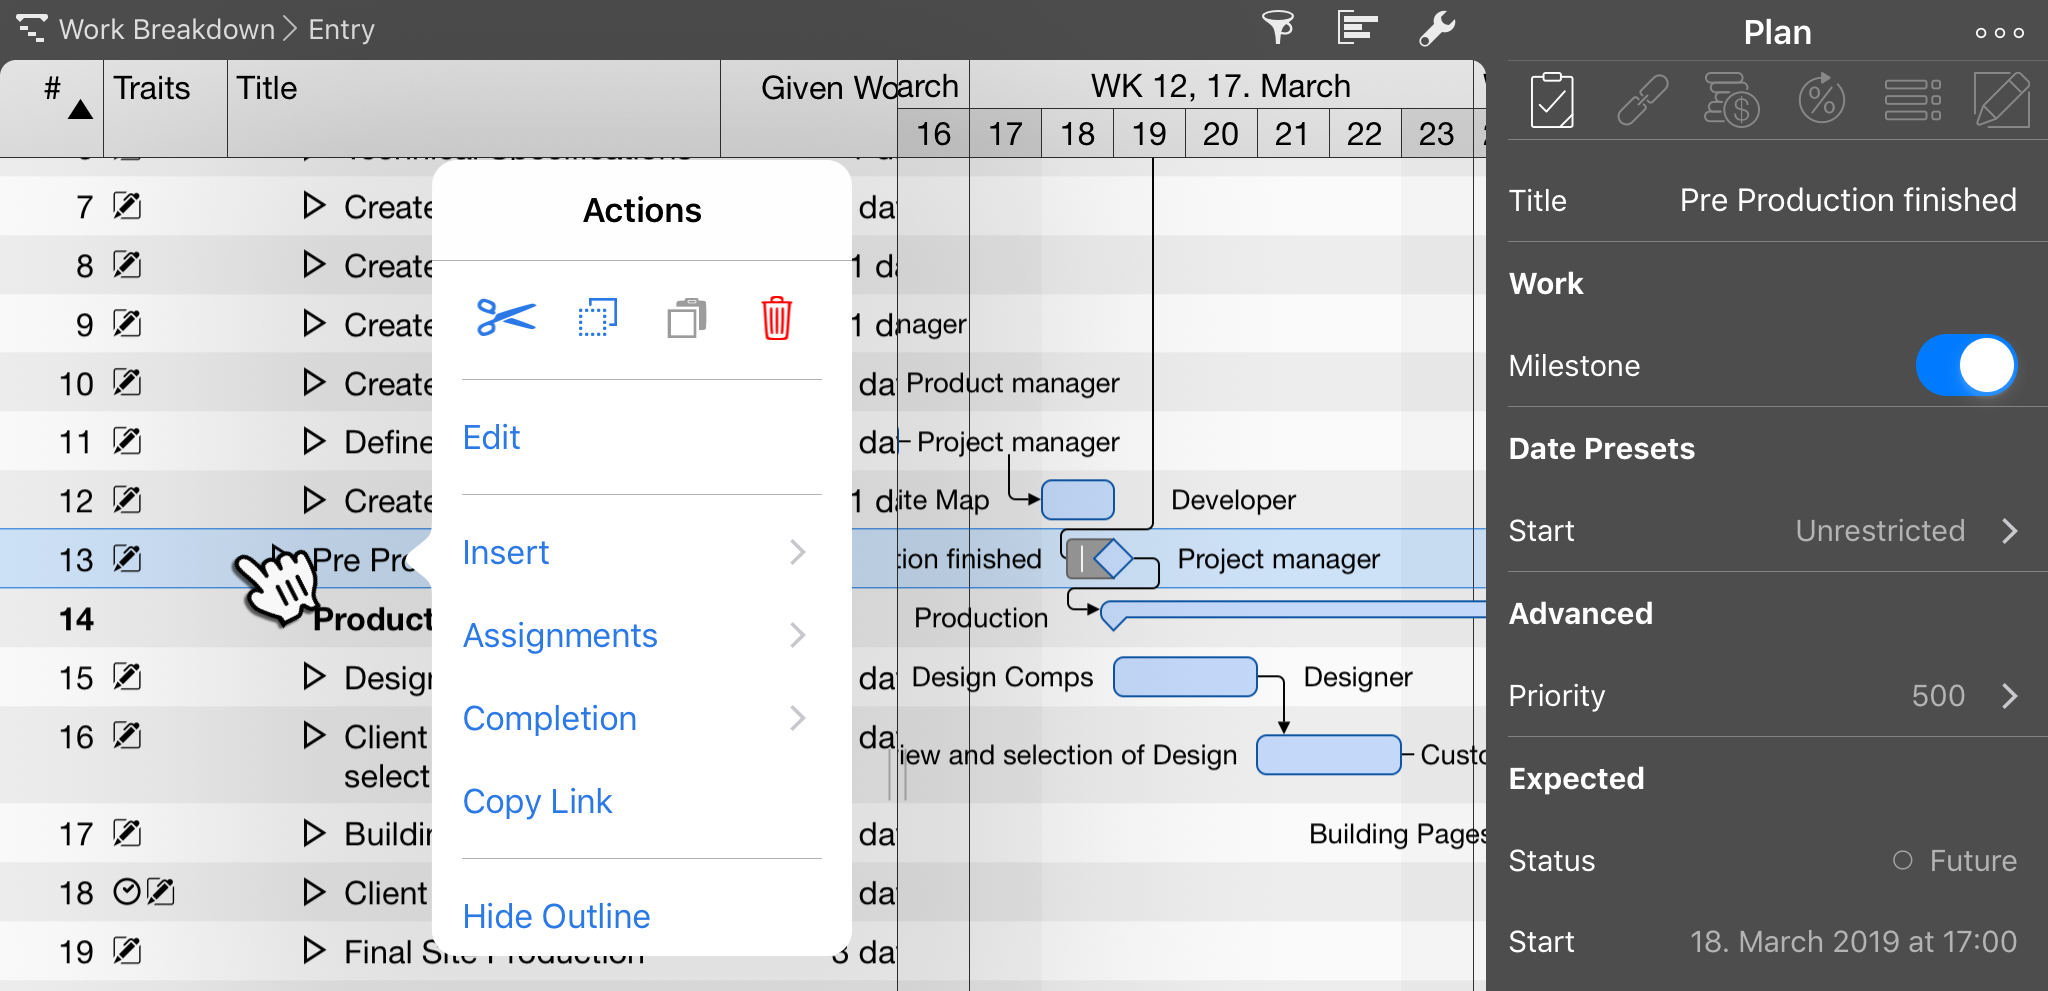
If you tap again an already selected row, the context menu opens. It contains various options for editing the contents. The context menu contains the four icons for cutting, copying, pasting and deleting selected content.
With a double tap on a content, the appropriate keyboard appears for the input.
|
|
You can edit the contents in the cells or use the various fields on the panes of the Inspector. |
The contents can be reordered with one touch. Place your finger on an already selected row and swipe it into the desired position.

Columns in the Outline
Tap a column header to select the entire column.
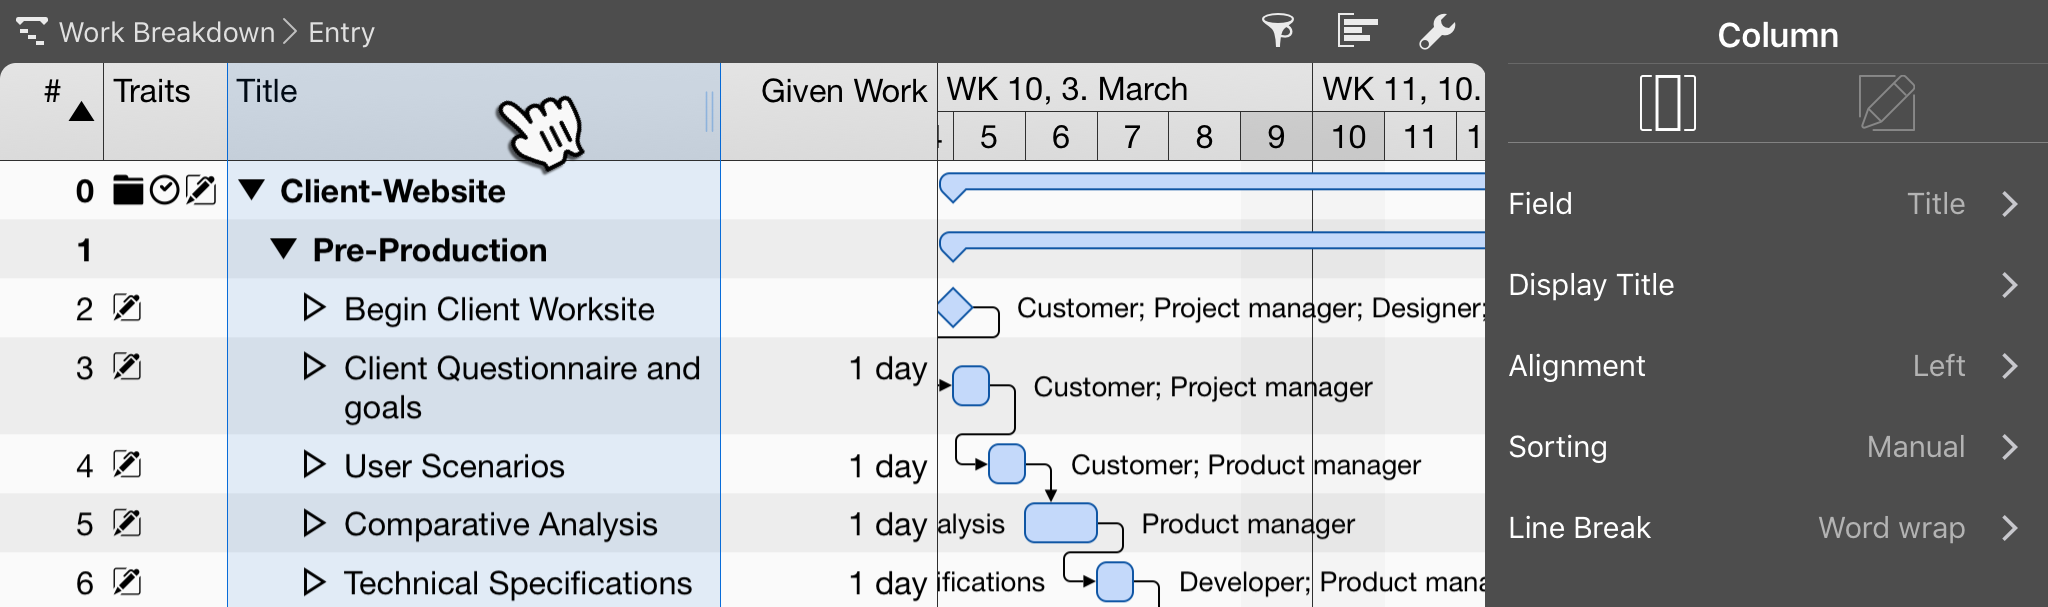
Move the handle on the right side of the column to change its width.

|
|
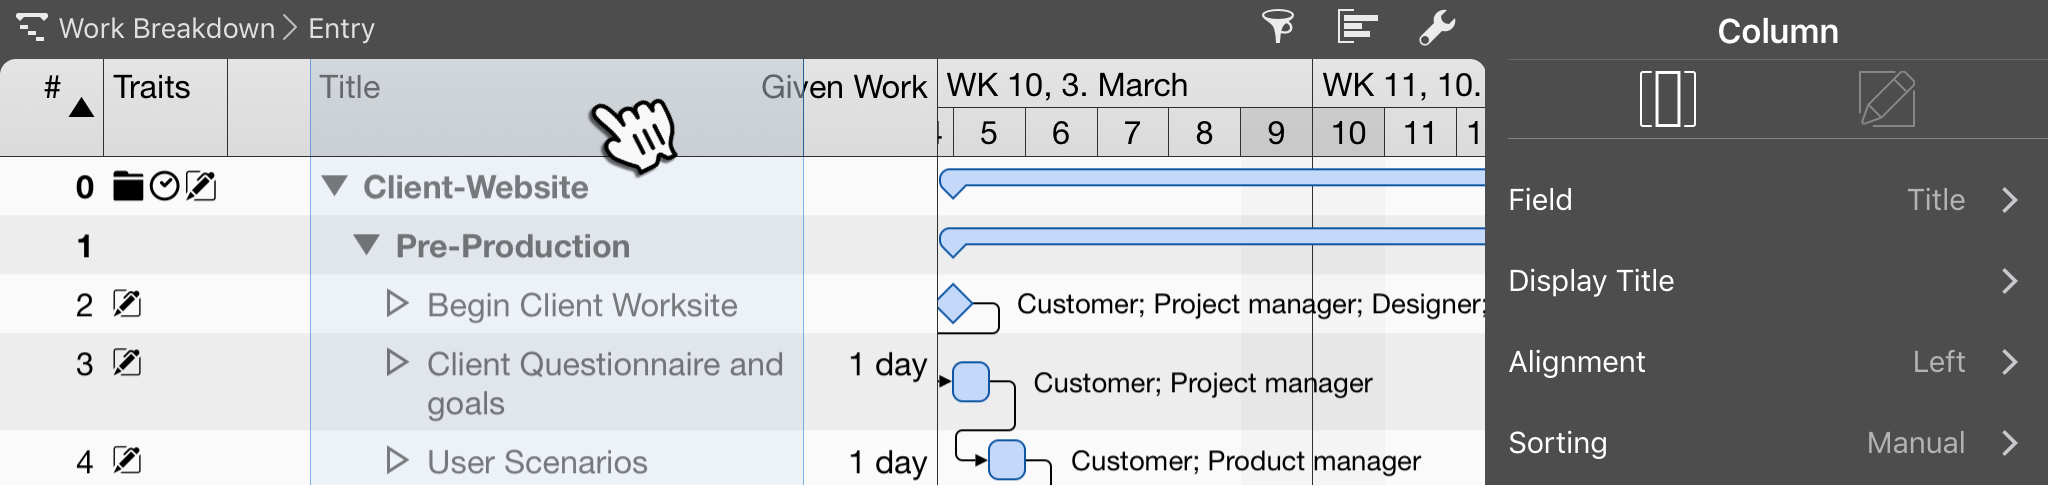
With a double tap on the column header, the width automatically adjusts itself optimally to the contents in the column. |
To rearrange the columns, hold down an active column and wipe to the right or left with your finger.
Tap on the column header of an already activated column, to open a context menu. It contains various options for sorting, adding and hiding the column, selecting column sets and hiding the entire outline.
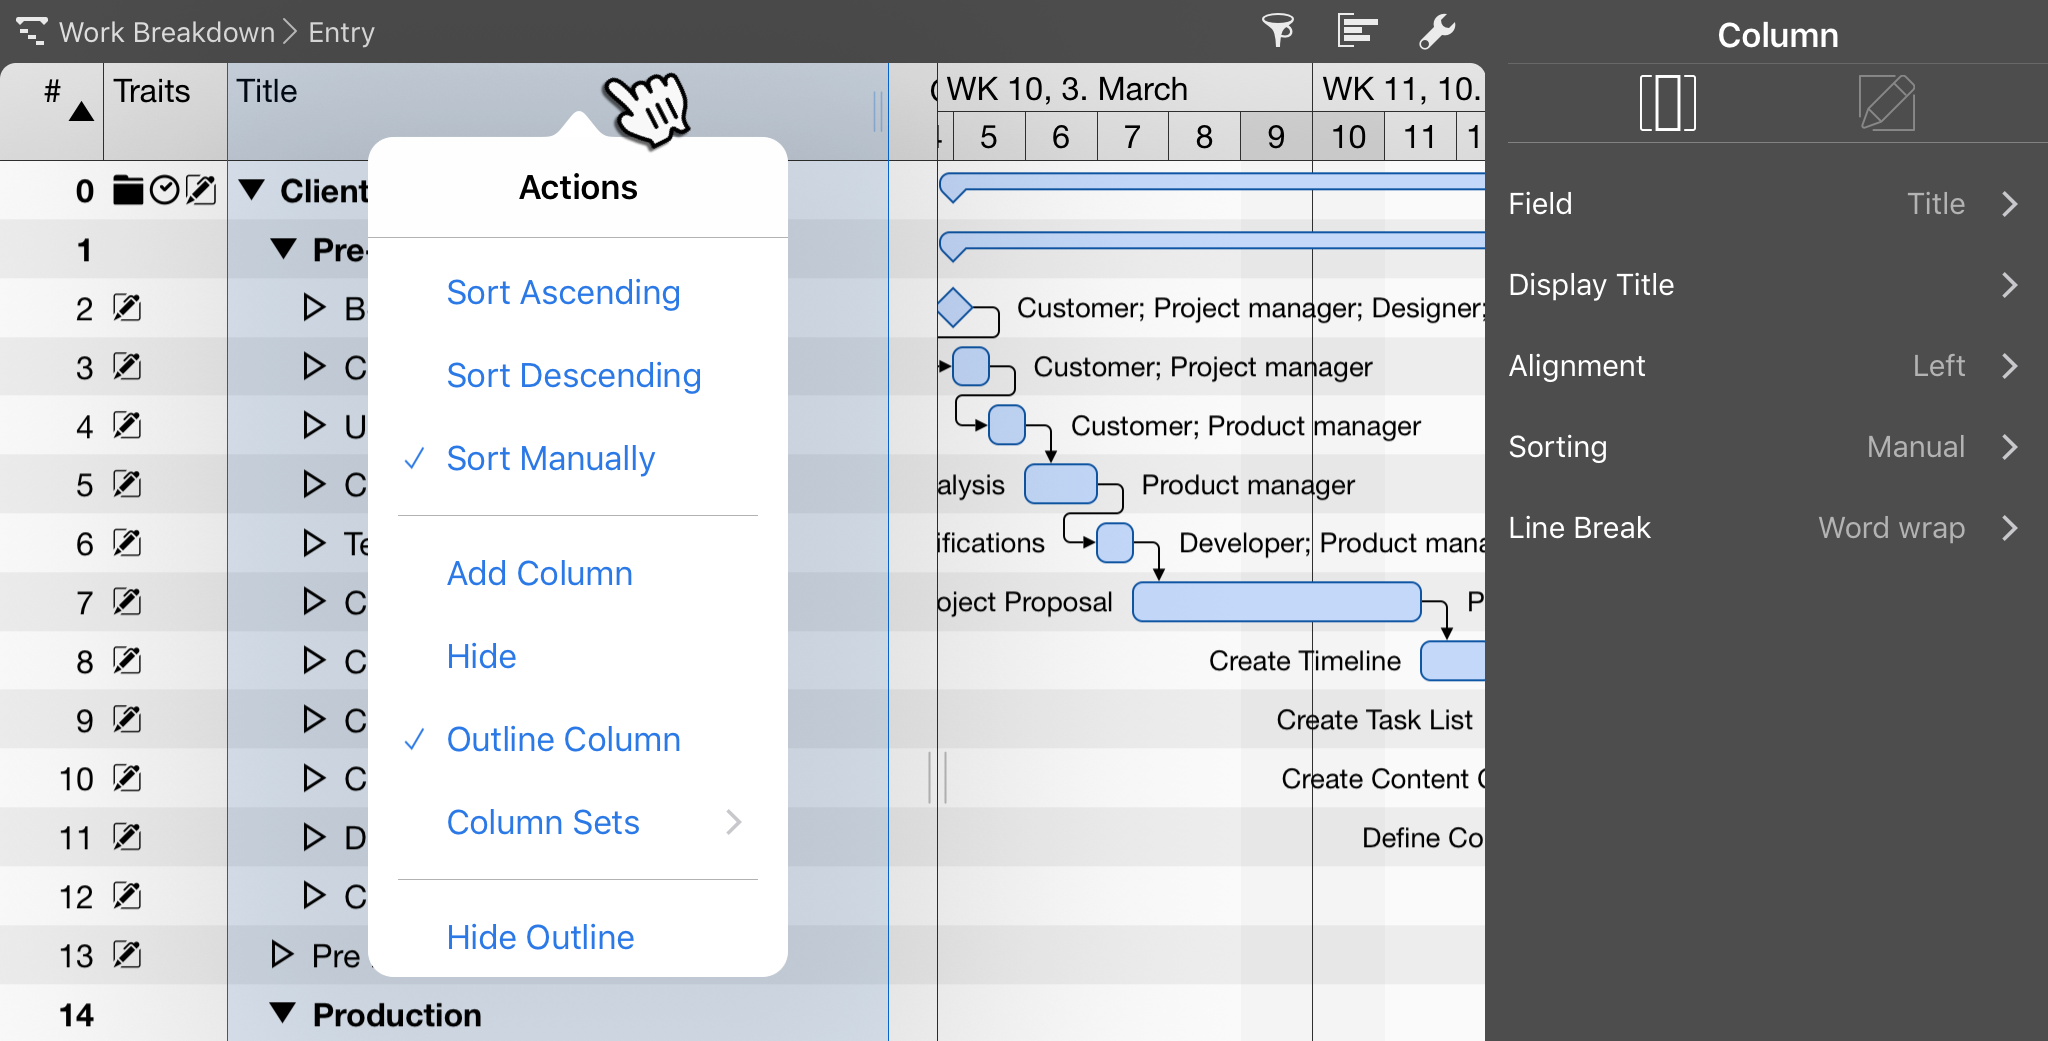
To add an existing column into the view, select Add Column, a new column will appear. Use the inspector and select the desired column from the Field list.
To create a new column, tap on Add Column and use the Field Definition area in the inspector as explained here.
|
|
You may use the Inspector to define a Display Title for any selected column. And you can replace the field displayed in a column by selecting a desired item from the Field list |
Gantt
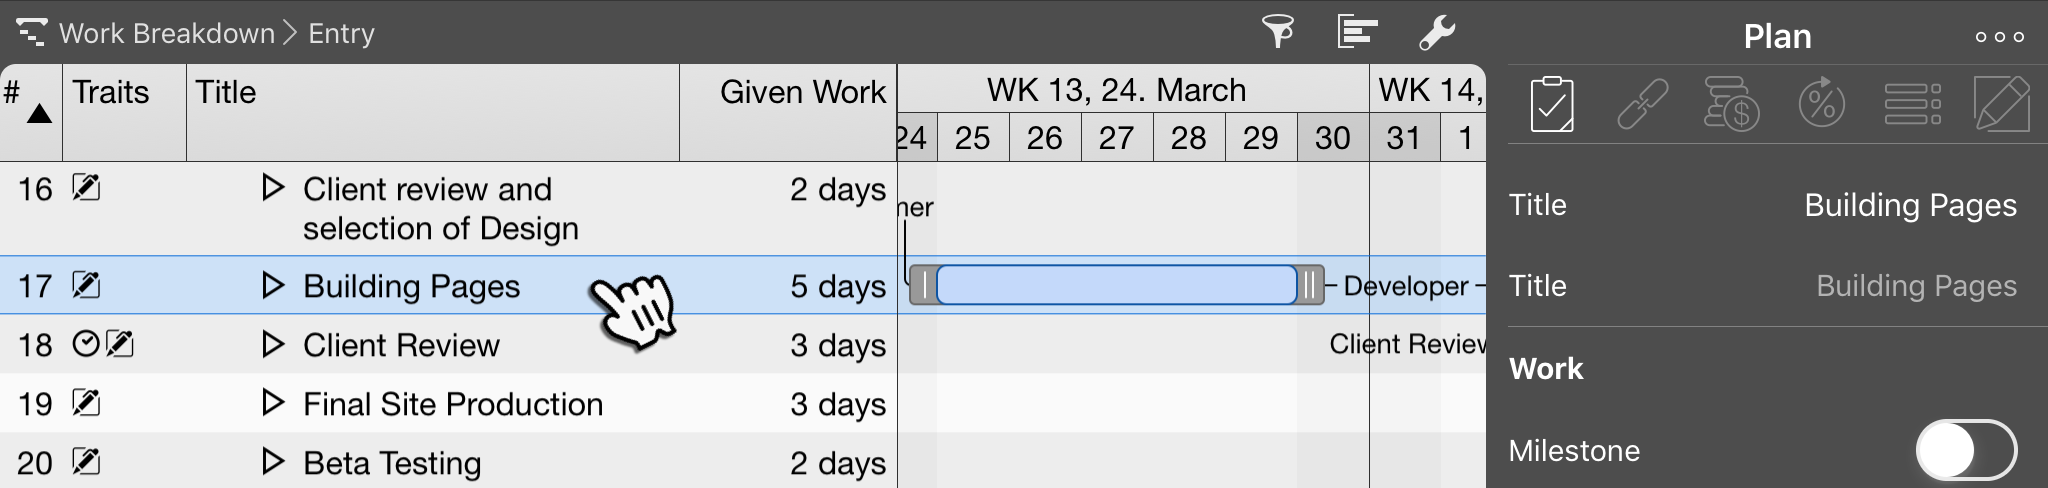
Bars in the Gantt chart can be activated by tapping them. Tap again to display the context menu.
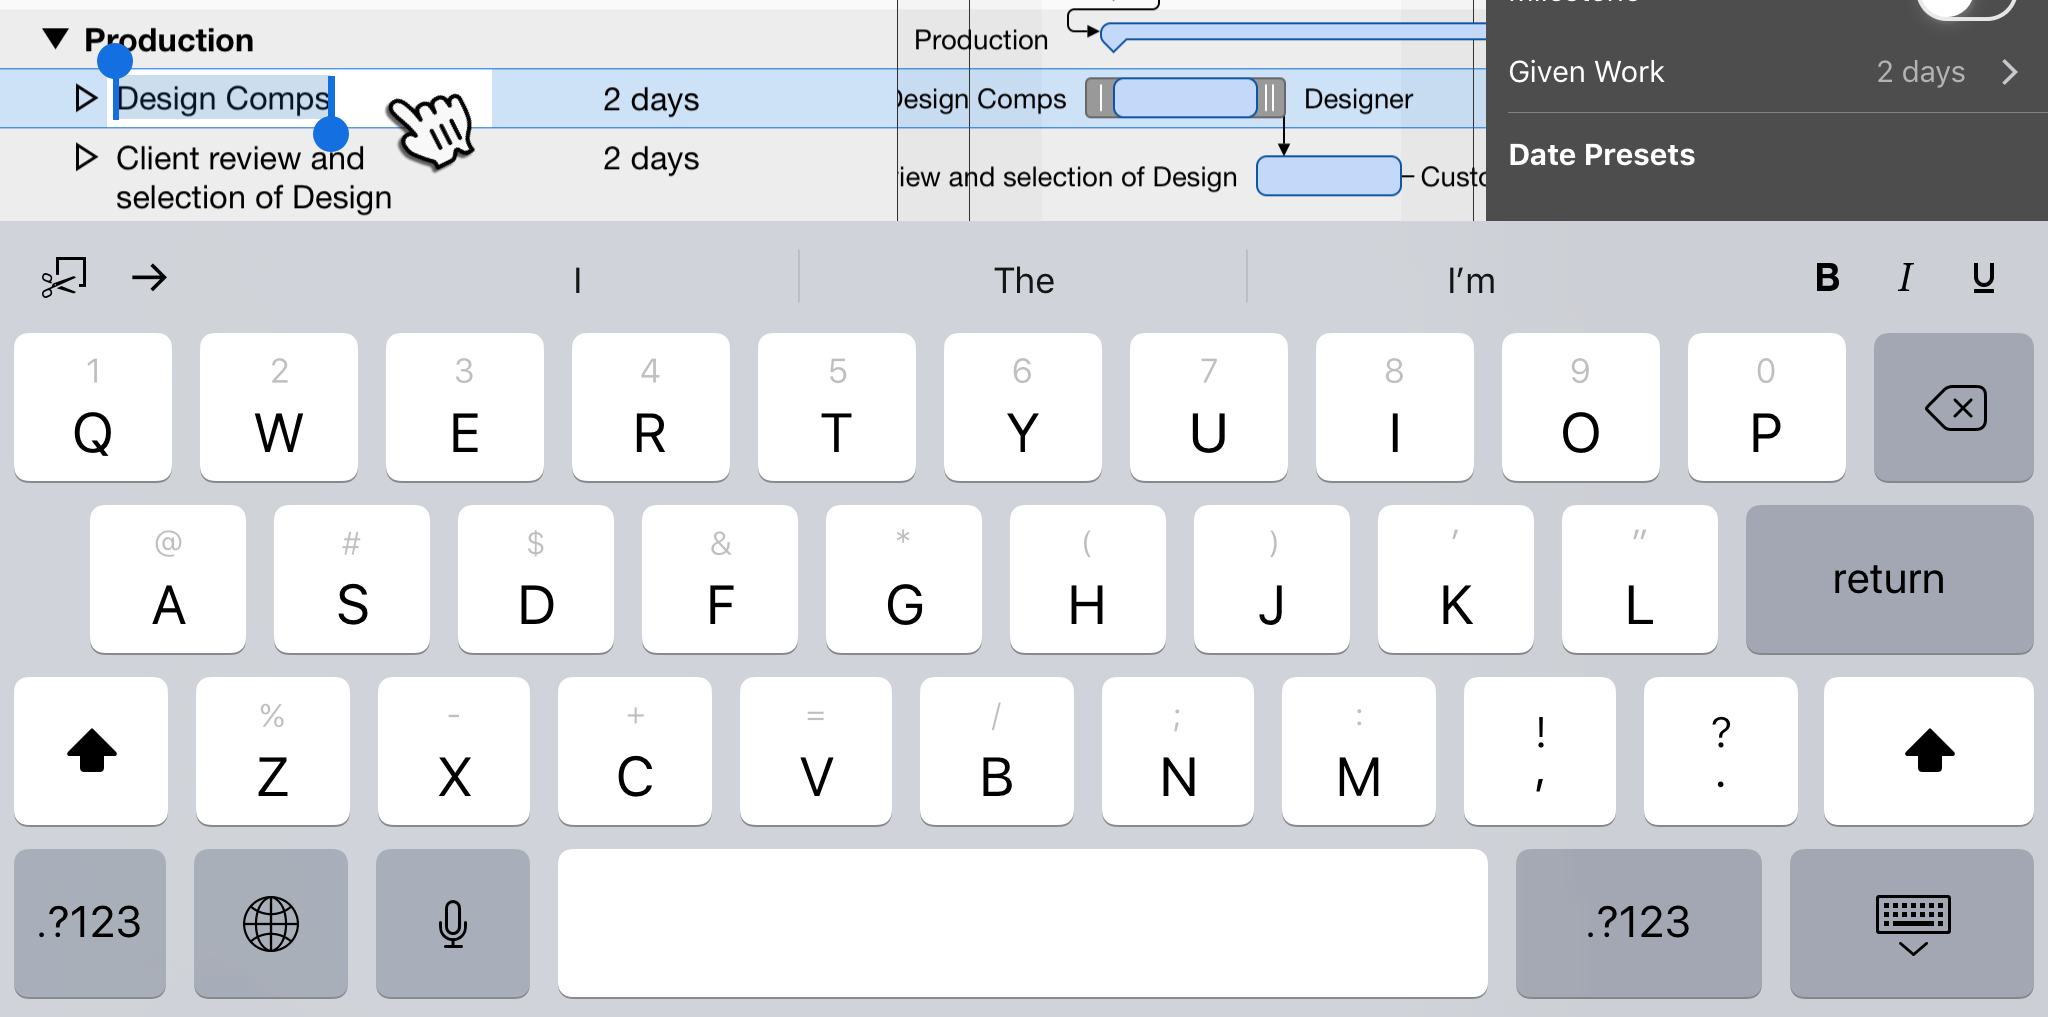
Two handles are available for moving the bar. If you move the first handle (left with a vertical line), the bar is moved in the time scale.
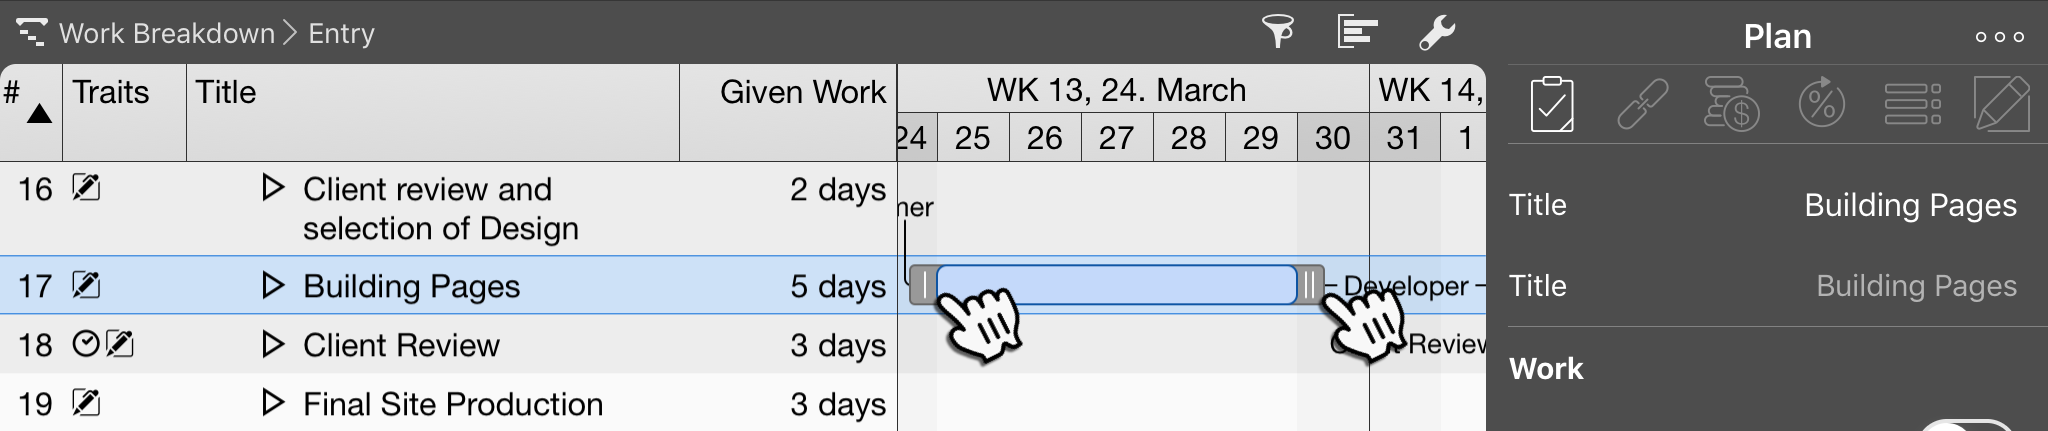
If you move the second handle (on the right with two vertical lines), the length of the bar and thus the work will be changed.
When moving bars in the Gannt, blue cursor lines appear in the time scale. These mark the start and end of the bar in the time scale.
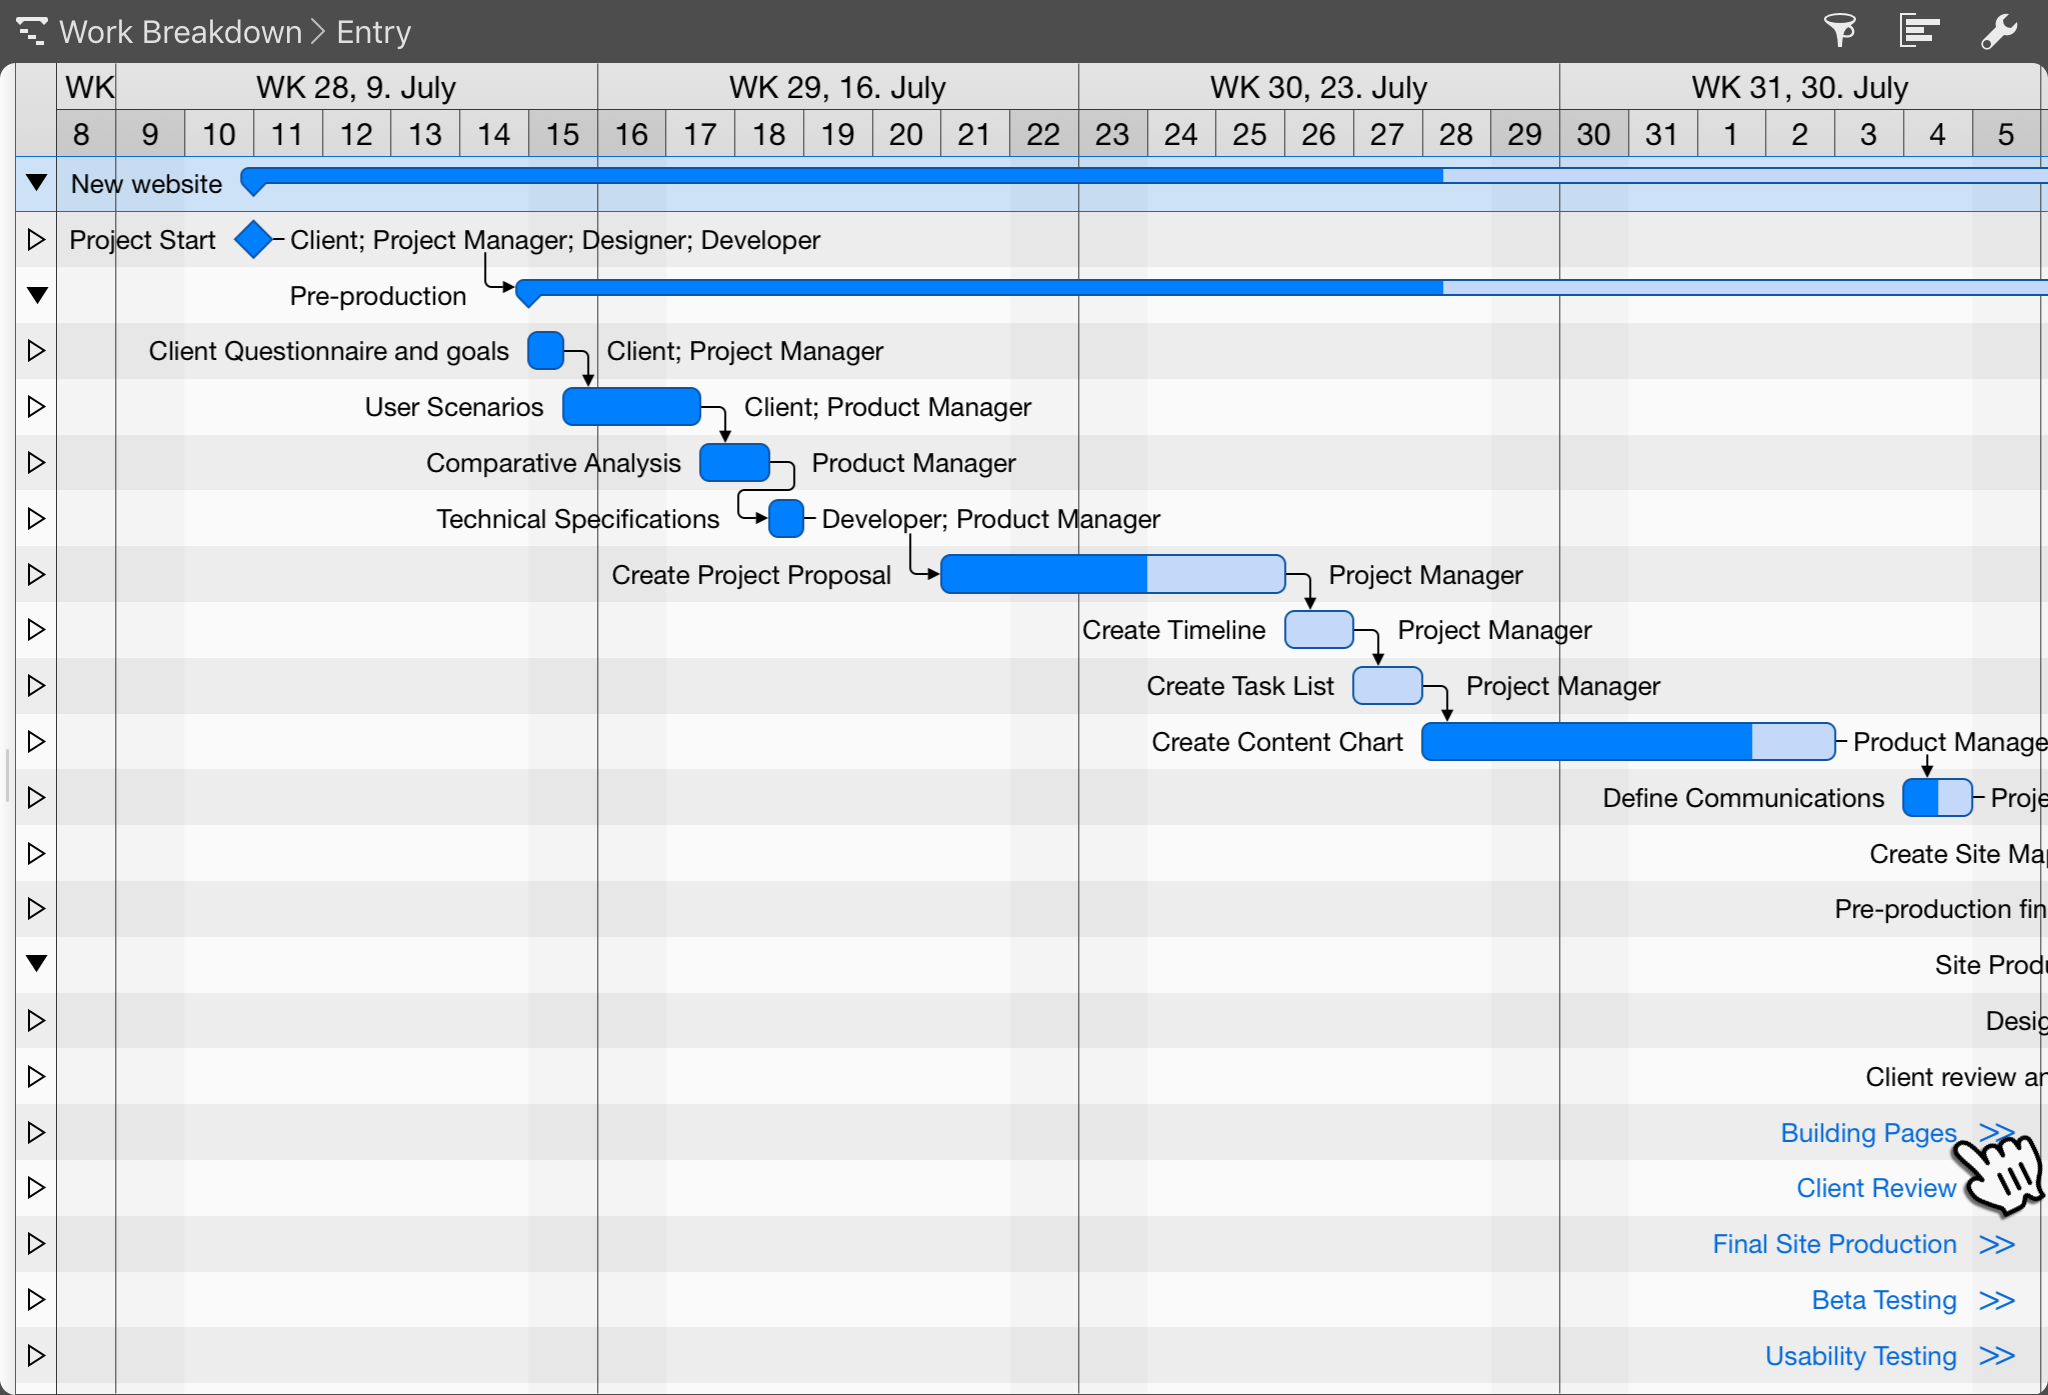
If the outline is hidden, folding triangles help you in the Gantt chart to show or hide the contents of groups (black) and assignments (light).

Activities that are outside the visible area appear in blue text and >> (or << ). With a tap on a scroll indicator, you can navigate directly to the gantt element.
Gantt Time Scale
Tap on the time scale to display the time scale inspector. There you will find various options and other related functions.
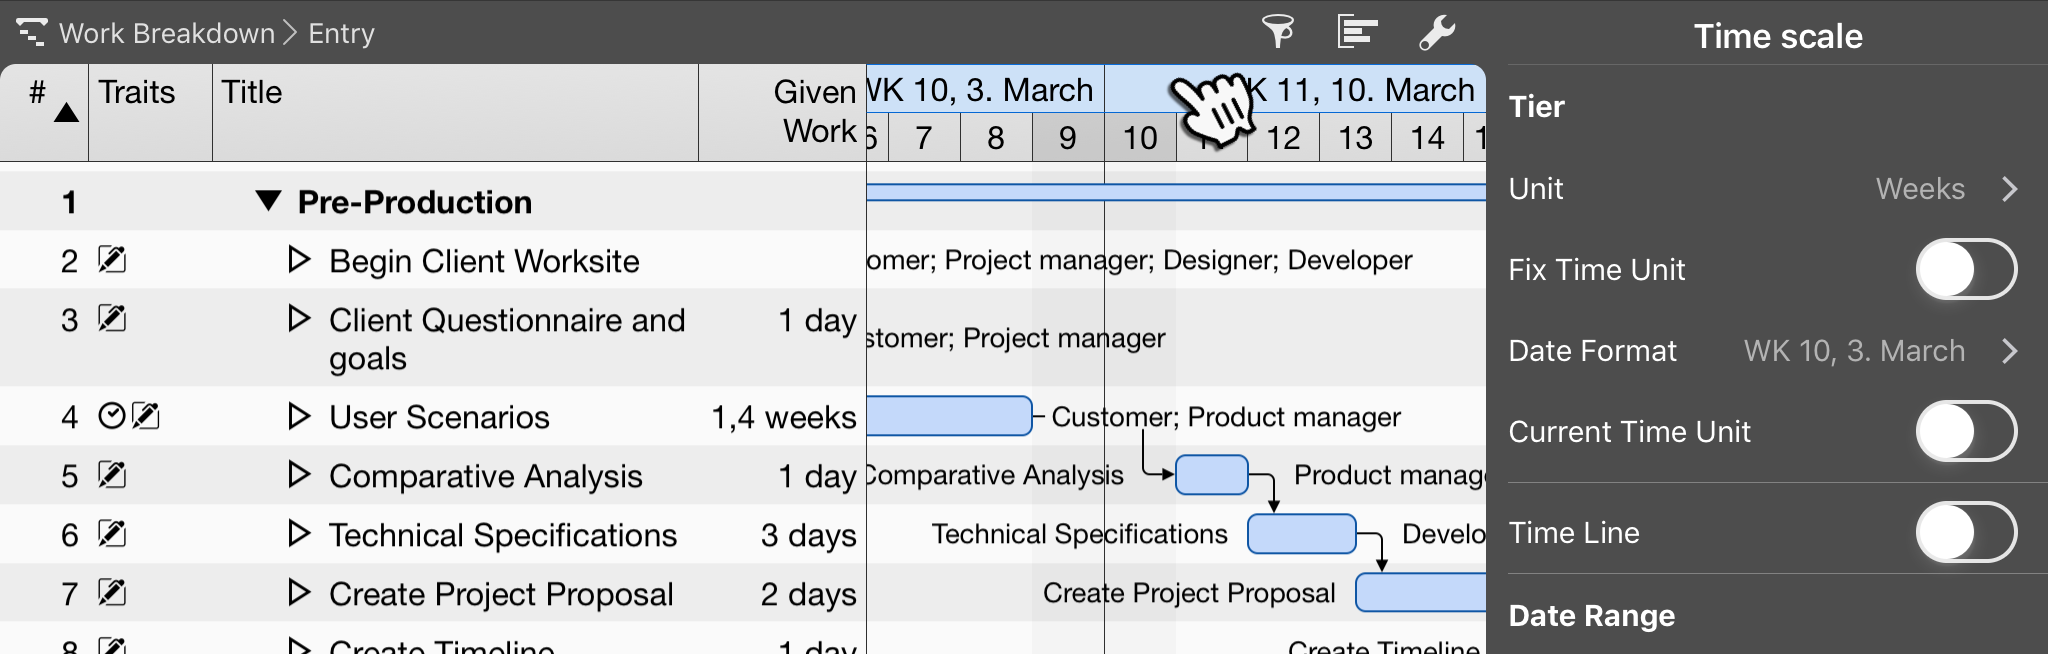
To change the time scale, wipe it to the left (longer time units) or to the right (shorter time units) with your finger.
Multiple Selection
Multiple selection makes it easier for you to work with several selected objects at the same time.
Tap an object and hold it with one finger (1), tap other objects with another finger (2).
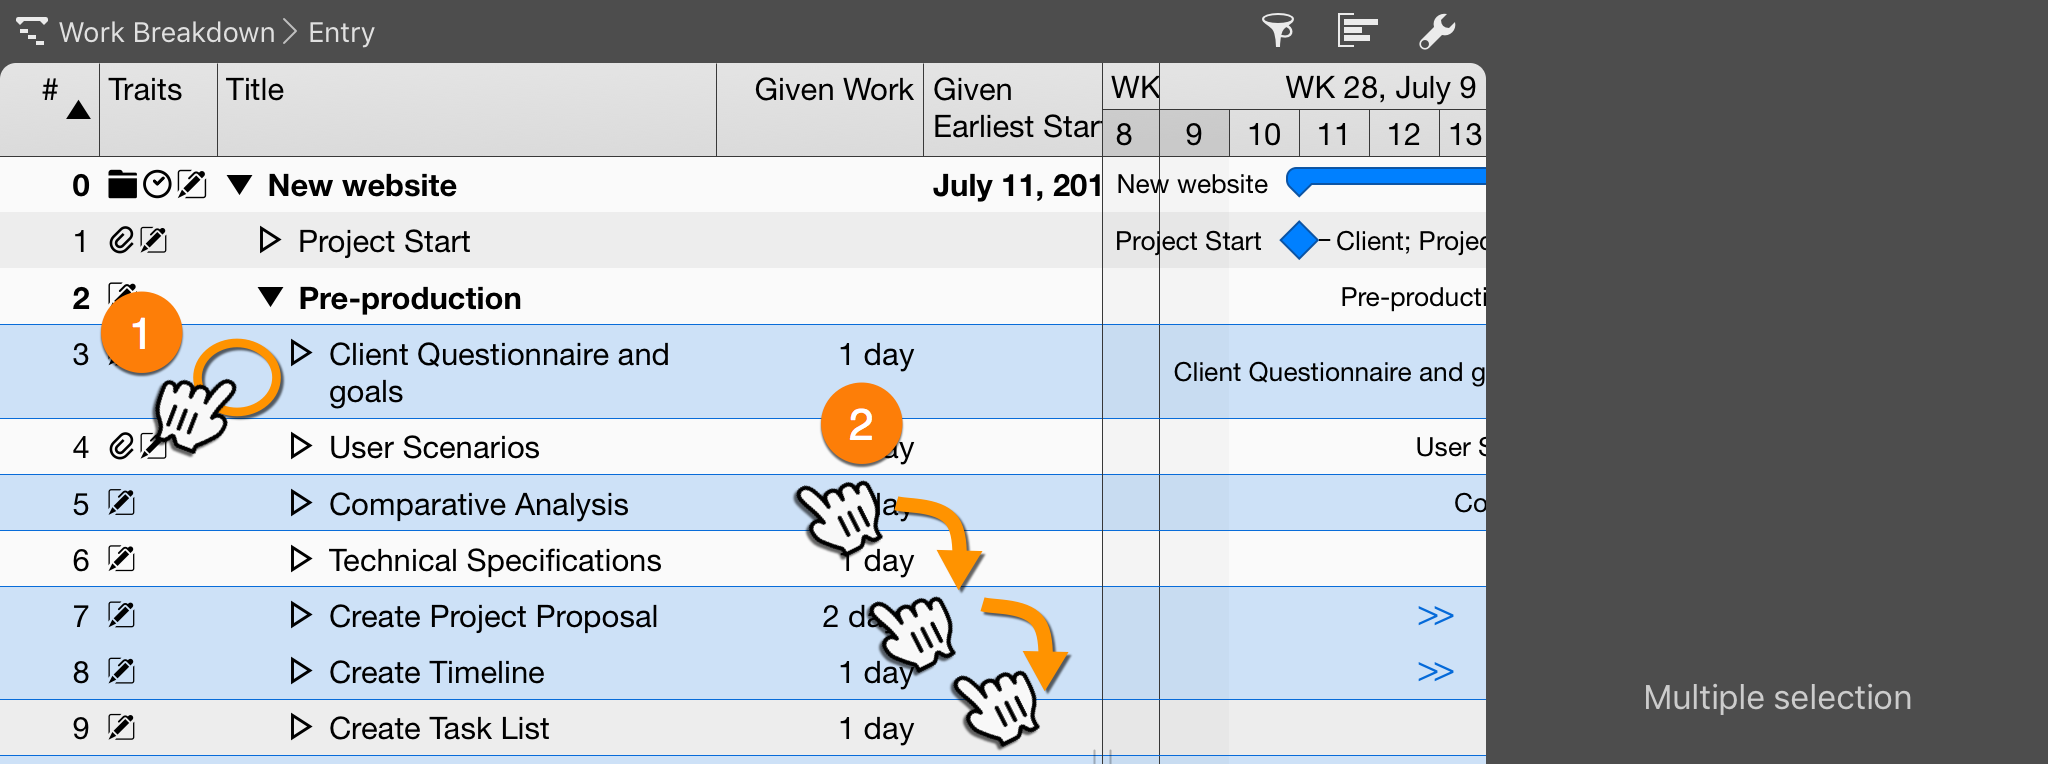
This is useful, for example, when you want to link rows by dependencies or move several objects within the project at the same time.

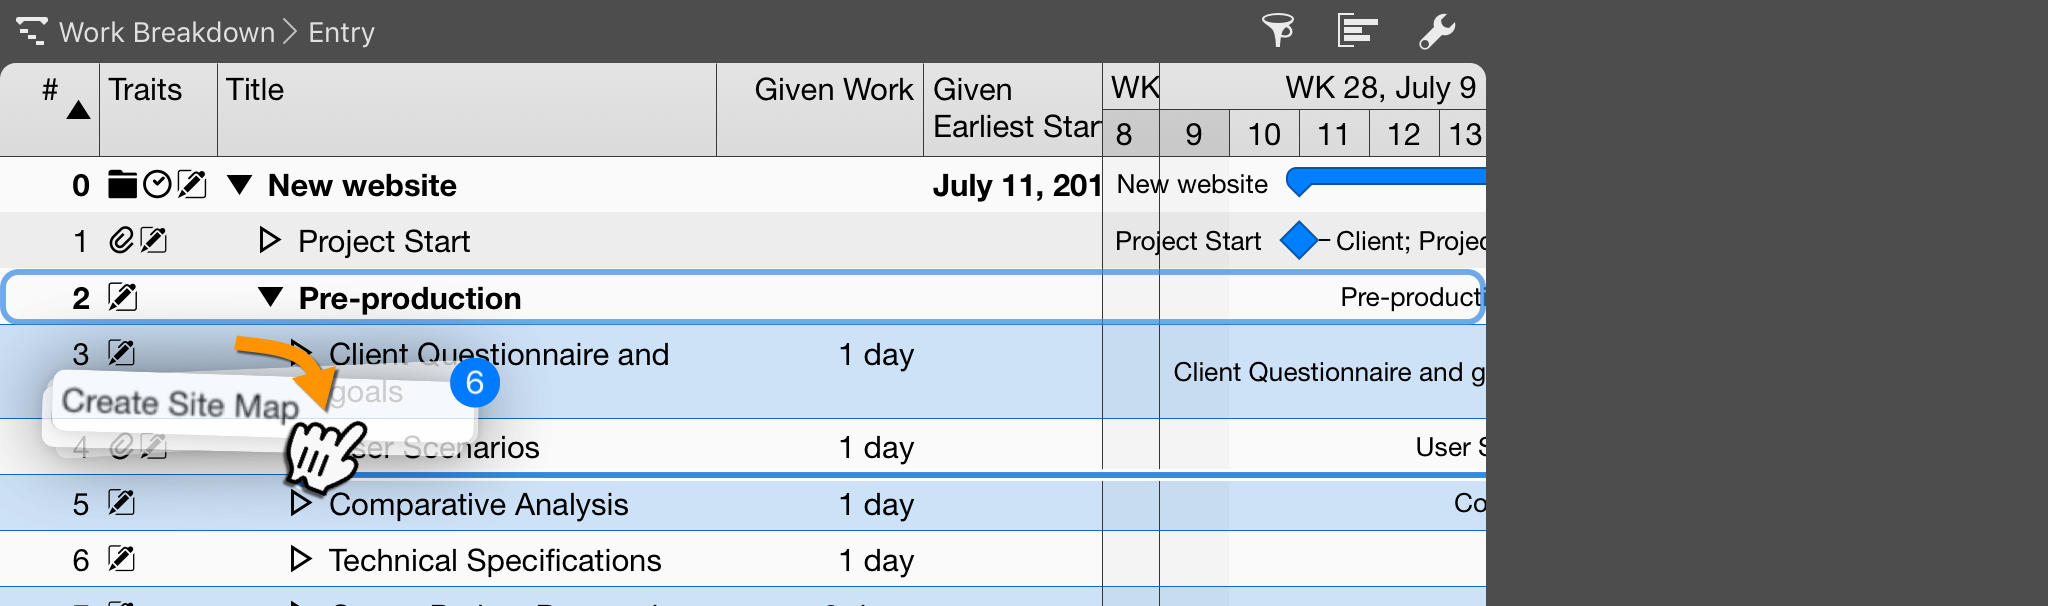
Tap and hold on one of the selected objects and move the selection, the number of all selected objects will appear.
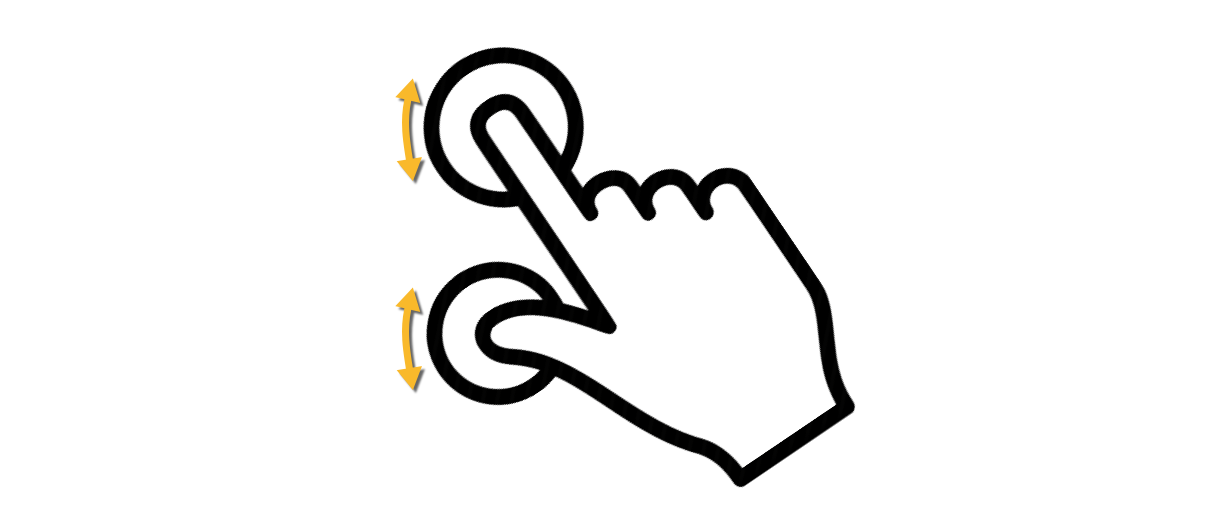
Zoom
With the pinch gesture (two fingers) you can enlarge or reduce the views and their contents.
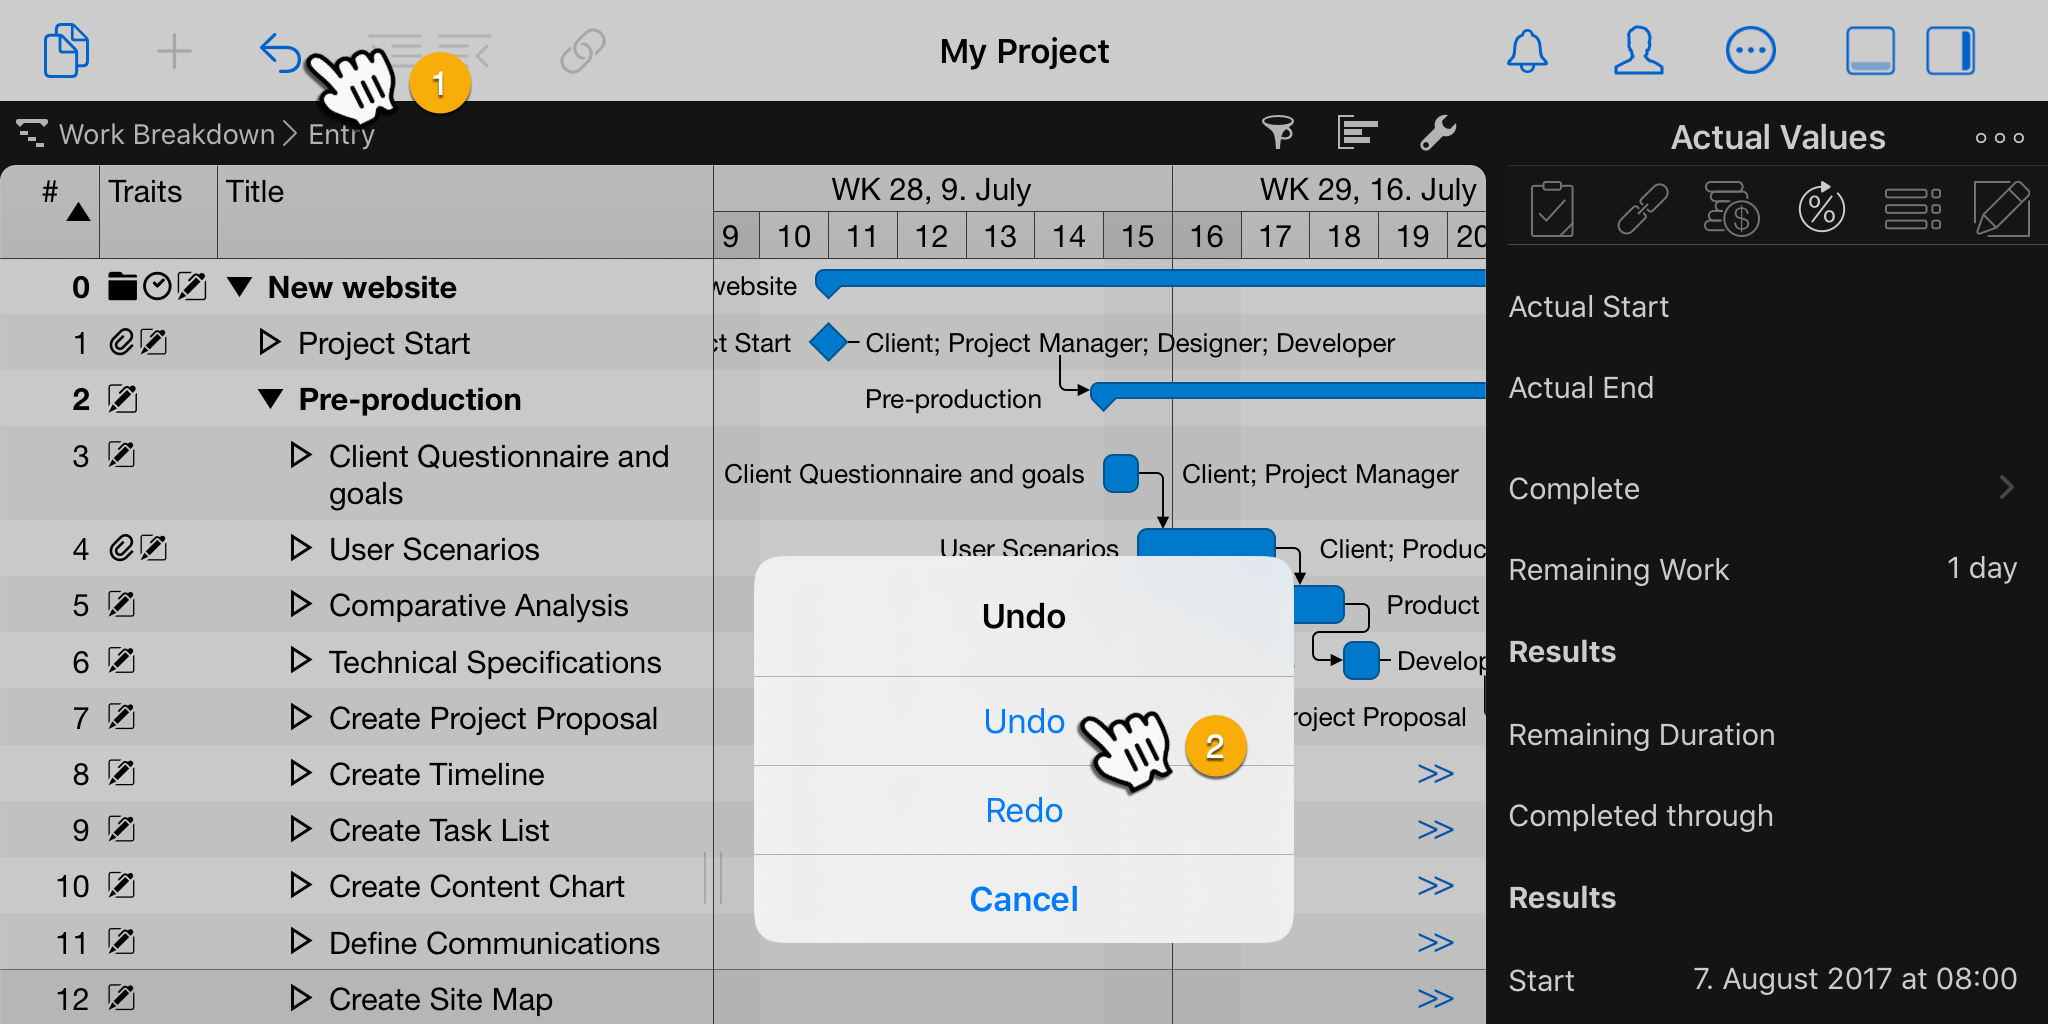
Undo/Redo
Merlin Project on iPad supports persistent Undo.
That means, you can at any given time point undo all your actions back to document creation.
To undo an action, tap the arrow icon (1) or shake the iPad (2).
To redo, tap and hold the arrow icon.
|
|
You’ll need to call at least once 'Undo', for the 'Redo' to be offered. |
After shaking, a window will appear giving you one or both options to choose from.
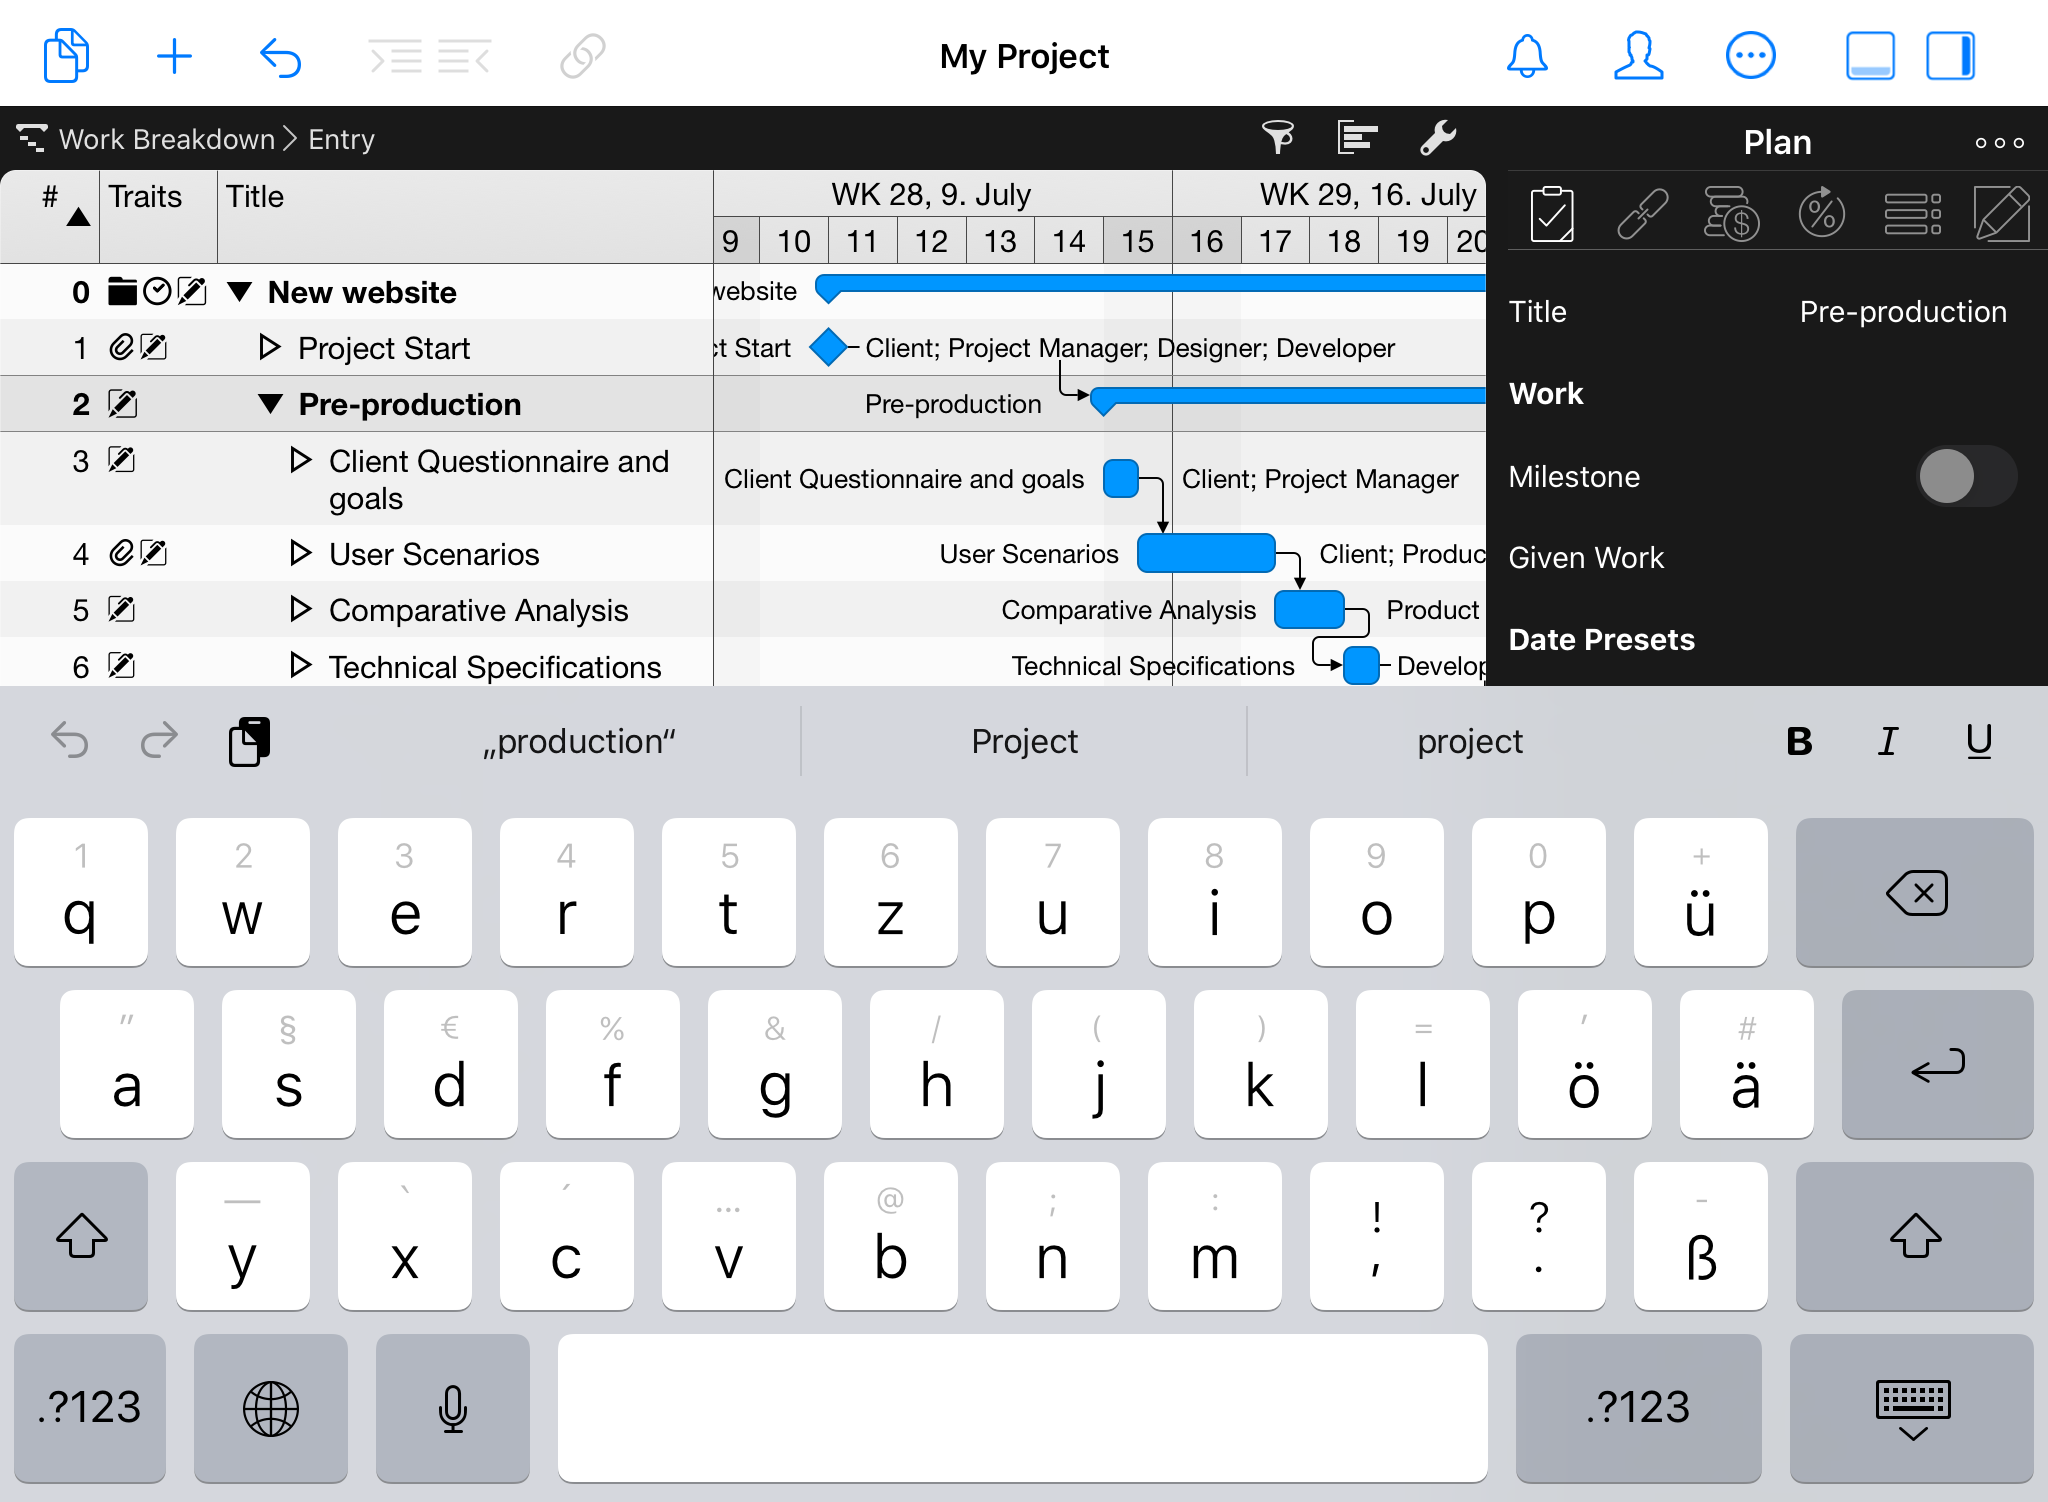
Keyboards
Depending on the input value, Merlin Project on iPad displays its own keyboards. This is the case, for example, with date values or time specifications.

If you select a text field in the Inspector, the appropriate keyboard appears as shown. In the upper left corner there are symbols for options such as "Cut" (scissors), "Copy" (two rectangles) or "Paste" (clipboard).

Use the arrows to the left of the keyboard to jump between individual column entries.
The curved arrows control the Undo and Redo options. The symbol in between is for pasting information from the clipboard.
Inspector
You can view and edit a wide range of information in the Inspector. Change to a different Inspector tab by tapping the icons along the top.
|
|
Tap "…" on the top right to see all fields of the current inspector. |
Project Views
In Merlin Project there are several views for your projects.
The views support the Dark Mode, available in iOS 13 or later.
|
|
Even if using the app in Dark Mode, printing always takes place in the light appearance. |
Switching Views
Tap a view title in the upper left corner to see the list of existing views.

Tap Work Breakdown for the selection list of all views.
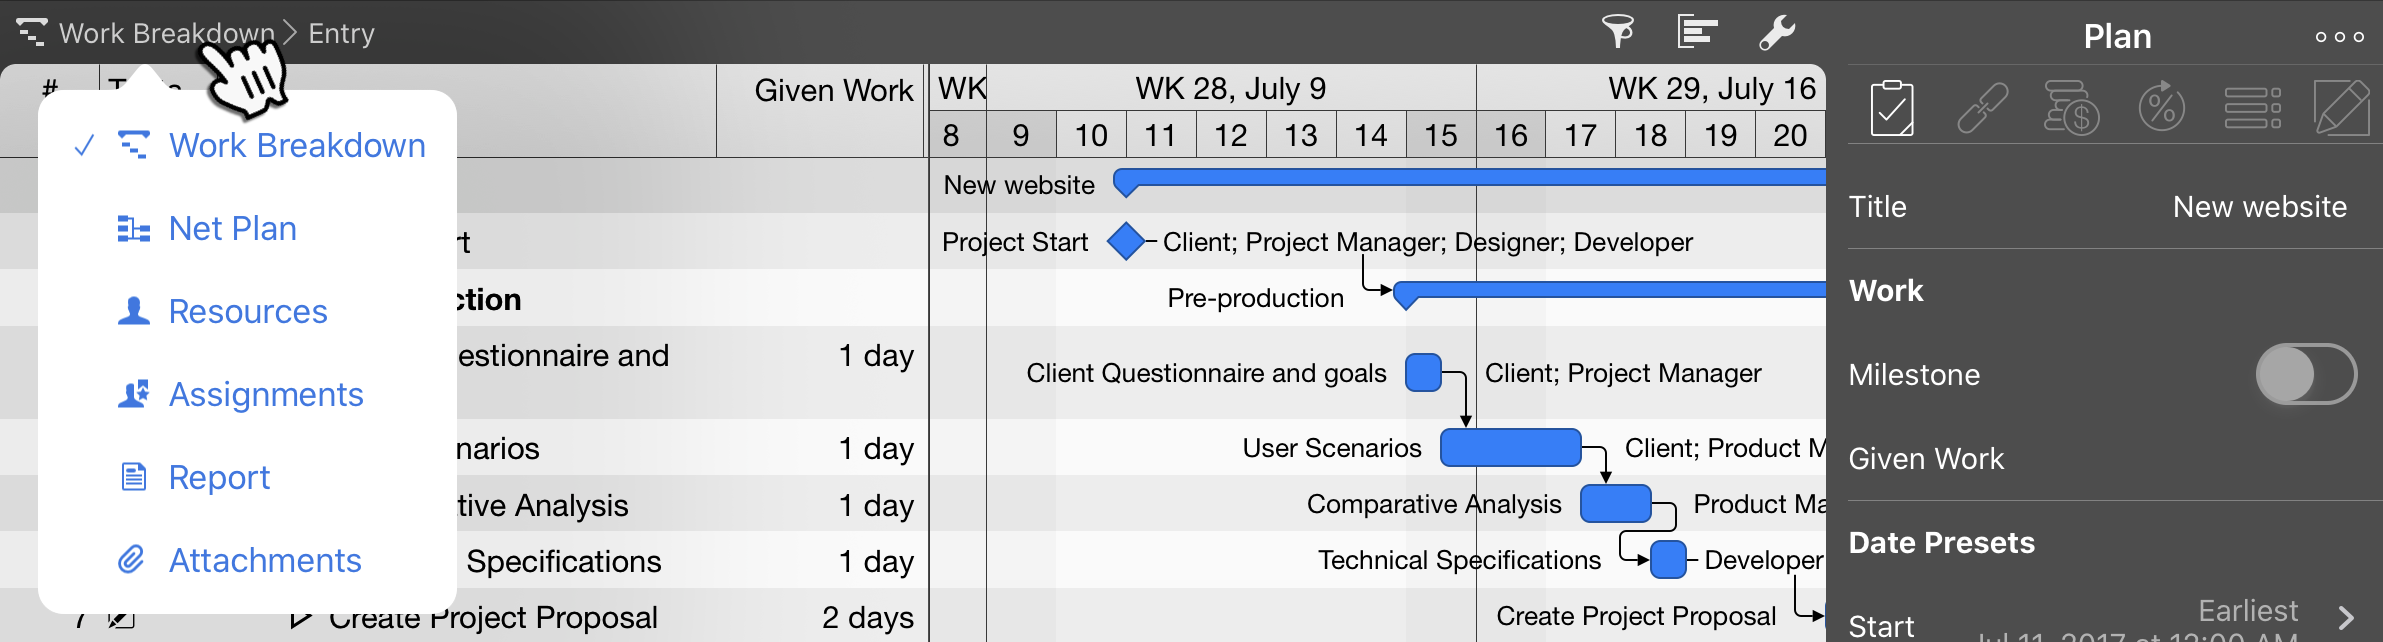
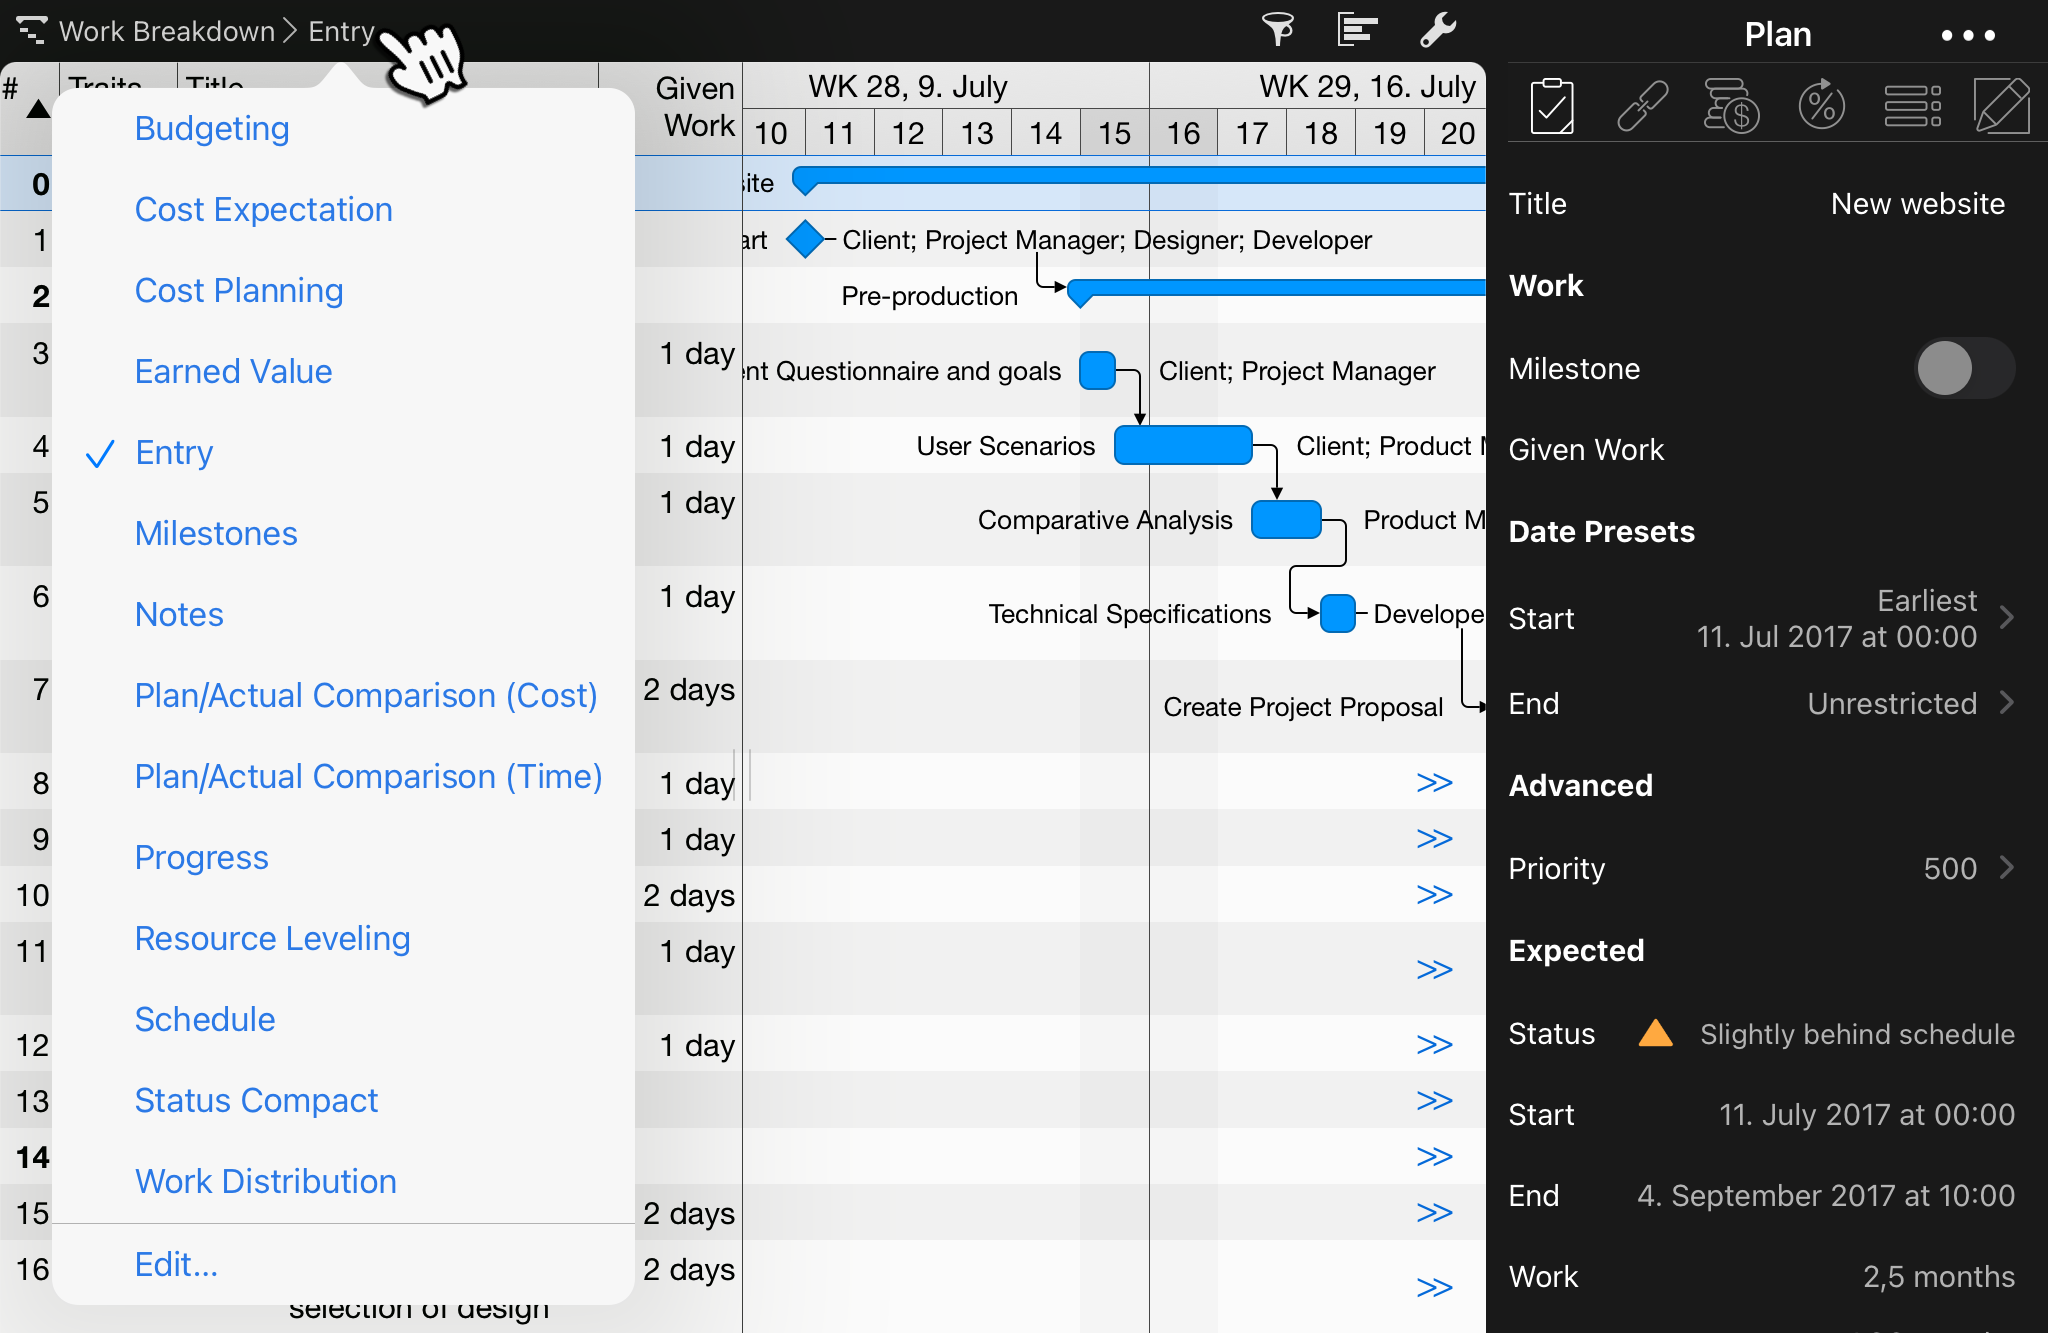
Tap Entry to see all built-in Work Breakdown views.
Switch to another view, by selecting another item from the view list.
|
|
If you want to create or manage your custom views, select Edit… from the views list. |
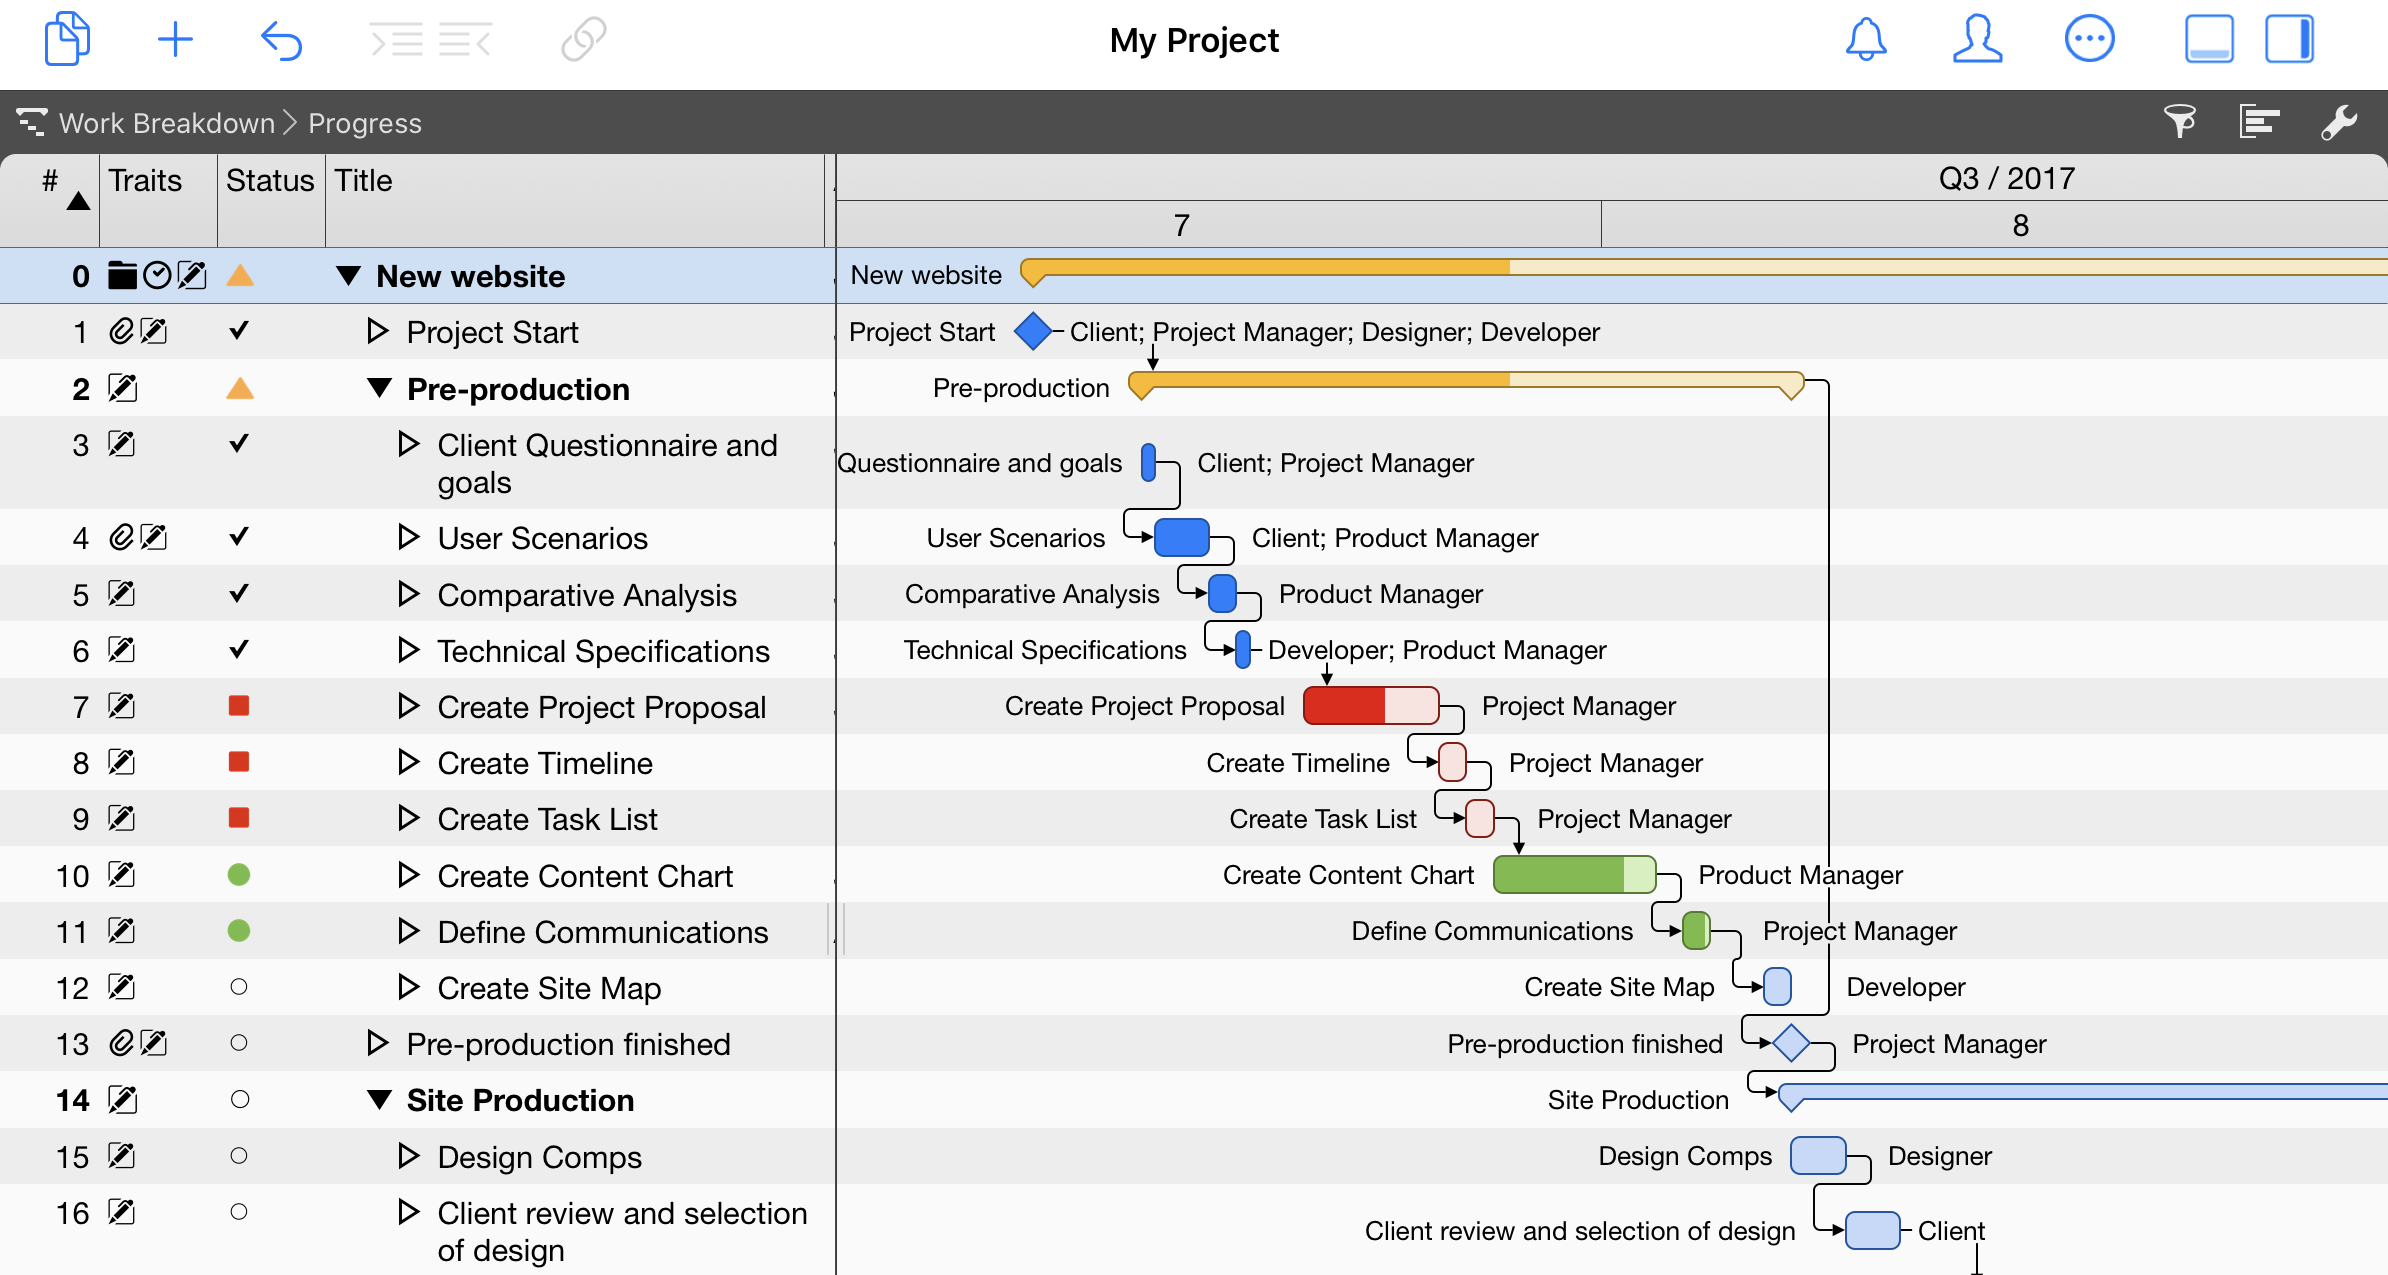
Work Breakdown
The Work Breakdown view is a traditional view and contains the following information displayed as an Outline and Gantt chart:
-
Entry
-
Schedule
-
Budgeting
-
Progress
-
Cost Expectation
-
Cost Planning
-
Earned Value
-
Milestones
-
Notes
-
Resource Leveling
-
Plan/Actual Comparison (Cost)
-
Plan/Actual Comparison (Time)
-
Status Compact
New Items
To insert new items, tap the + icon. A new activity will be created.

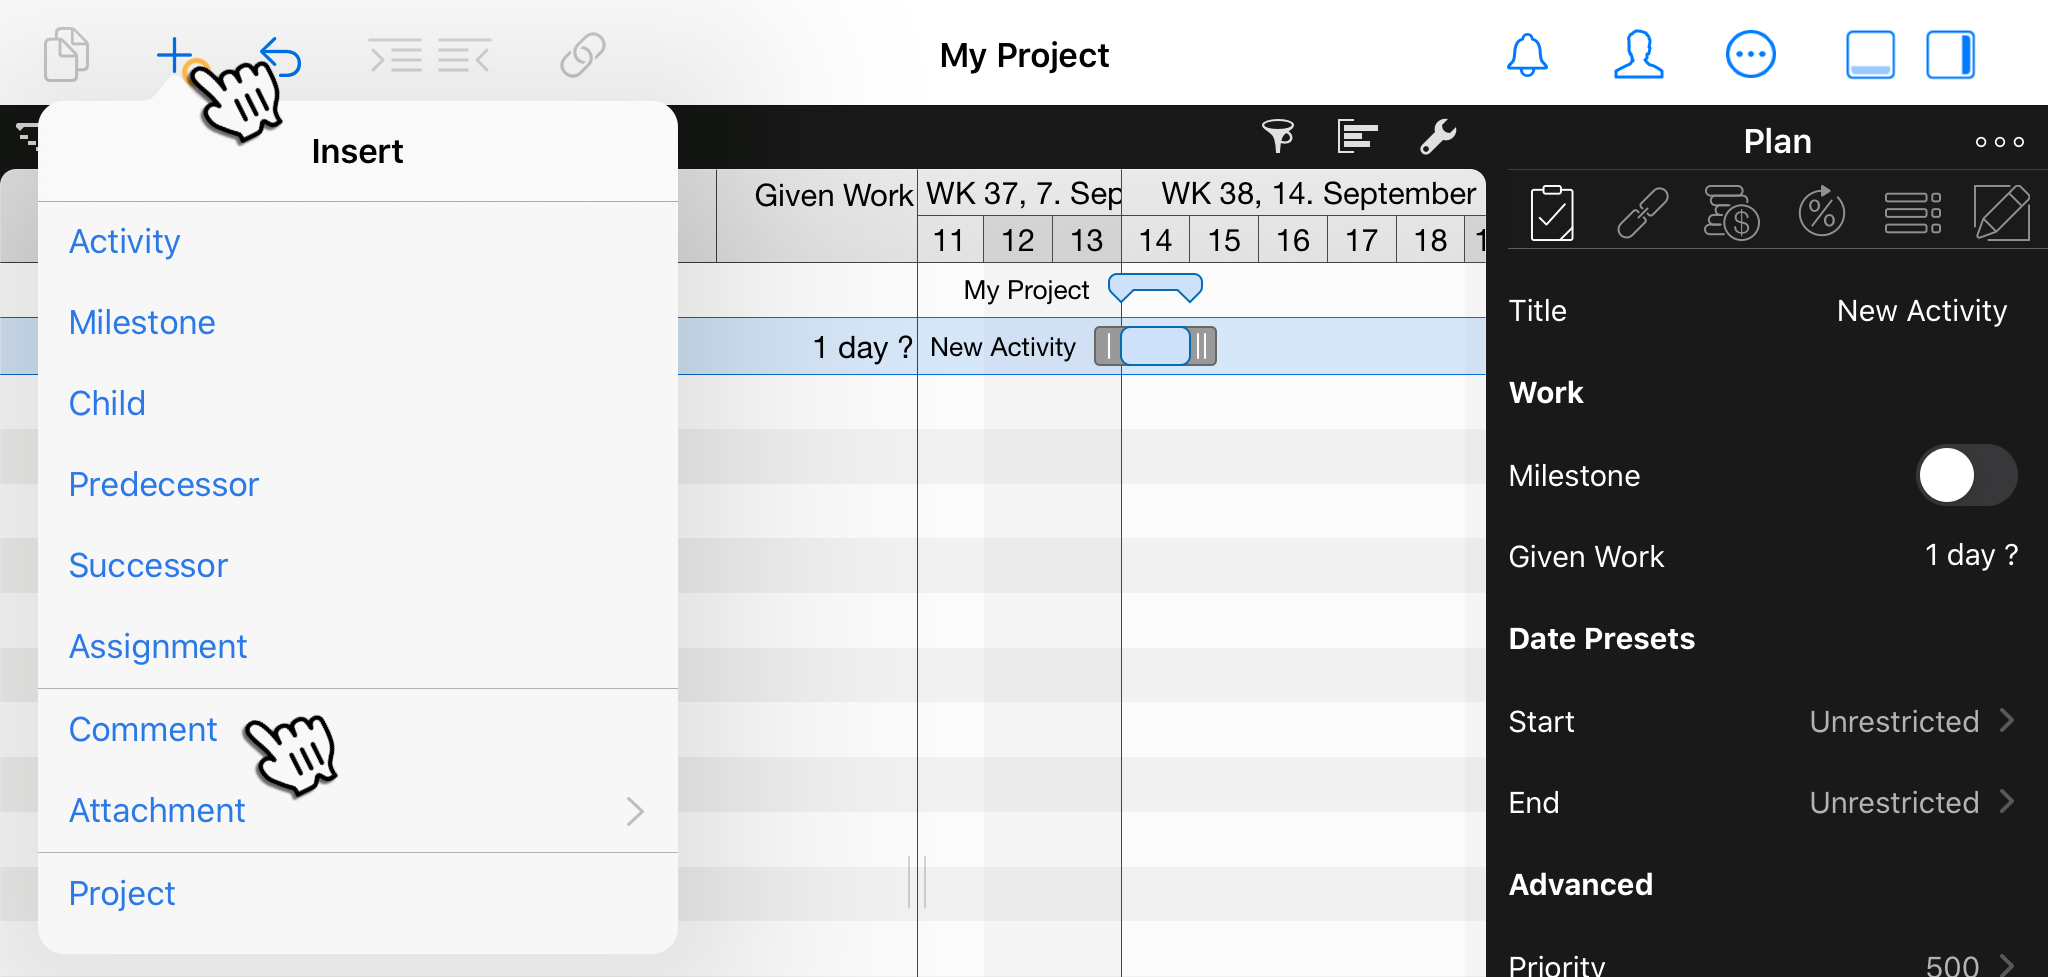
Tap and hold the + icon to insert other items such as:
-
Activity
-
Milestone
-
Child
-
Predecessor
-
Successor
-
Project
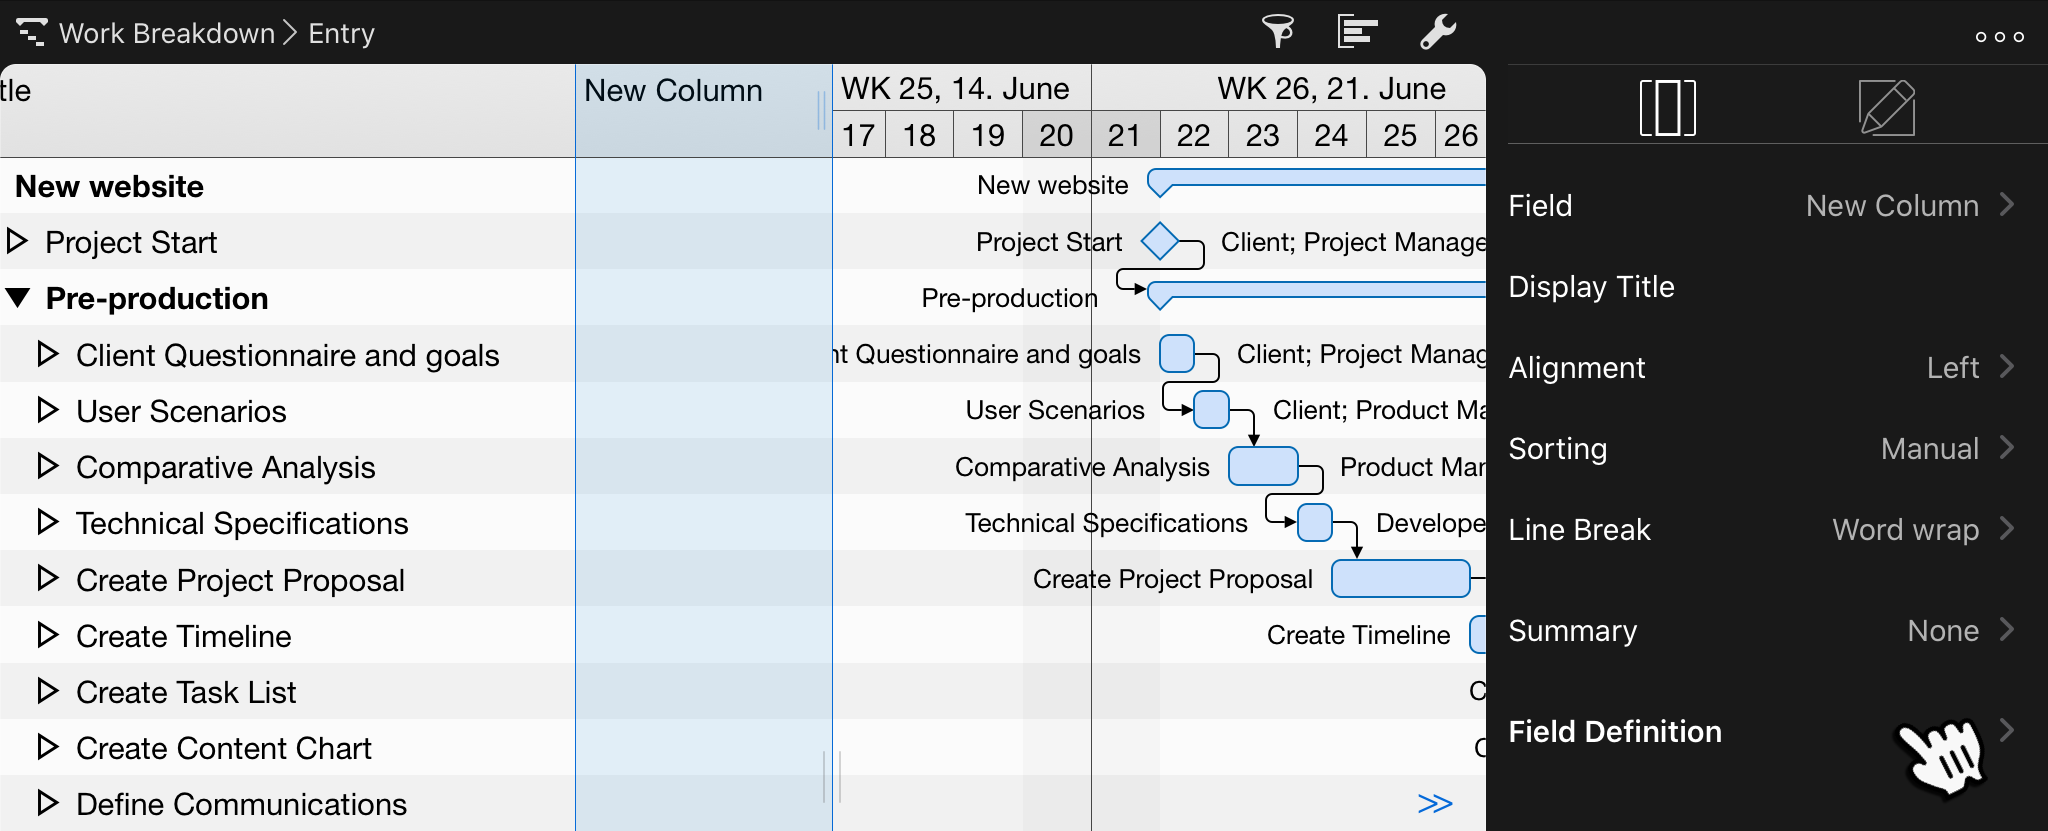
New Columns
You can create new fields and show them directly in the outline all in one action.
-
Tap a column header.
-
Tap again the column header of the already activated column again. A context menu opens.

-
Select Add Column.
-
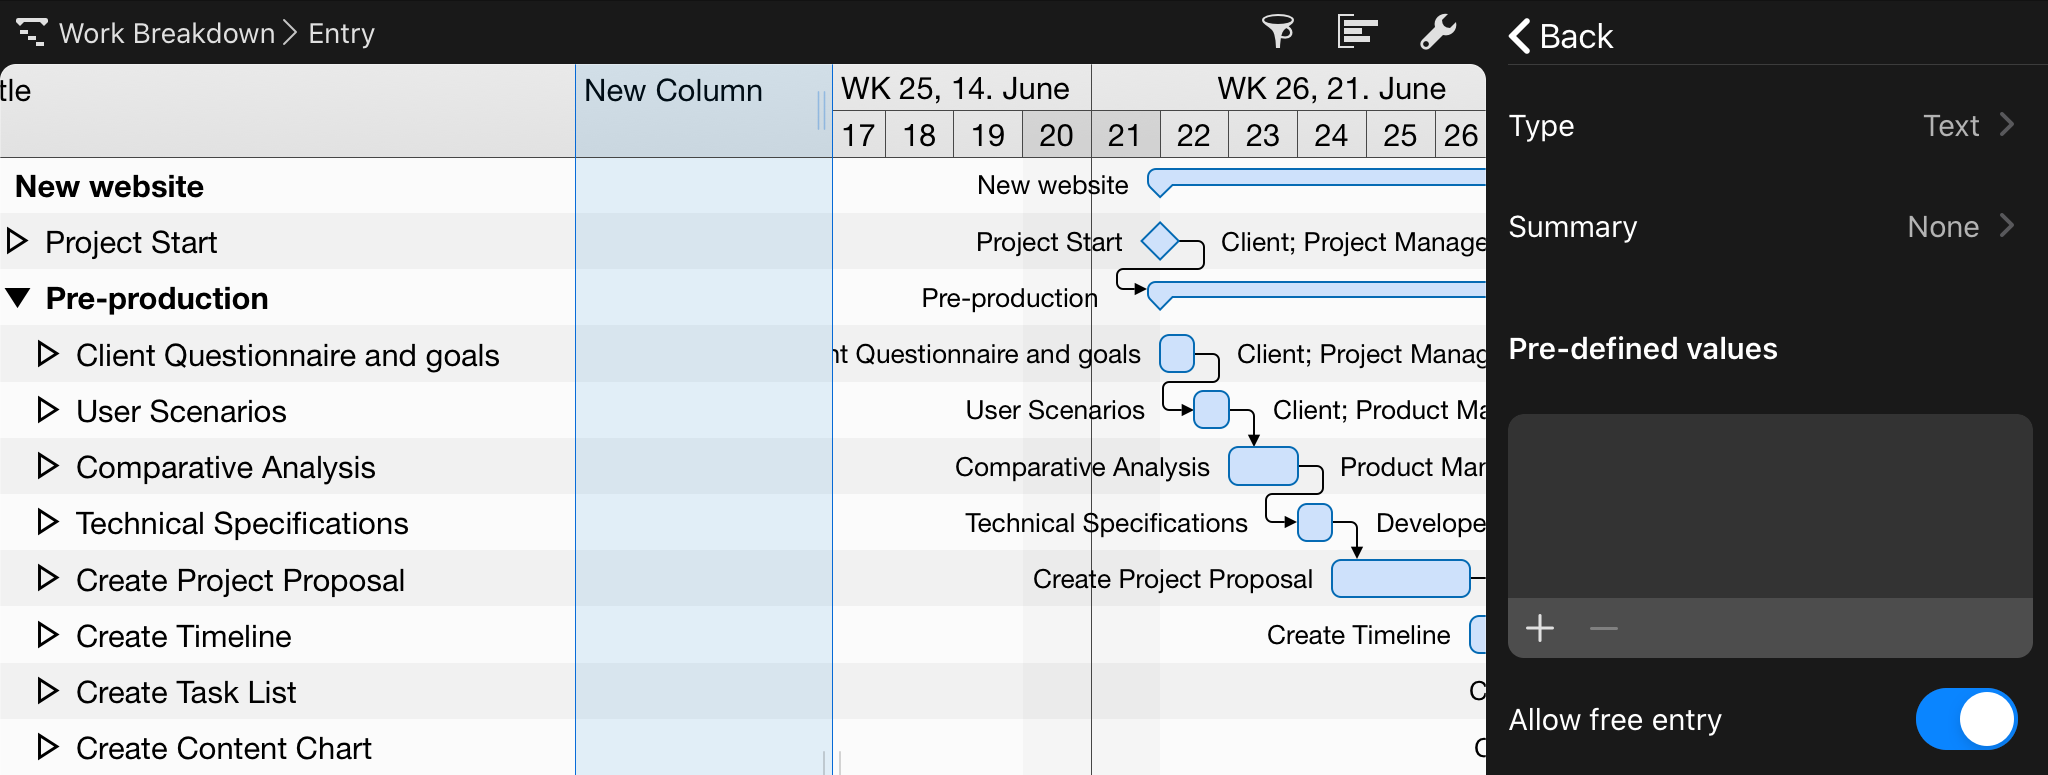
In the Inspector, insert the Display Title
-
Use the Field Definition area to specify the Type (text, number, date, duration, checkbox, status, media), Summary options (none, total, average, minimum, maximum, state, hidden), pre-defined values, and whether you allow free entry.
Alternatively, you can insert a field and decide later wether or not to show it in the outline:
-
select a row in the outline
-
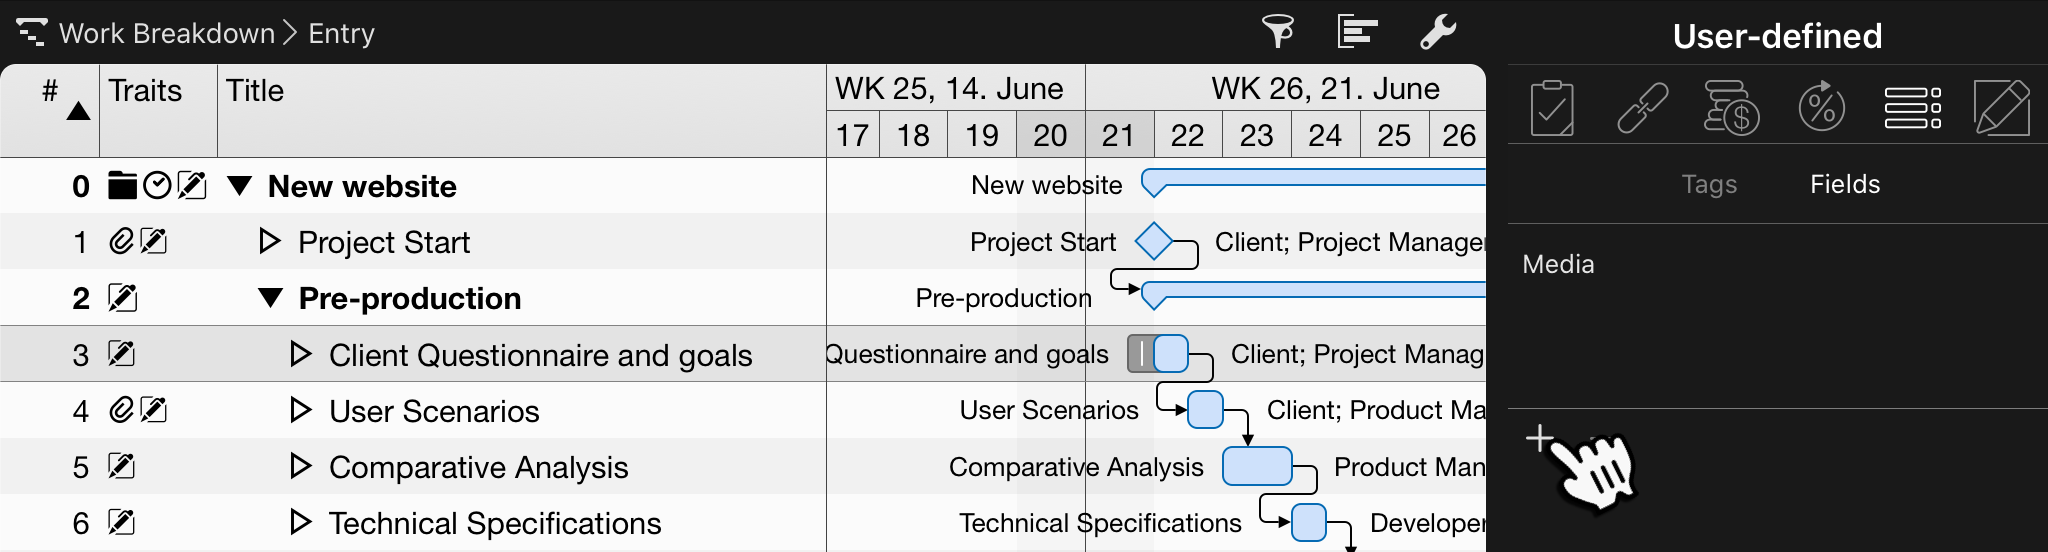
Use the User-defined inspector
-
switch to the Fields area
-
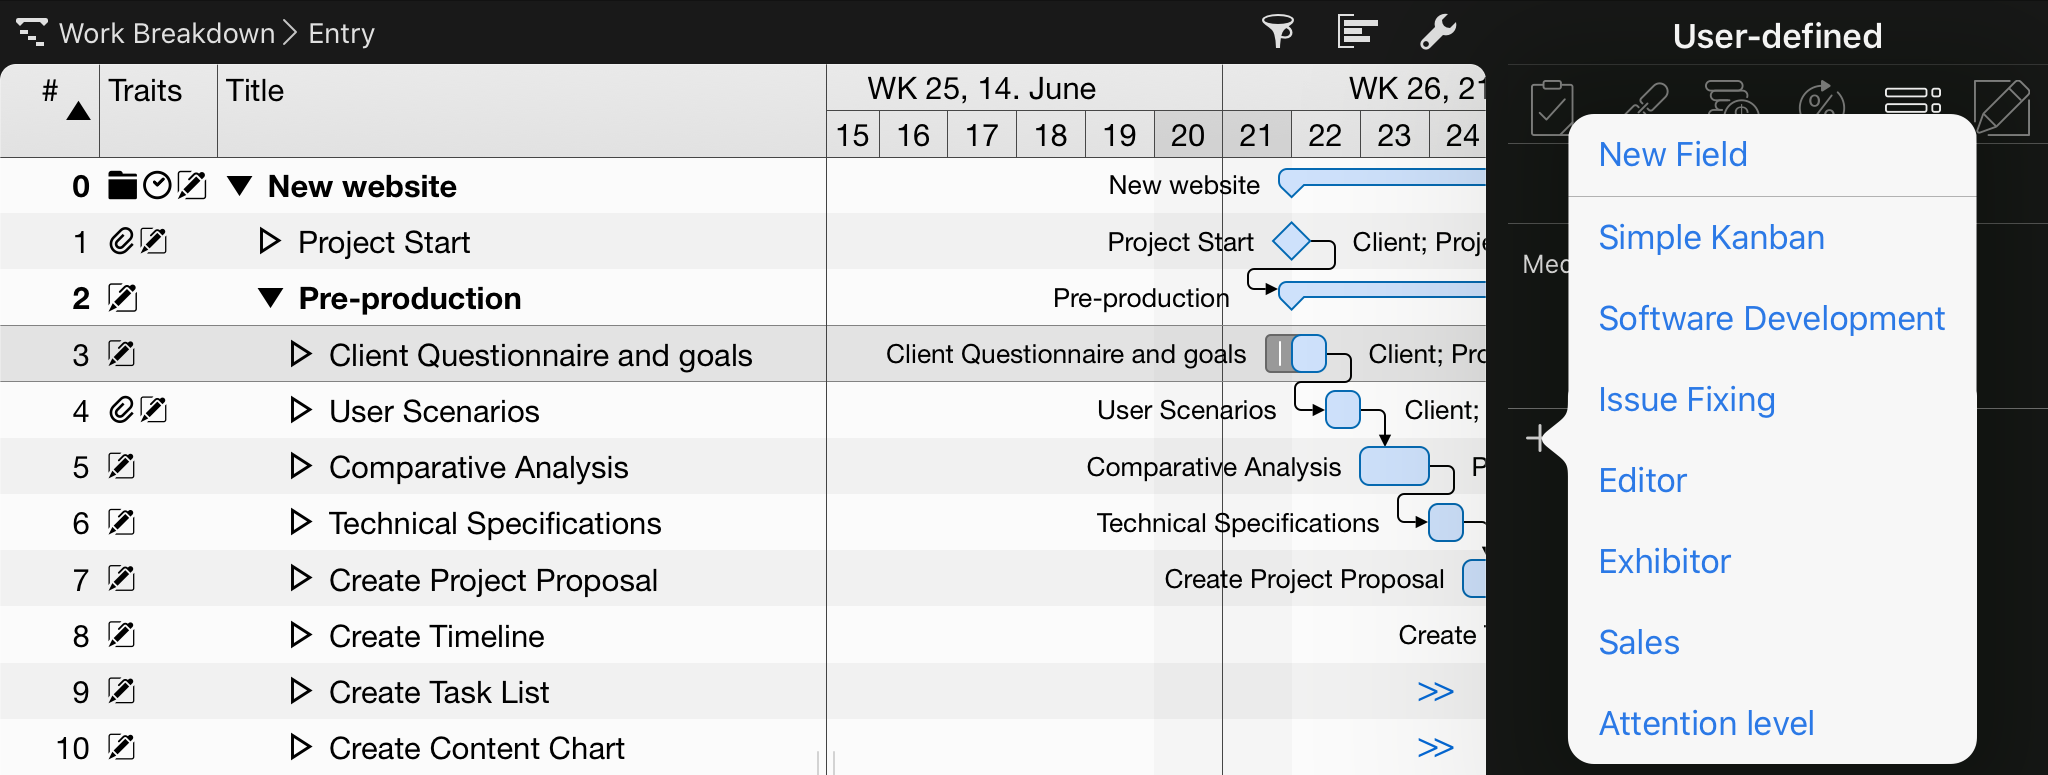
tap the + symbol. A context menu appears.
-
tap on New Field
-
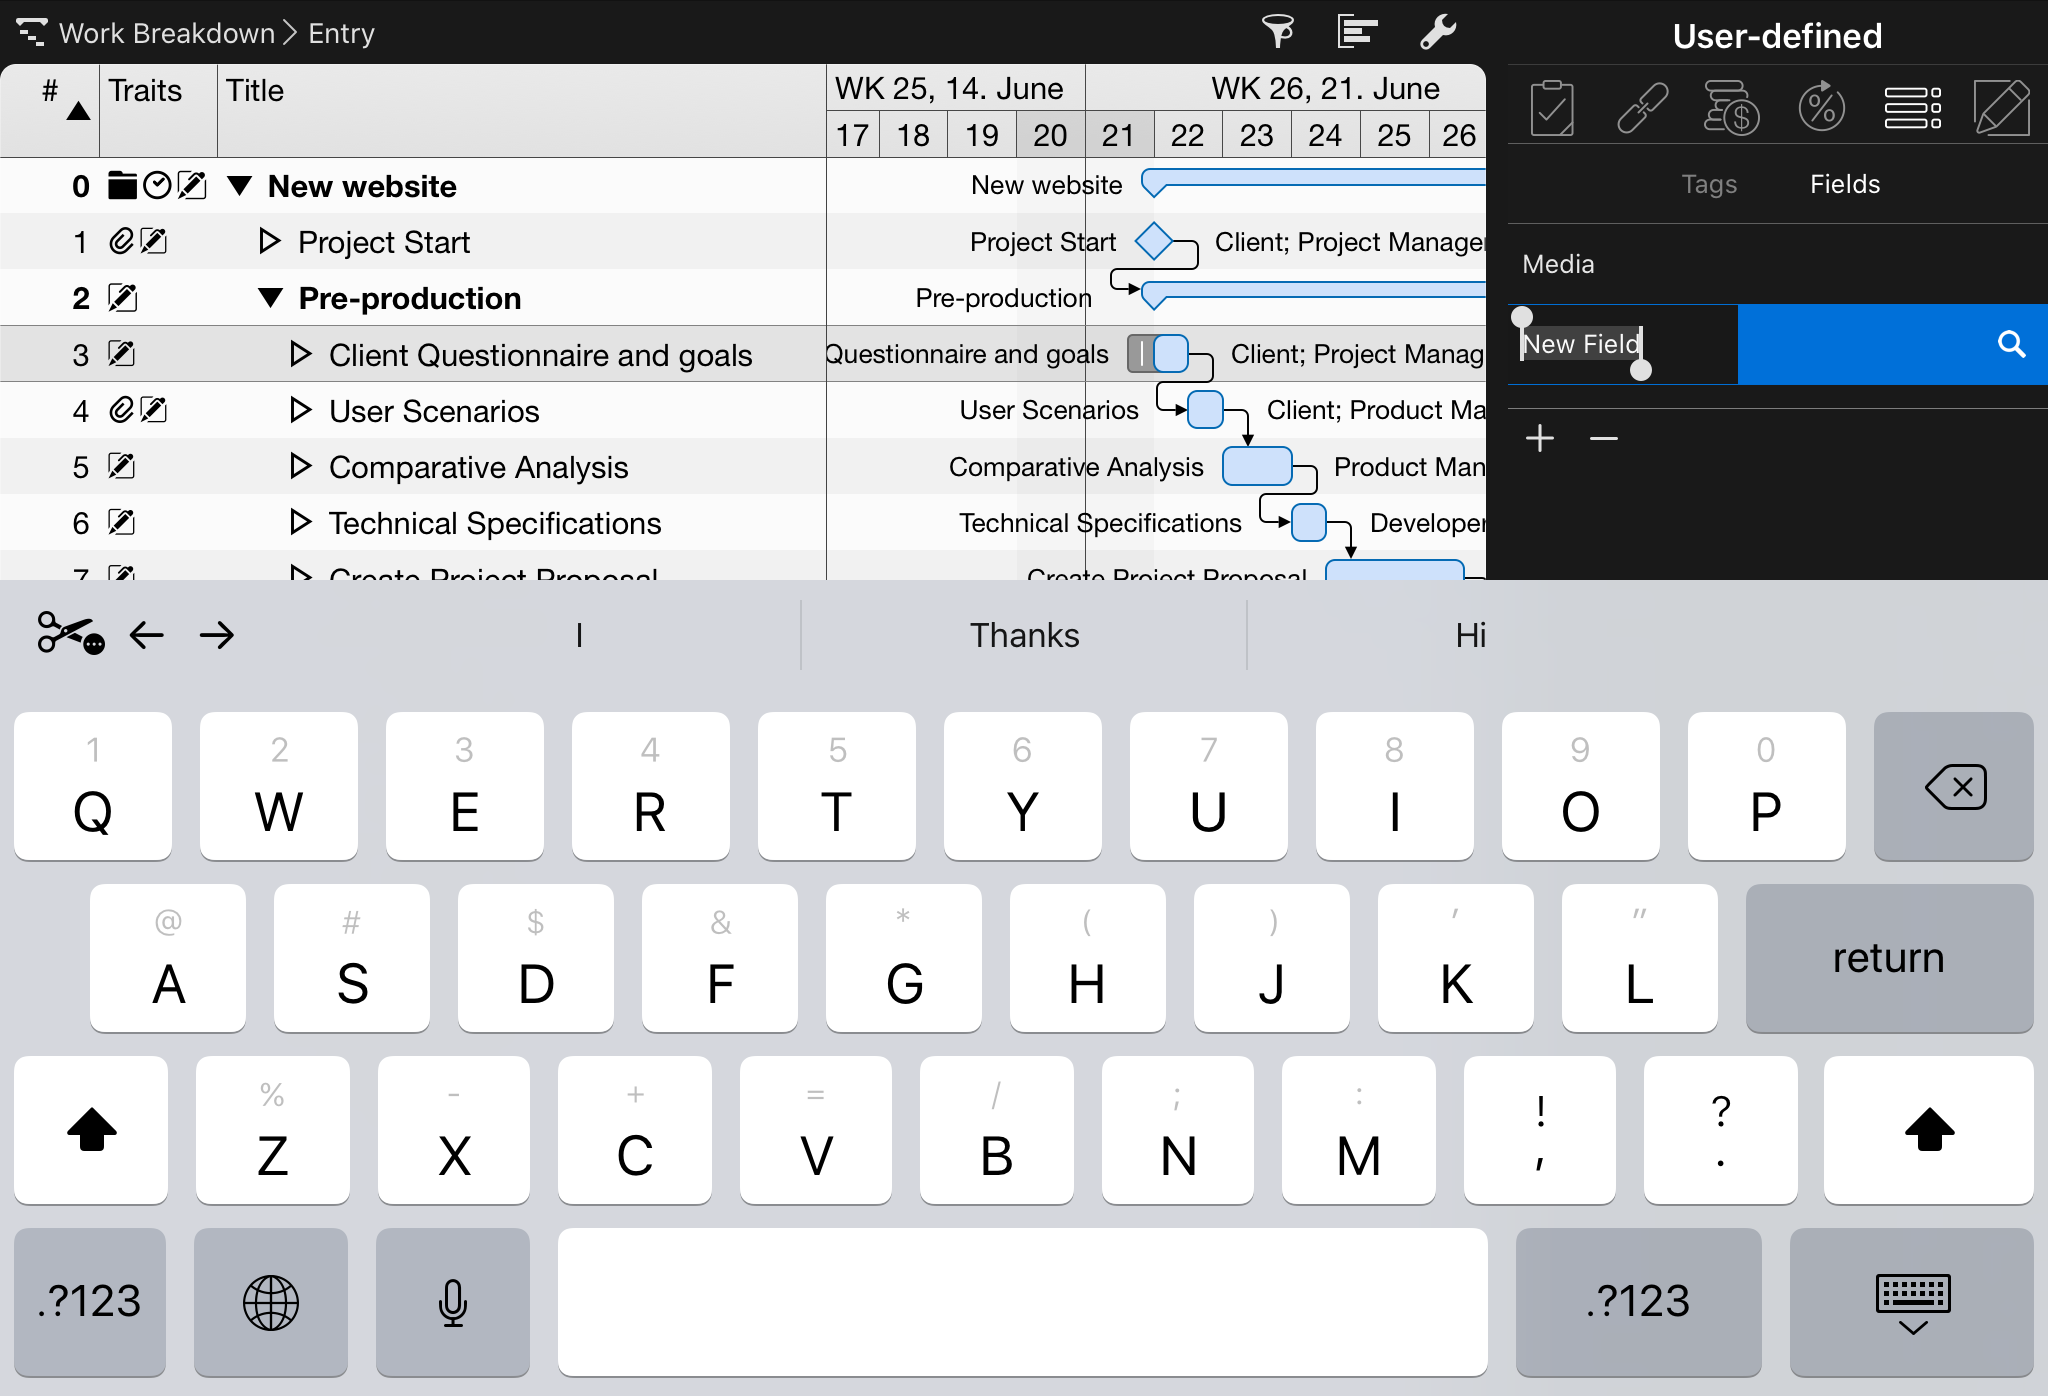
enter the desired name for the new field
-
tap the magnifying glass symbol to complete the Field Definition.
|
|
To edit the value of a field for a particular row, select the row in question, use User-Defined Inspector and the Fields area and edit the value in the list. If the field is visible as a column in the outline, you can also edit its value directly in the outline. |
New Tags
Every new empty project comes with a predefined set of tags:
-
Decision
-
Discussion
-
Draft
-
Proposal
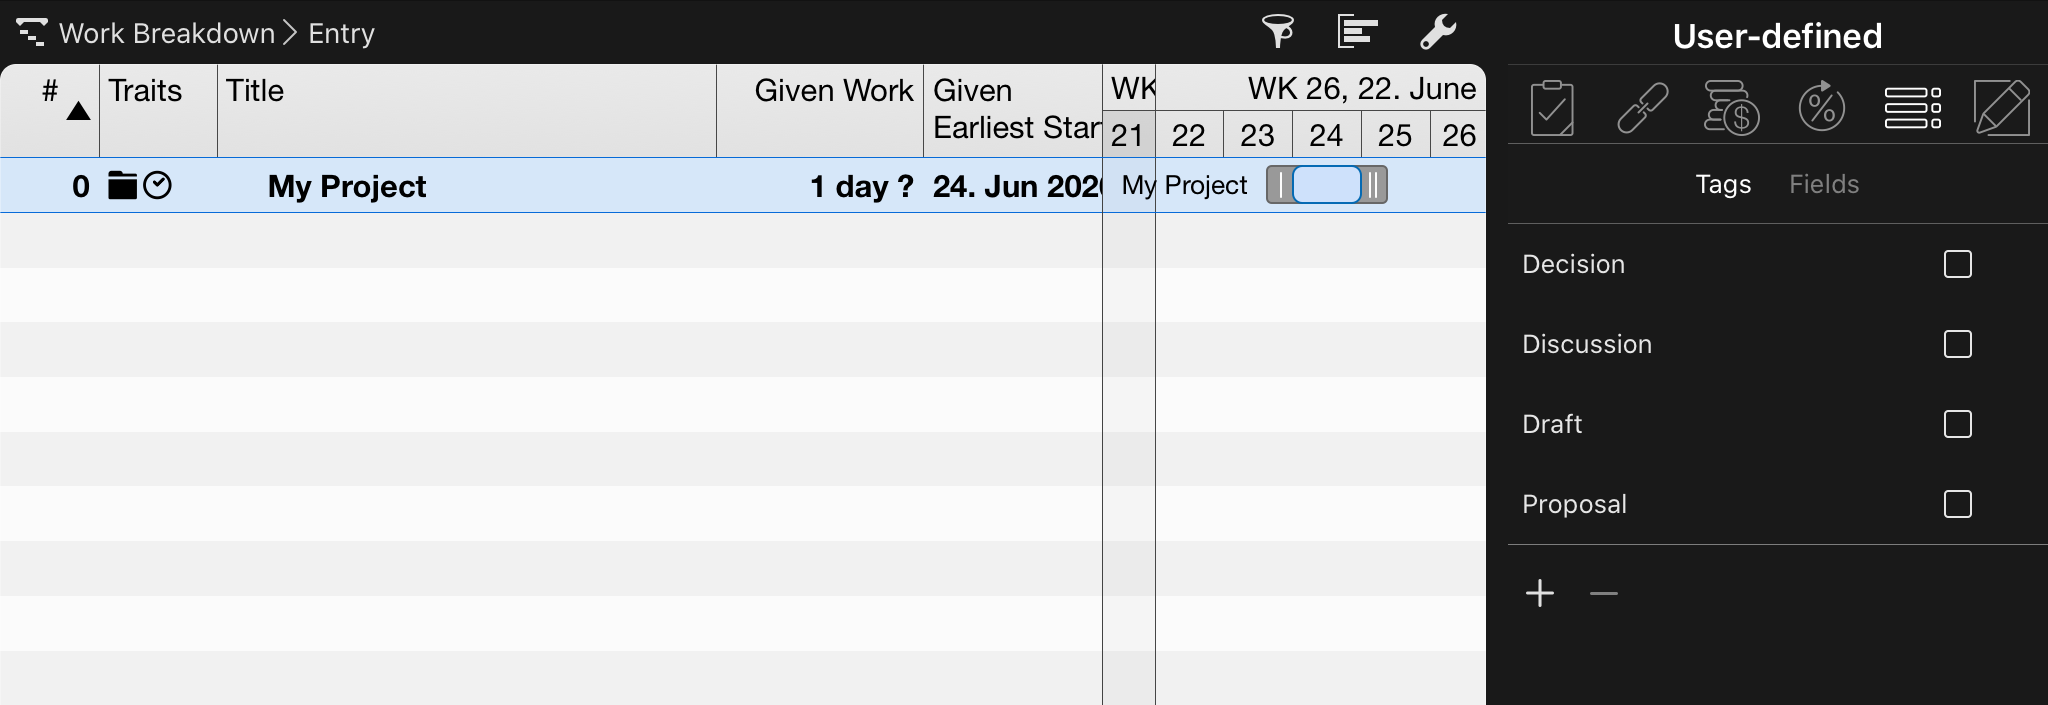
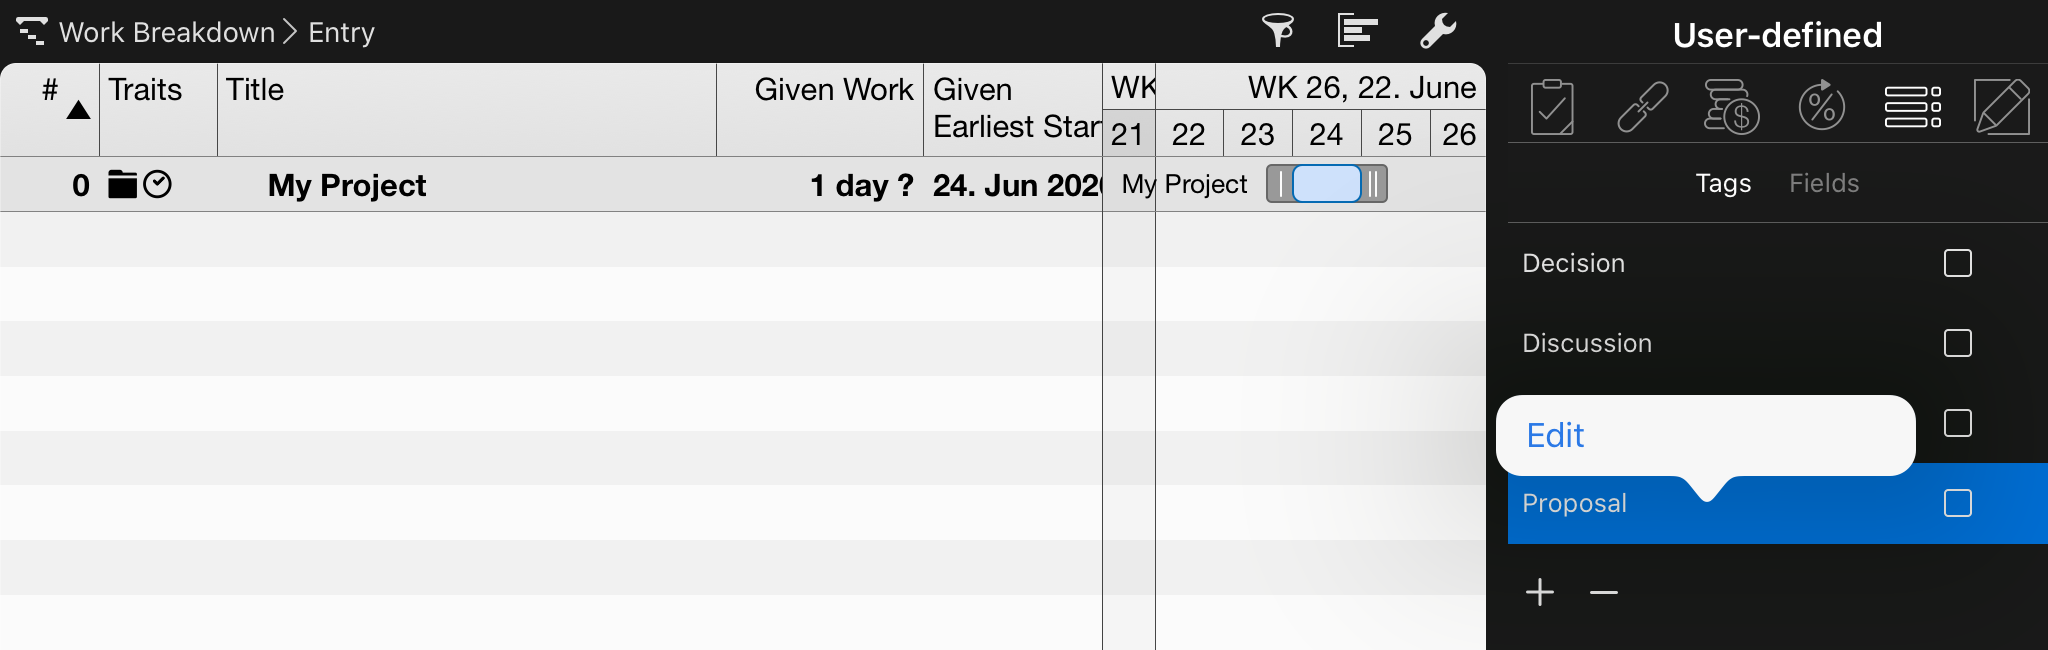
You may edit the titles of existing tags.
To insert a new tag:
-
select a row in the outline
-
Use the User-defined inspector
-
switch to the Tags area
-
tap the + symbol.
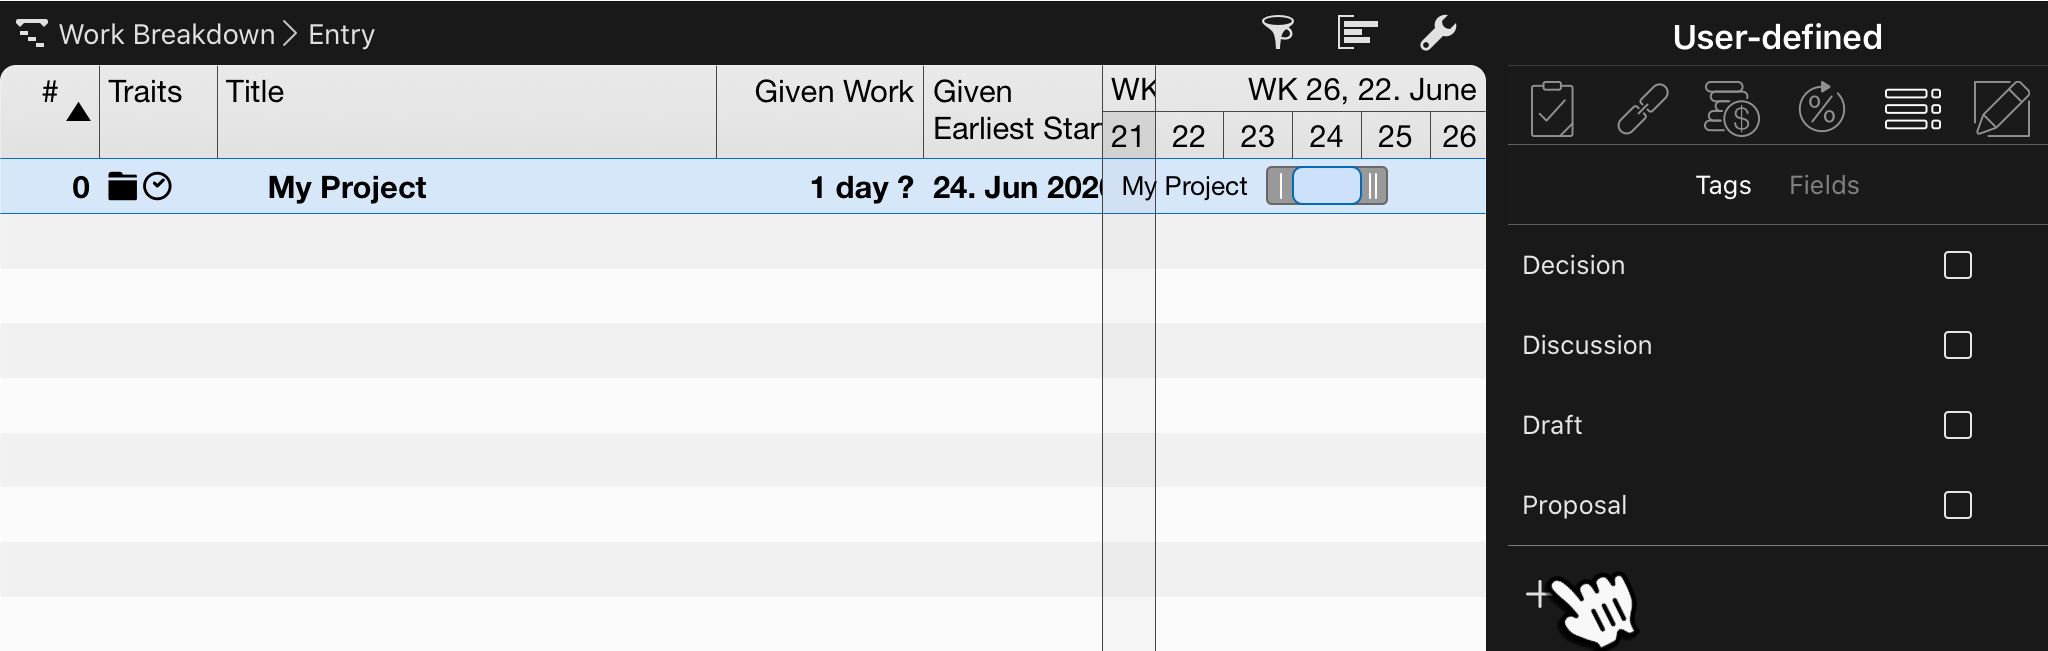
-
enter the desired name for the new tag.
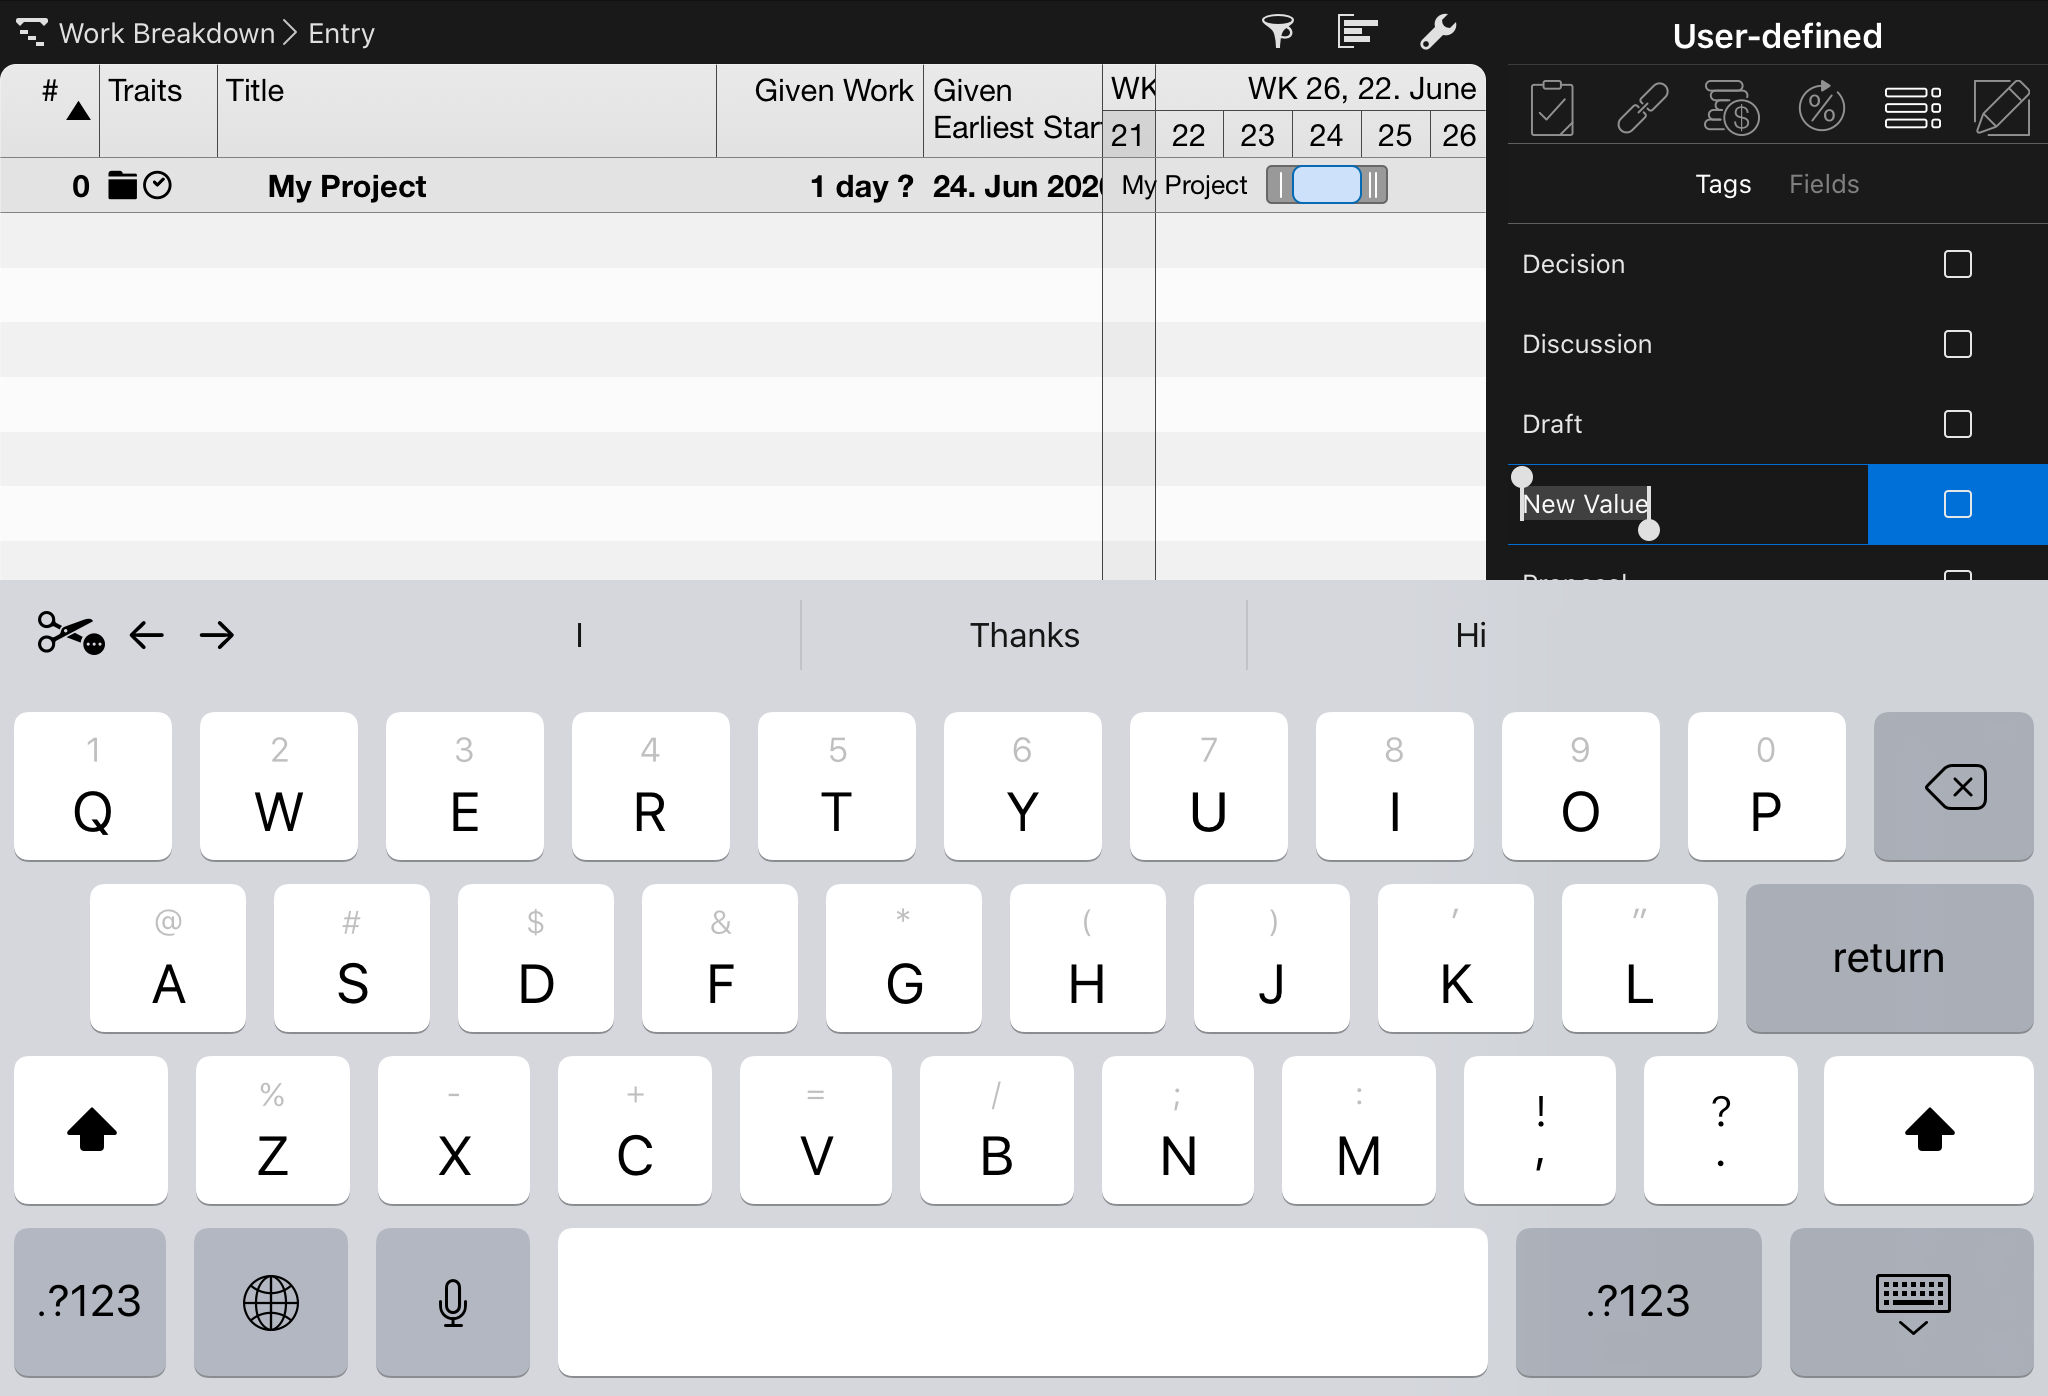
To set a tag for a row, select the row in question, use User-Defined Inspector and the Tags area and set the checkbox in the available list.

If the Tags field is visible as a column in the outline, you can also change the Tag assignment directly in the outline.
Net Plan
The Net Plan view lets you select various graphical plan views:

-
PERT
-
Phases
-
Status Compact
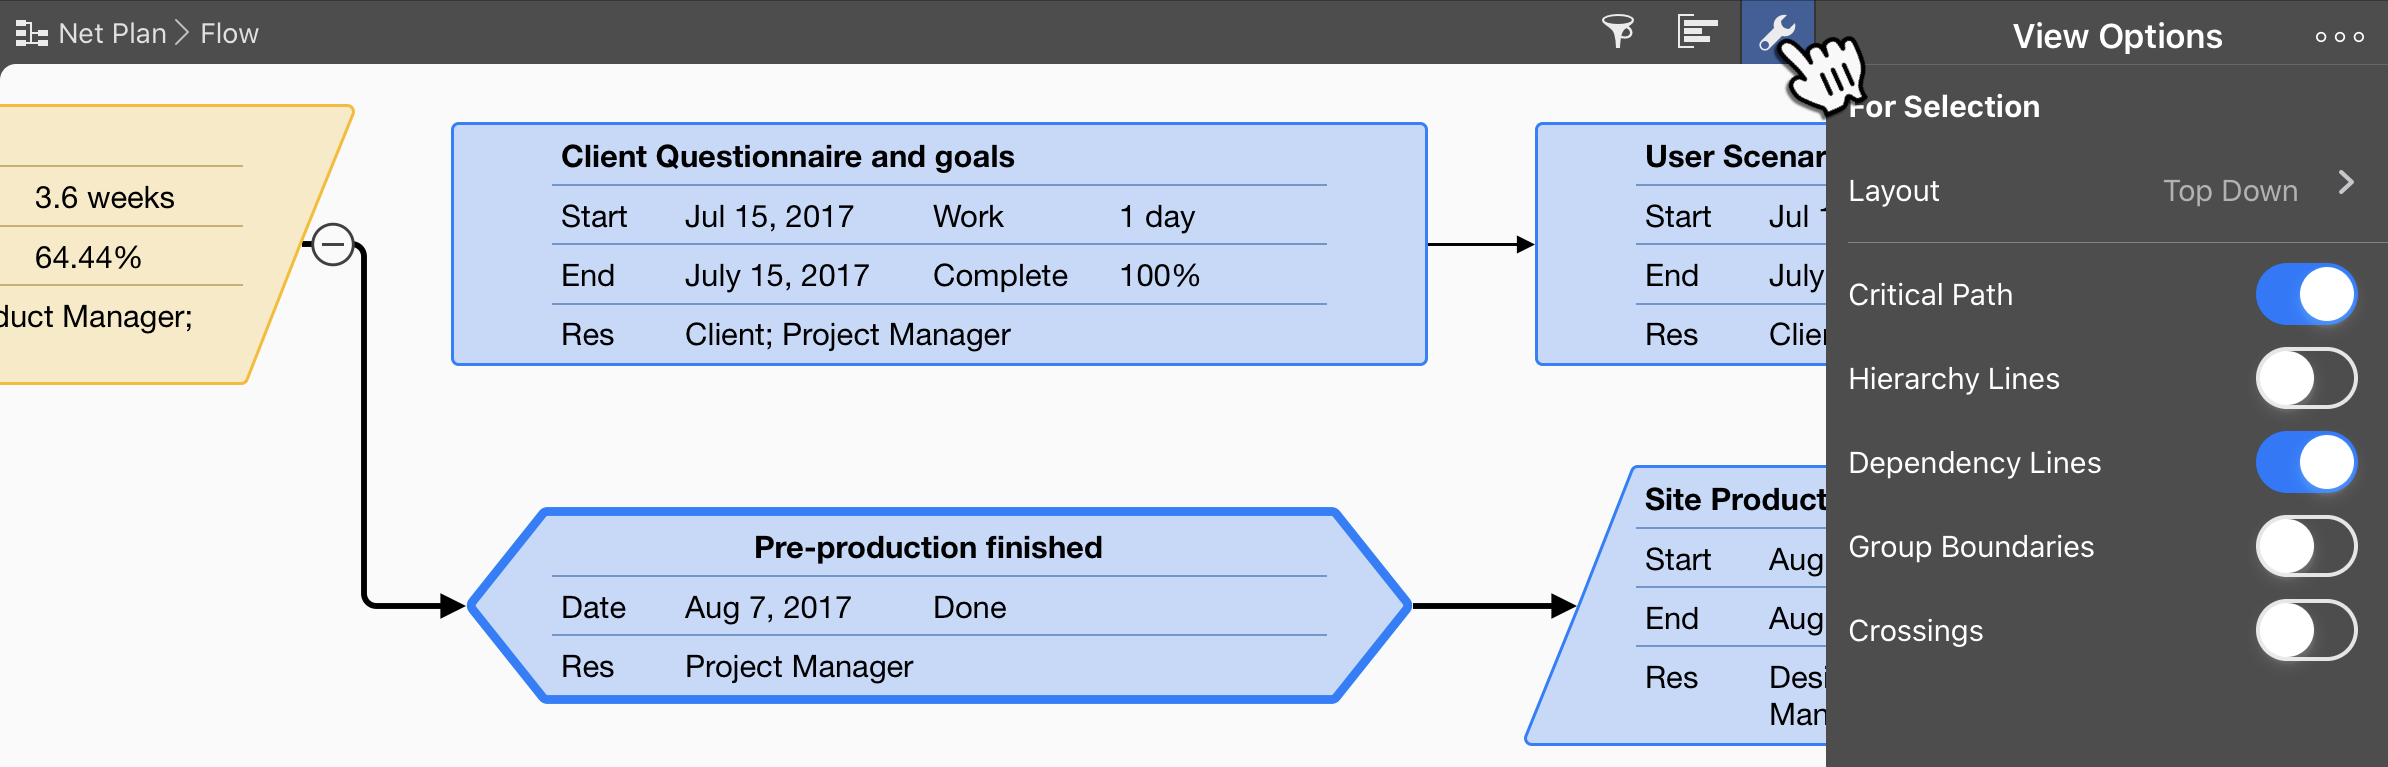
Flow
The Flow view contains the logical connections and the structure of the project in the form of a Net Plan.
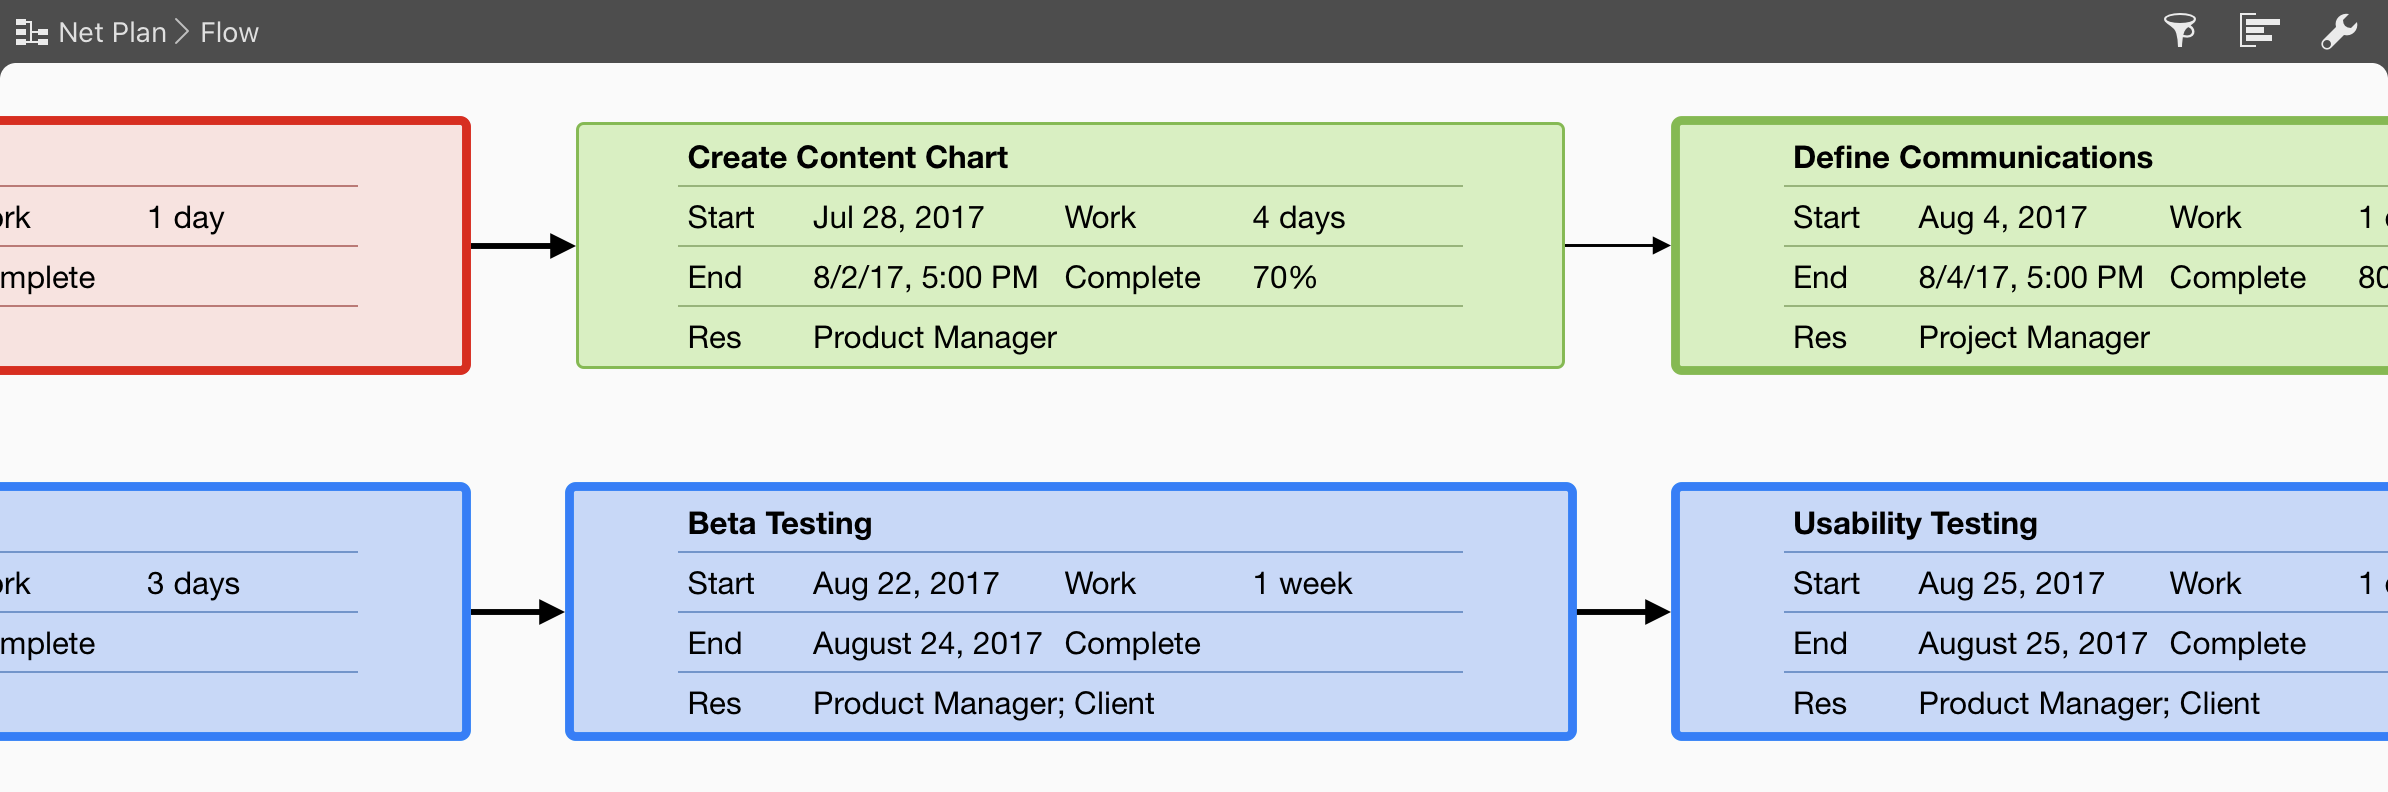
You can modify how the Net Plan is displayed in the View options using the Layout drop-down menu. The Inspector contains additional options for displaying the Net Plan.
Kanban
The Kanban view is intended for agile project management and offers a variety of possible applications.
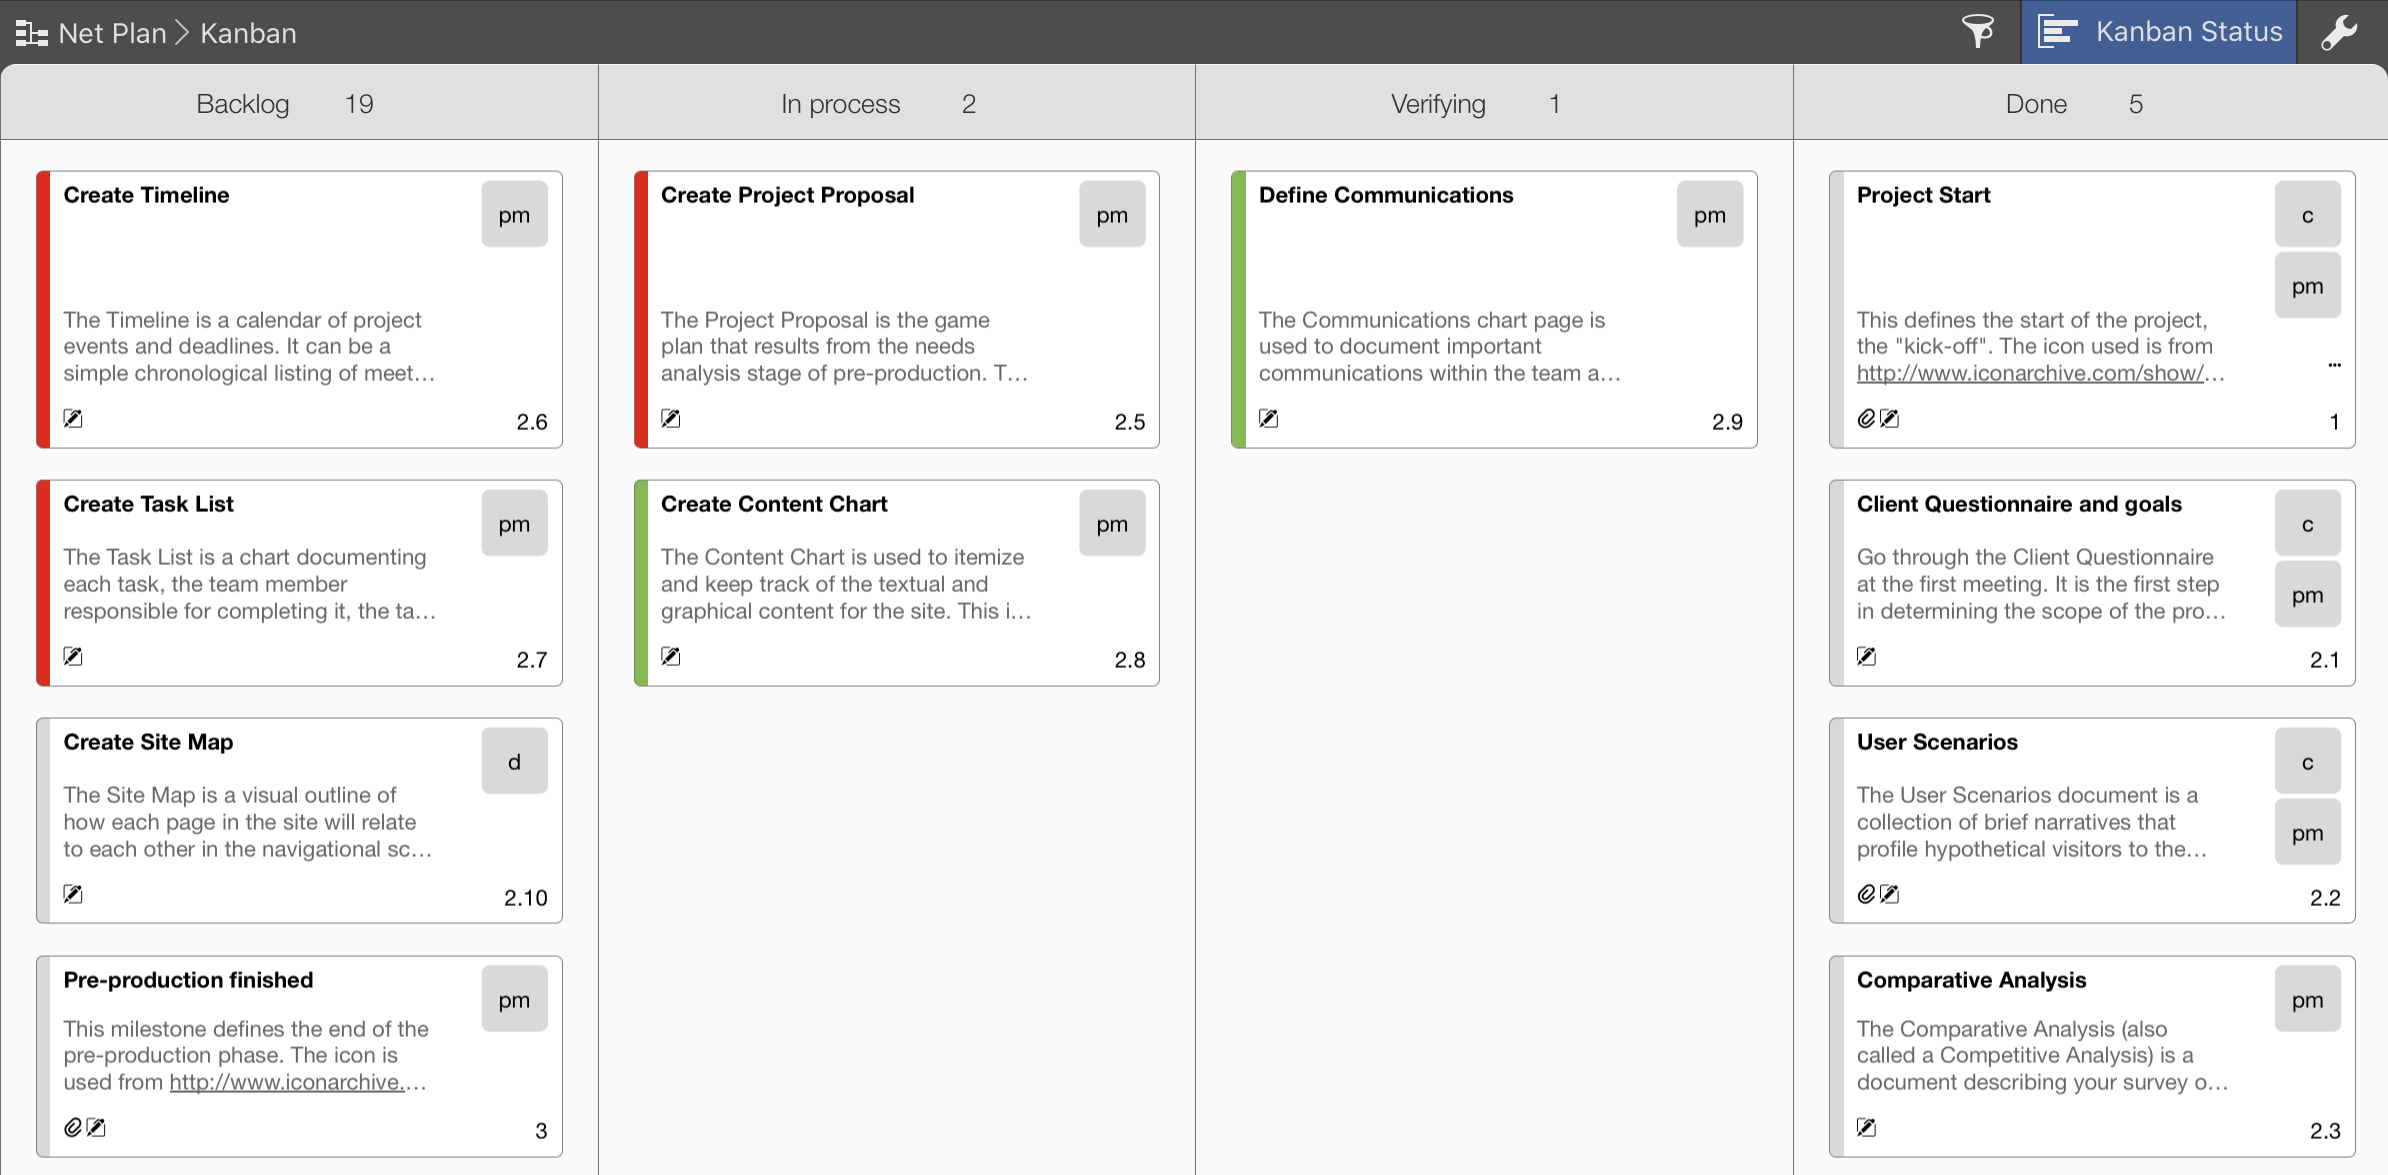
You’ll find detailed instructions for Kanban here.

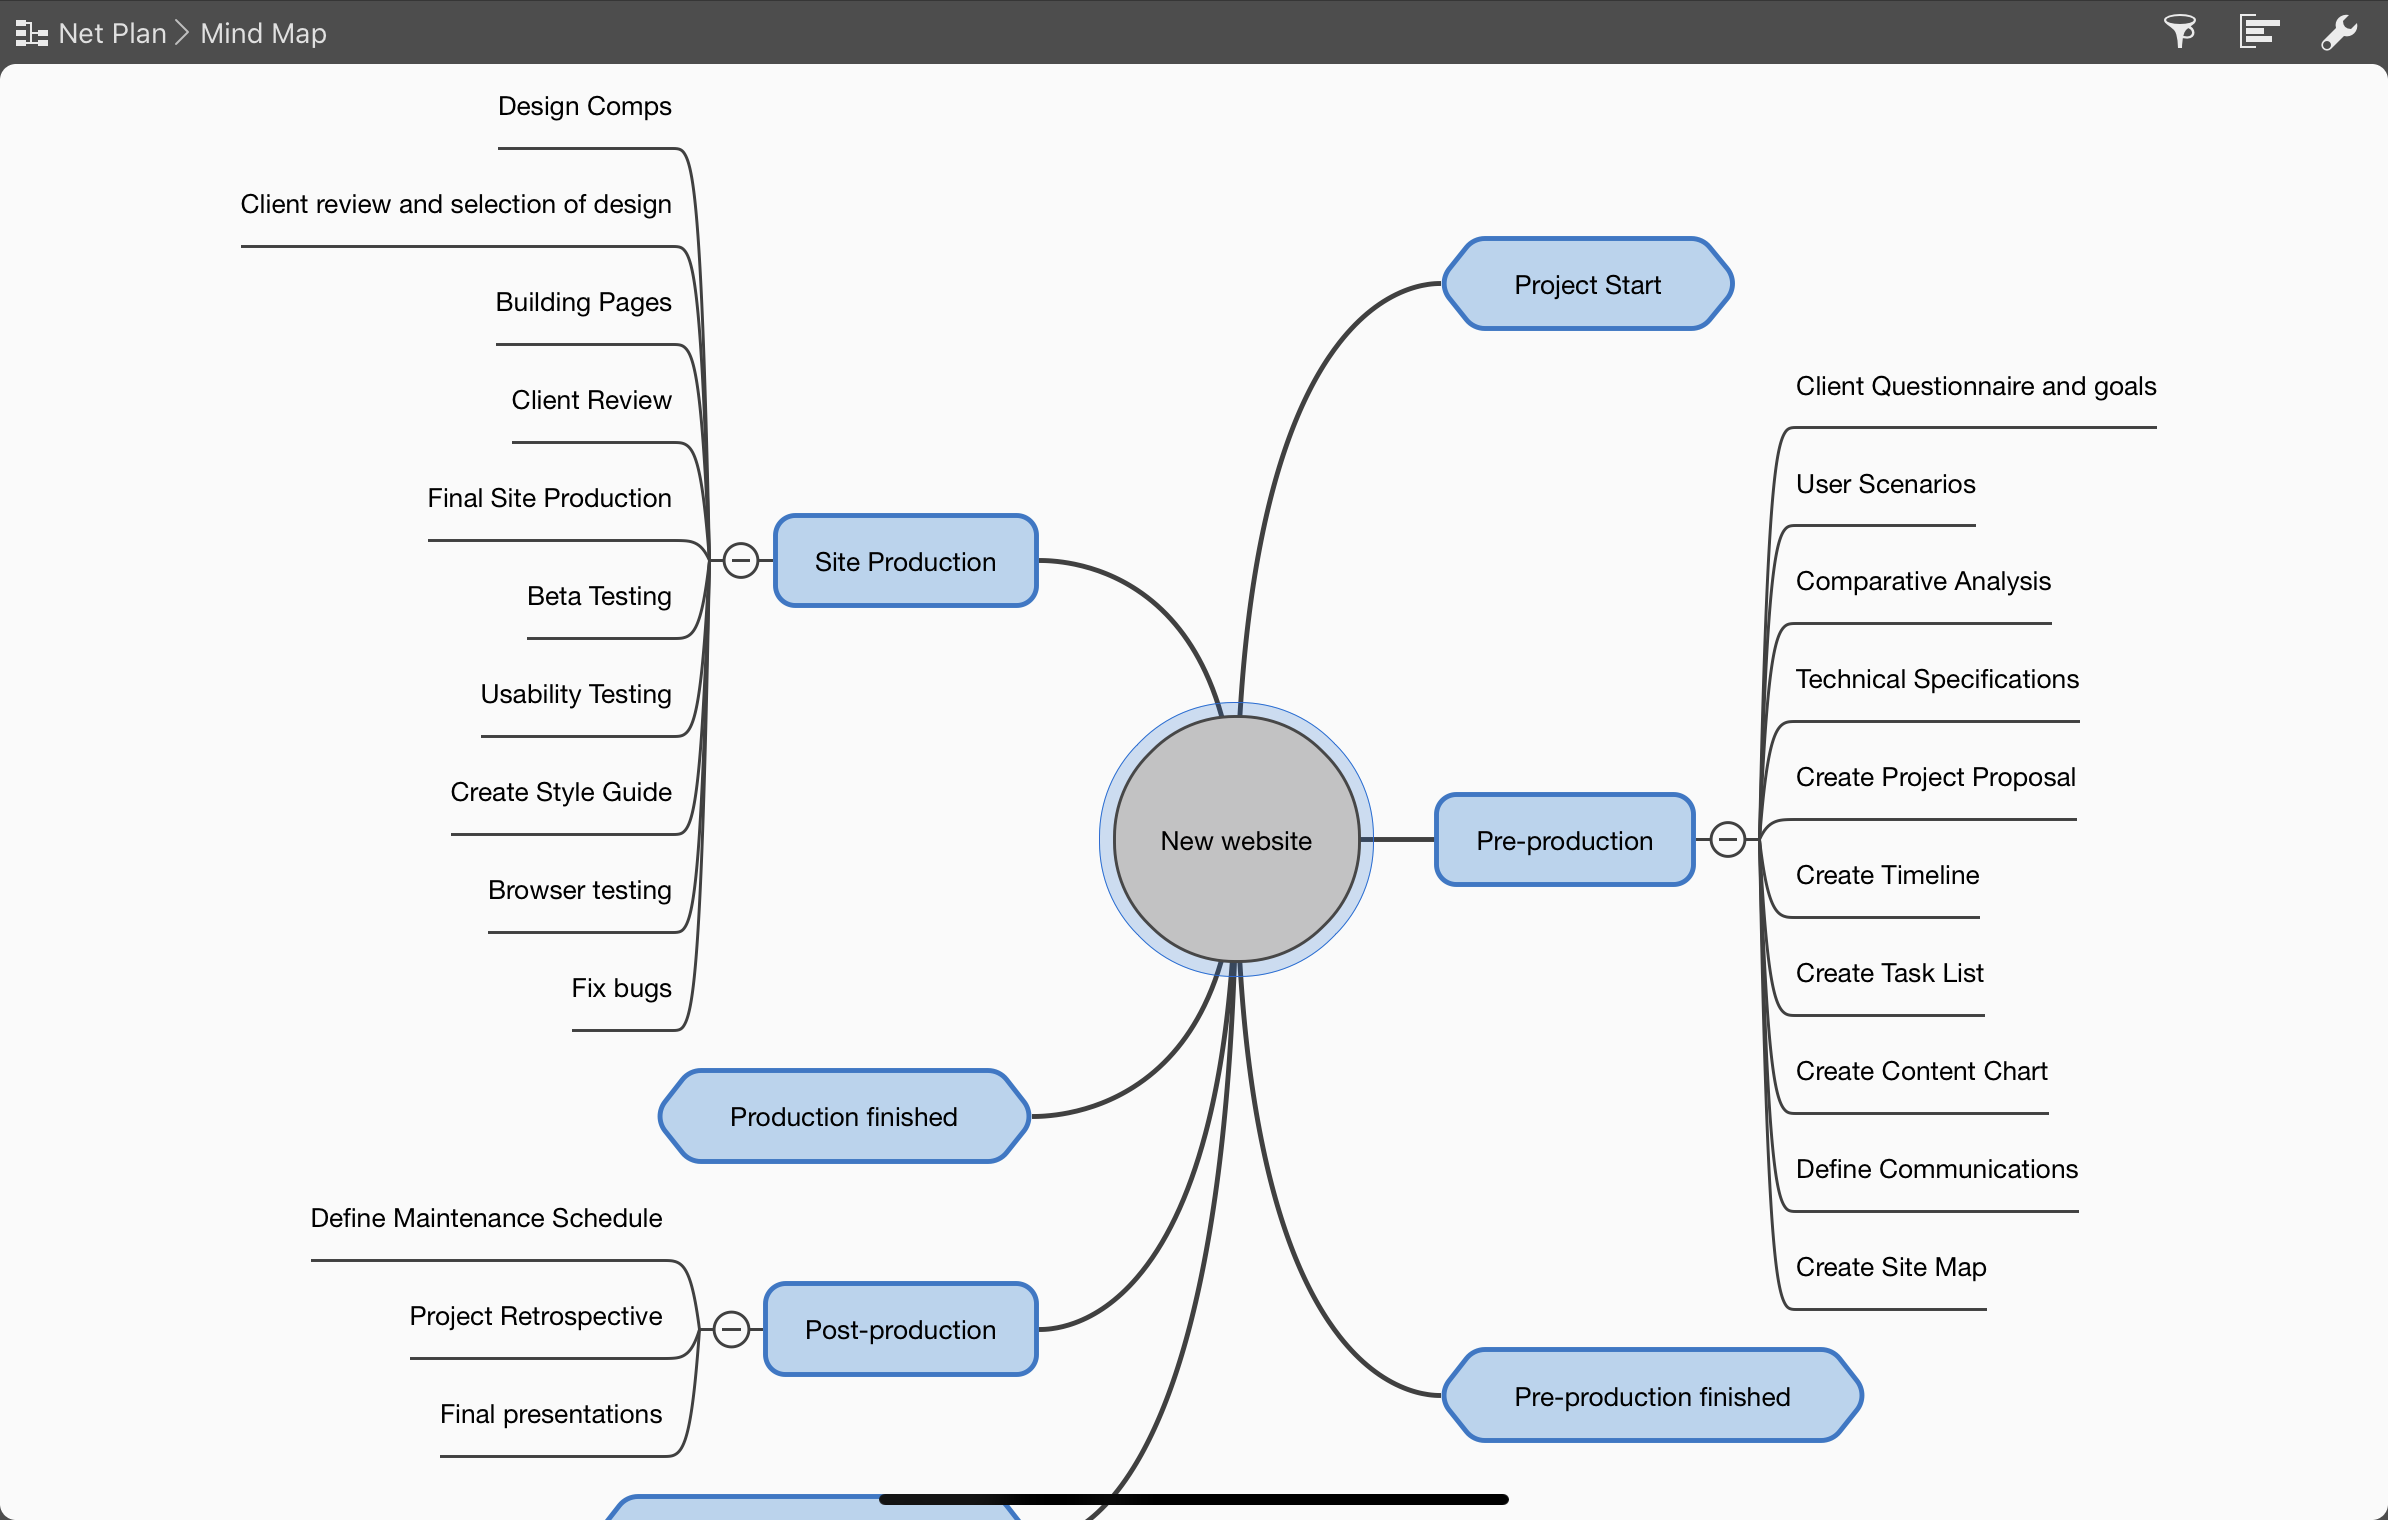
Mind Map
The Mind Map view is perfect for displaying projects graphically. You can adjust the layout of the Mind Map in the View options and change how it looks. Tap the displayed icon.
Organizational Chart
The Organizational Chart view in the Net Plan is perfect for the hierarchical display of different projects.
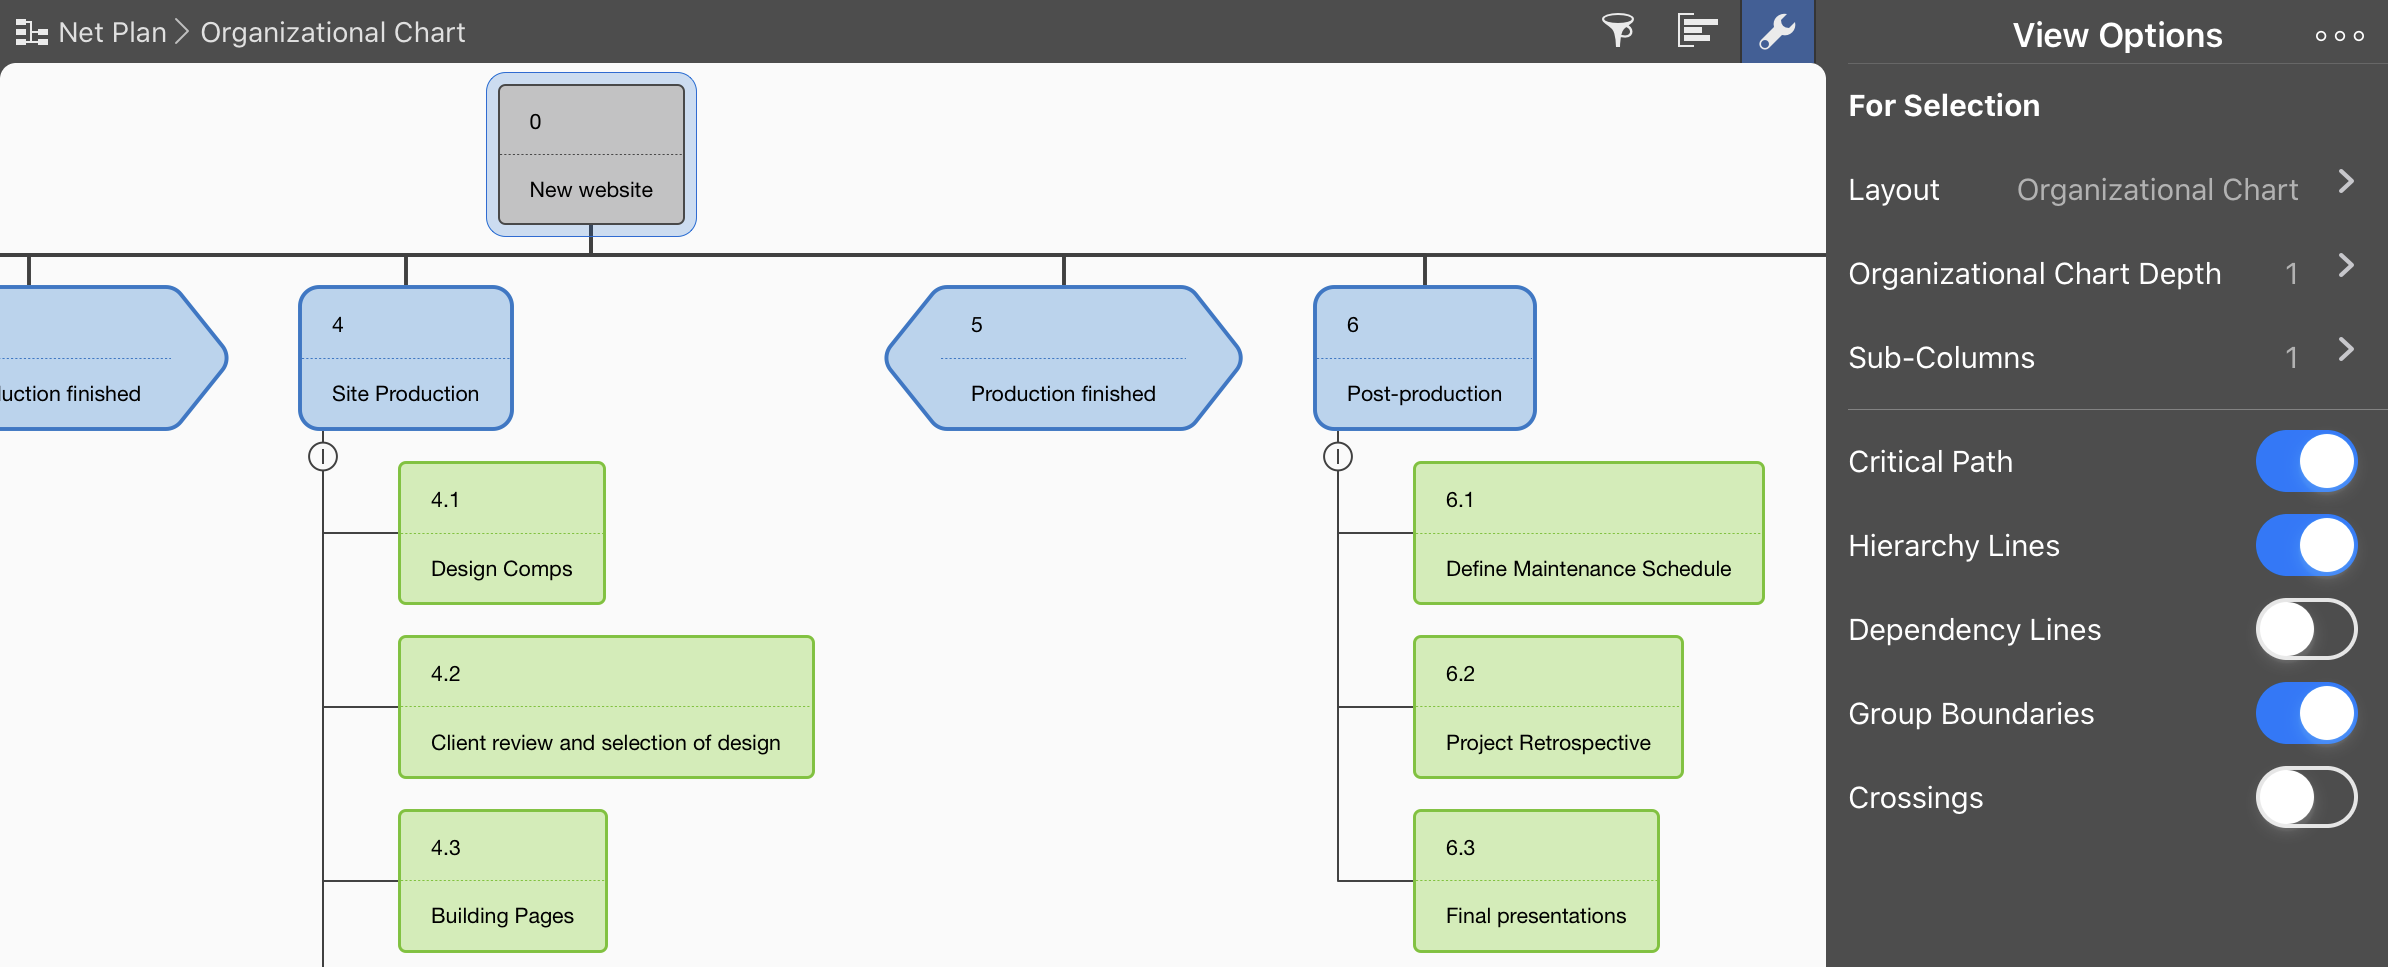
You can adjust the layout of the Organizational Chart in the View options and change how it looks.
Organizational Chart with Status
The Organizational Chart with Status in the Net Plan is a more detailed variant of the view Organizational Chart.
Resources
The Resources view contains all resources involved in the project and gives you an overview of the available resources.
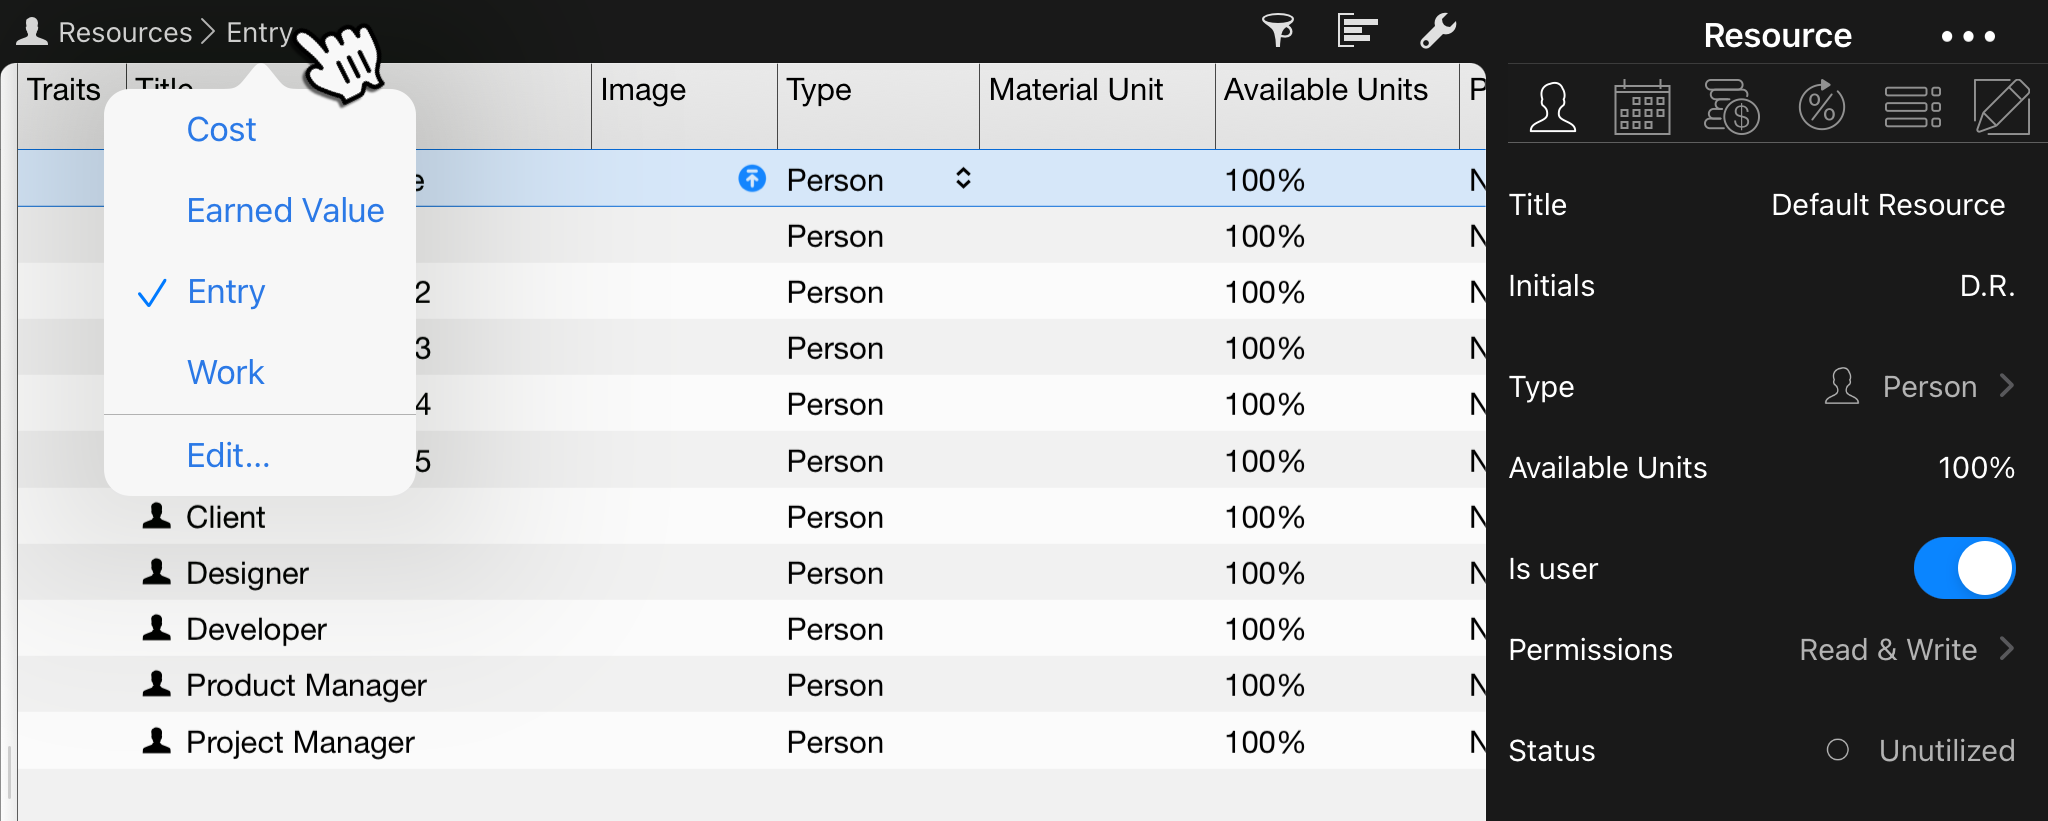
Resources can be viewed in the four following views:
-
Work
-
Entry
-
Costs
-
Earned Value
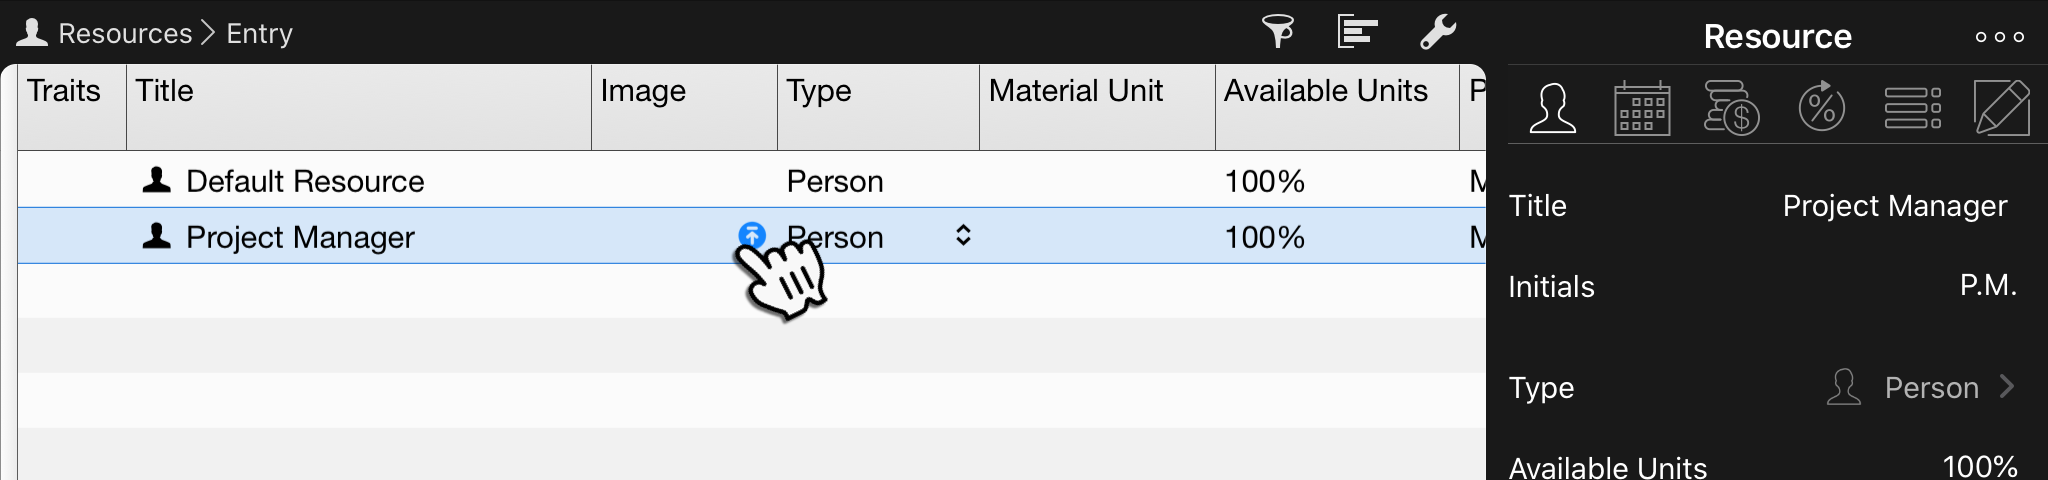
New Resources
Within a Resources view, to insert new items, tap the + icon. A new resource will be created.
Following resource types are possible in Merlin Project:
-
Person (actively or inactively involved in the project)
-
Material
-
Company
-
Equipment
|
|
If you are not currently within a Resources view, and need to insert new resources, just tap the resource icon and then on 'New Resource. |
Click the insert button as shown in the Image column, to insert an image for your resources.

|
|
The image will show up in Kanban cards and in any comments this resource inserts into the project. |
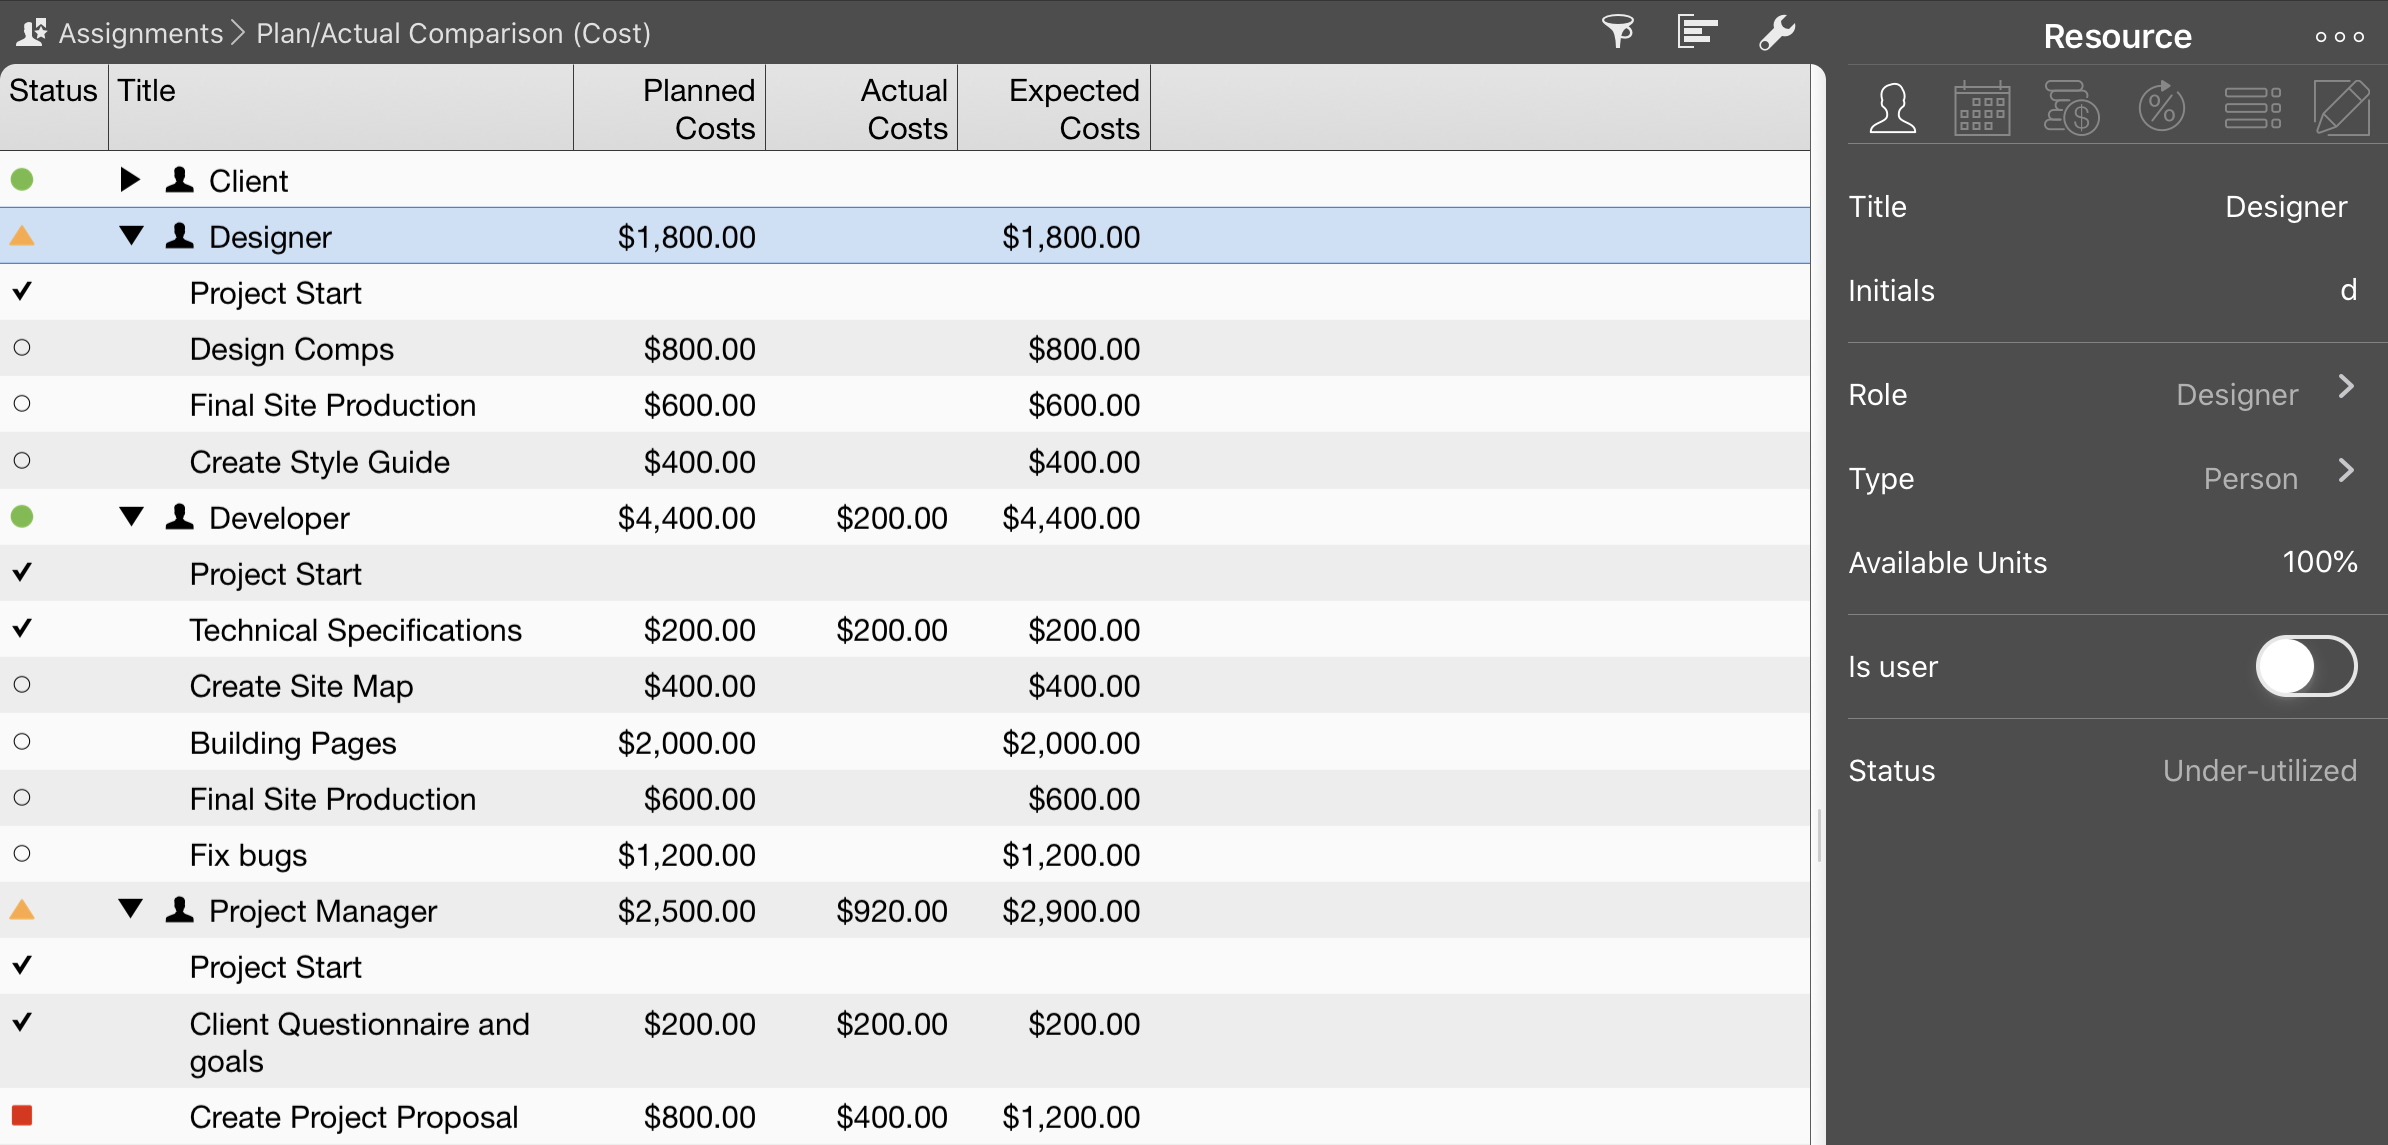
Assignments
The Assignments view contains all assignments grouped by resource. It displays related information in a Outline and Gantt chart.
This gives you a quick overview of utilization levels (shown in red) of individual assignments, allowing you to spot potential cases of over-utilization and correct these.

The available views for the assignments are:
-
Schedule
-
Work Distribution
-
Cost Expectation
-
Cost Planning
-
Resource Leveling
-
Plan/Actual Comparison (Cost)
-
Plan/Actual Comparison (Time)
The views let you check the assigned project resources according to different aspects, for example according to Expected Costs.
New Assignments
To create assignments, at least one resource must be existing in the project.
After you have created new resources you can select a line from the 'No resources assigned' area in the Assignments view and drag it with your finger to the name of a resource. The task will be then assigned to this resource and sorted underneath it.
Assignments can also be defined within the Work Breakdown view.
Report
The Report view lets you create reports from different view modules. Here you can combine any views to report the required project information.

You’ll find detailed instructions for Reports here.
Attachments
The Attachments view provides an overview of all attachments inserted in the project.
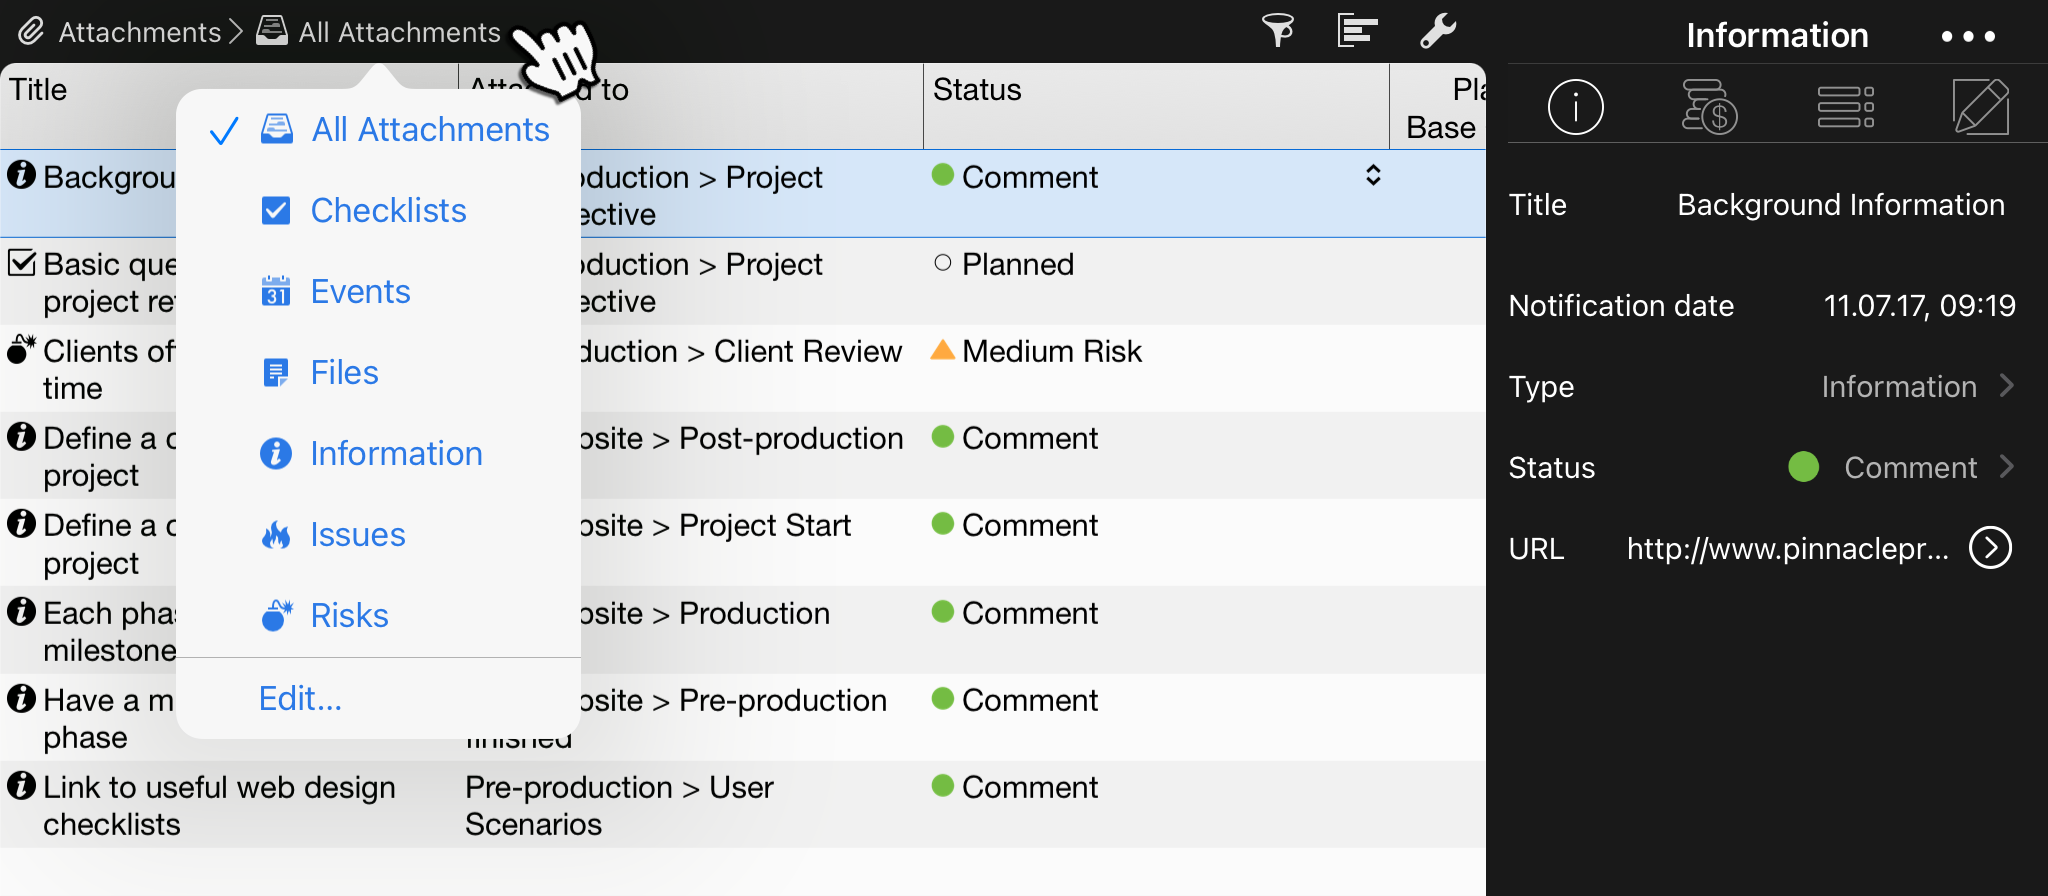
Tap All Attachments, to select a listing by type:
-
Checklists
-
Files
-
Events
-
Information
-
Issues
-
Risks
New Attachments
Tap and hold the + icon to insert new attachments:
|
|
Within an Attachments view, the + icon is disabled. In such a case, you need to switch to another view priorly. |
Settings
Tap the three horizontal lines icon to access the settings menu.
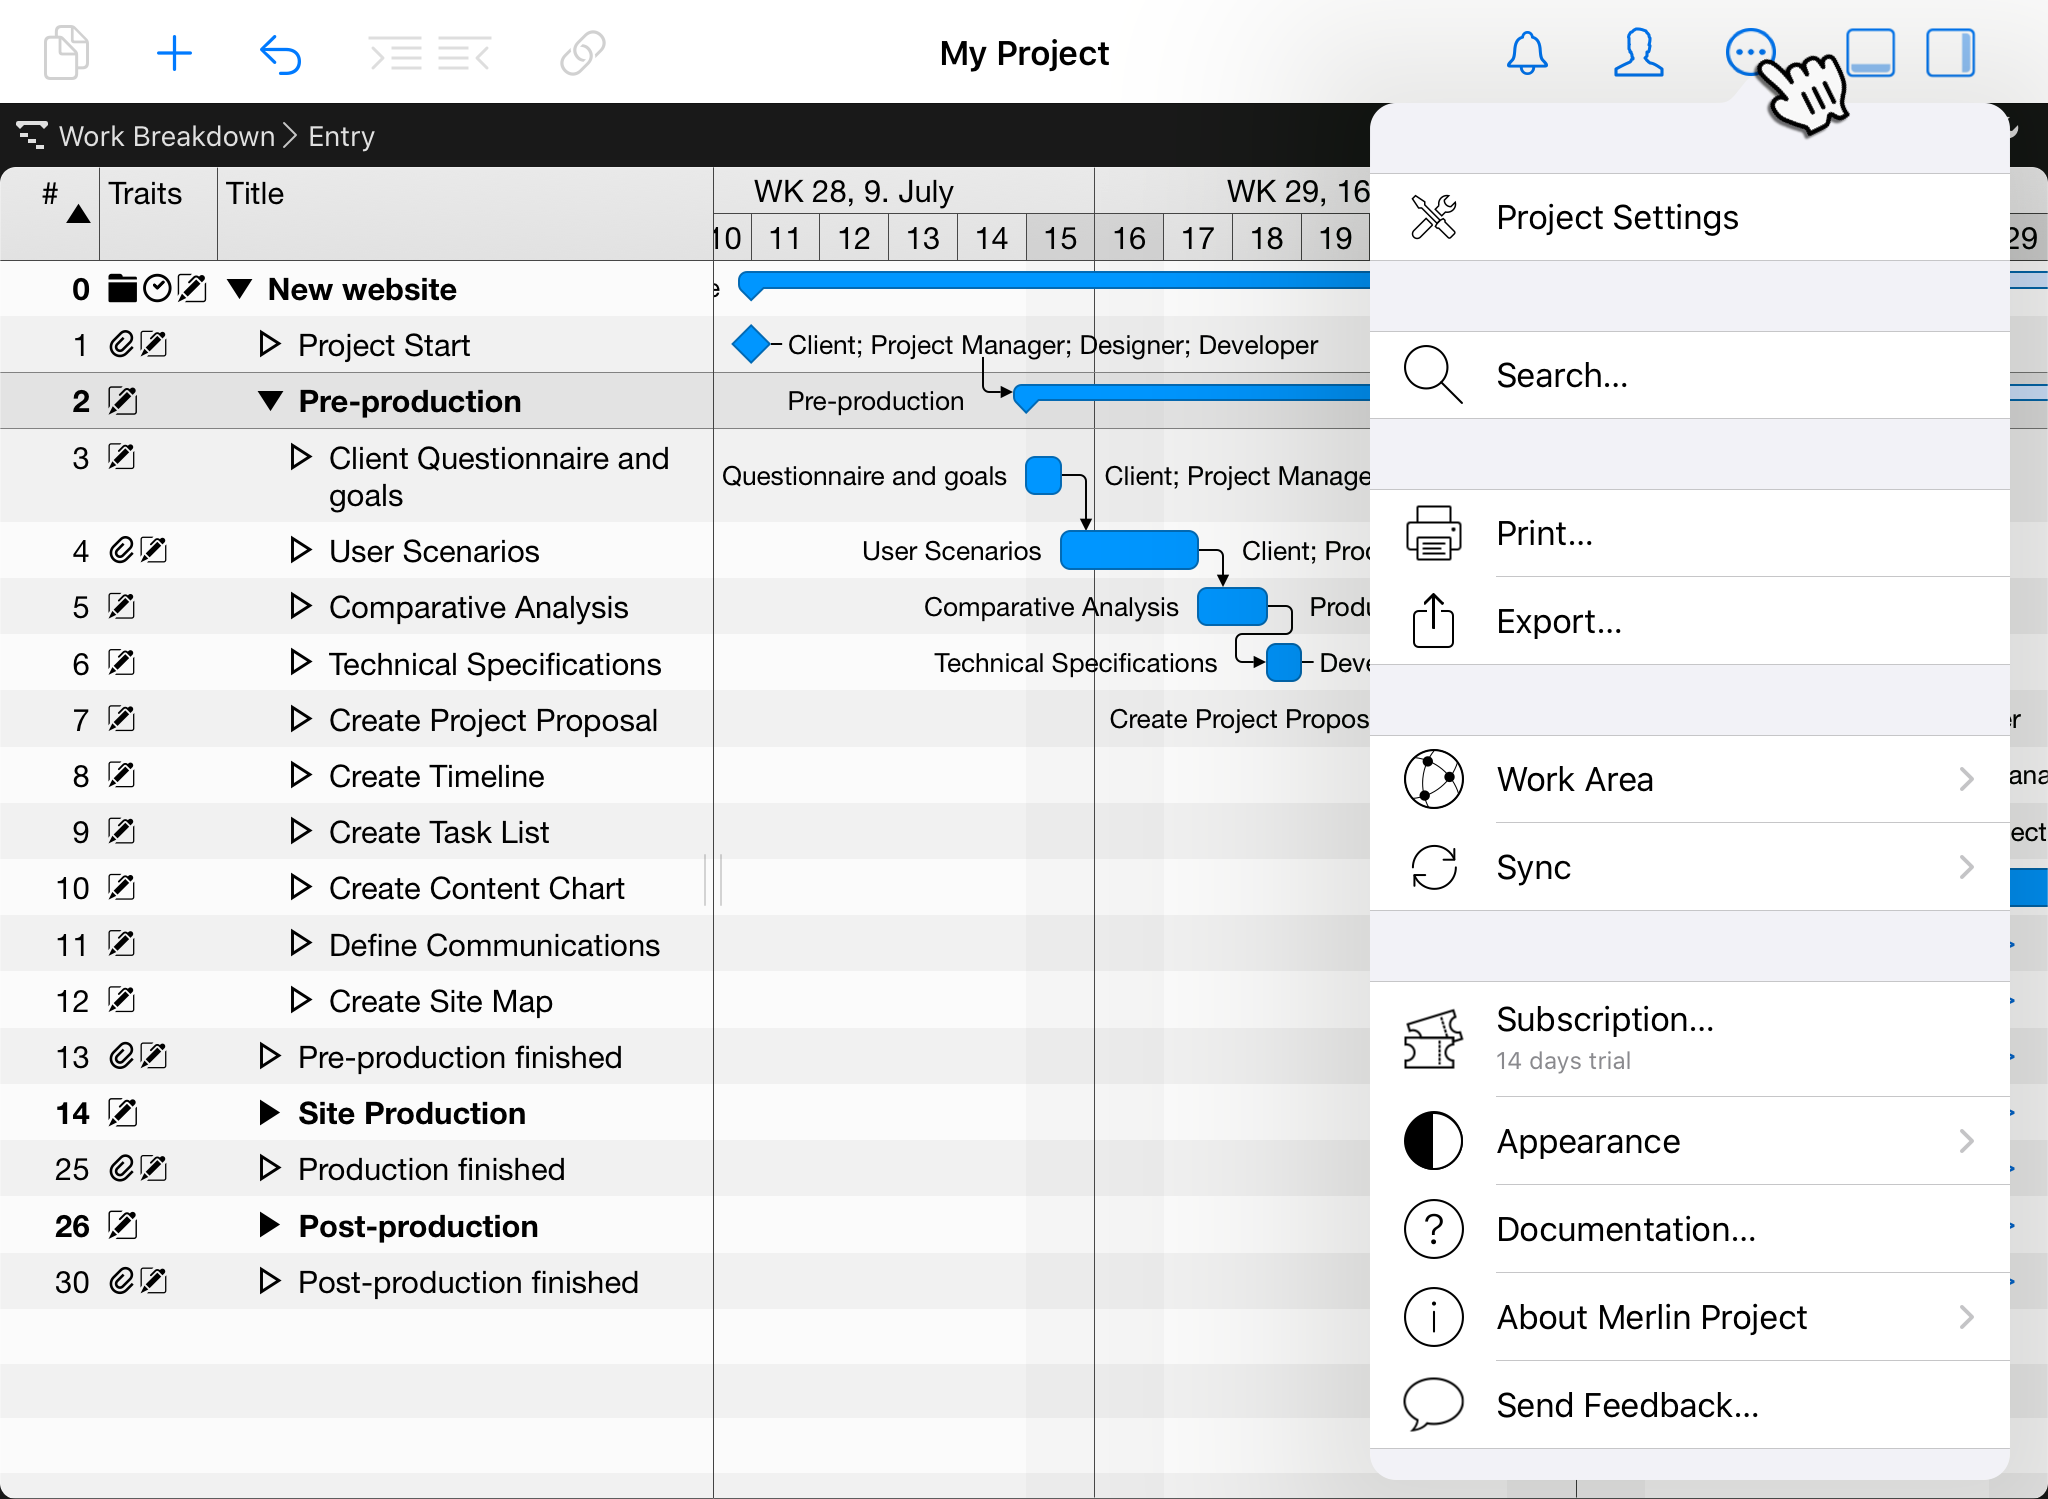
This menu includes following options:
Project Settings
The Project Settings are divided into various parts.
General Project Settings
Here you can configure the general settings for the project.
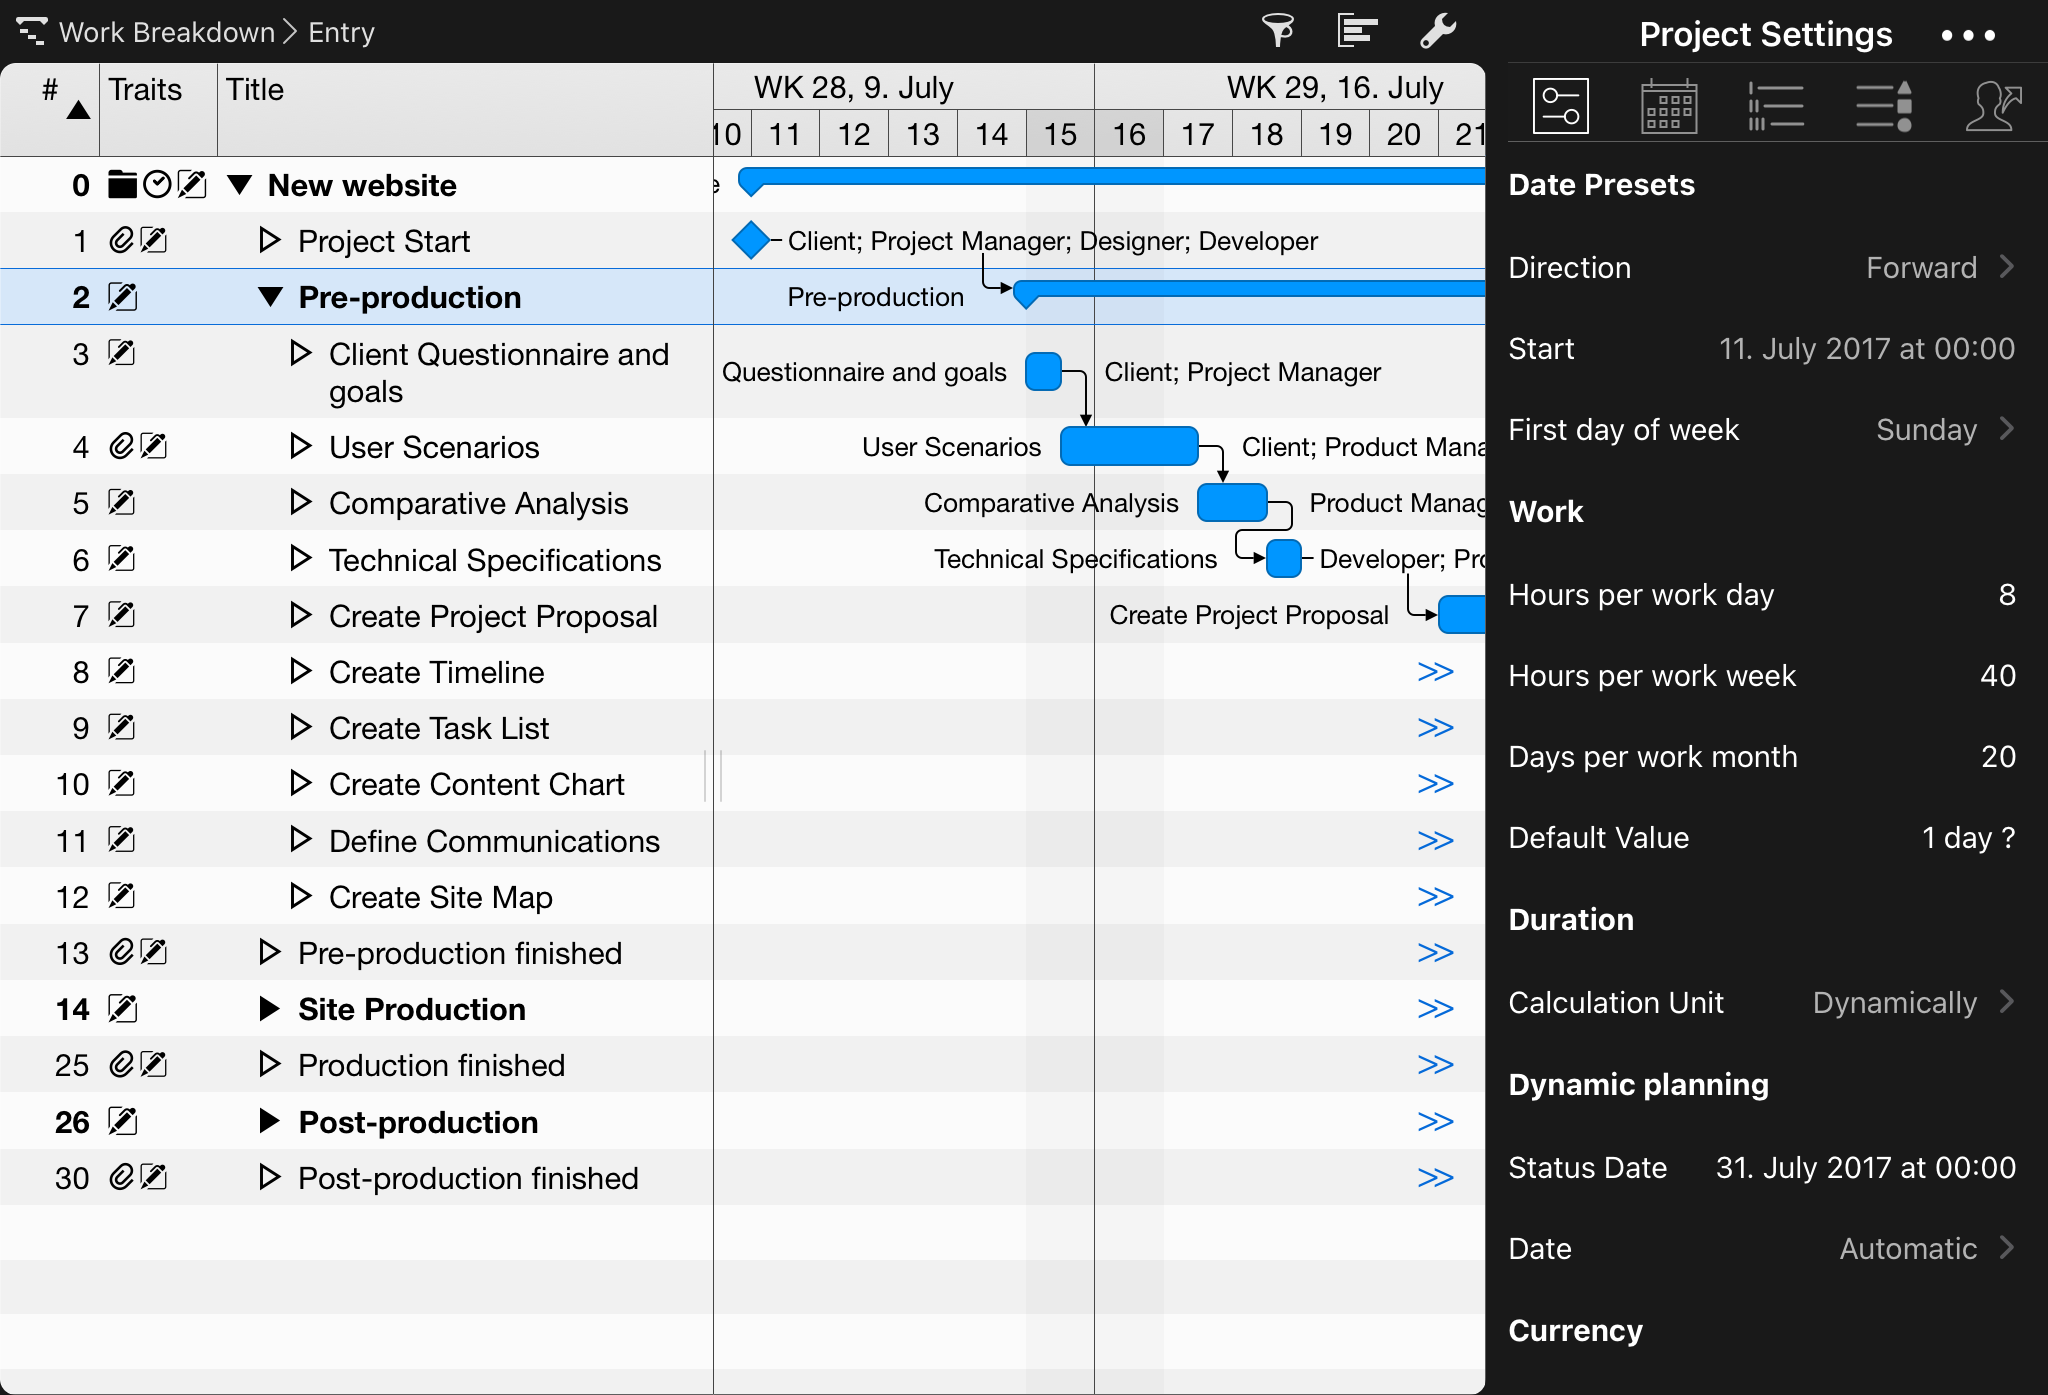
Settings are available for the following areas:
-
Date Presets
-
Work
-
Duration
-
Dynamic Planning
-
Currency
|
|
Tap on the '…' button to see more editable settings. |
Calendars
Under Calendars you can configure the calendars for the project.
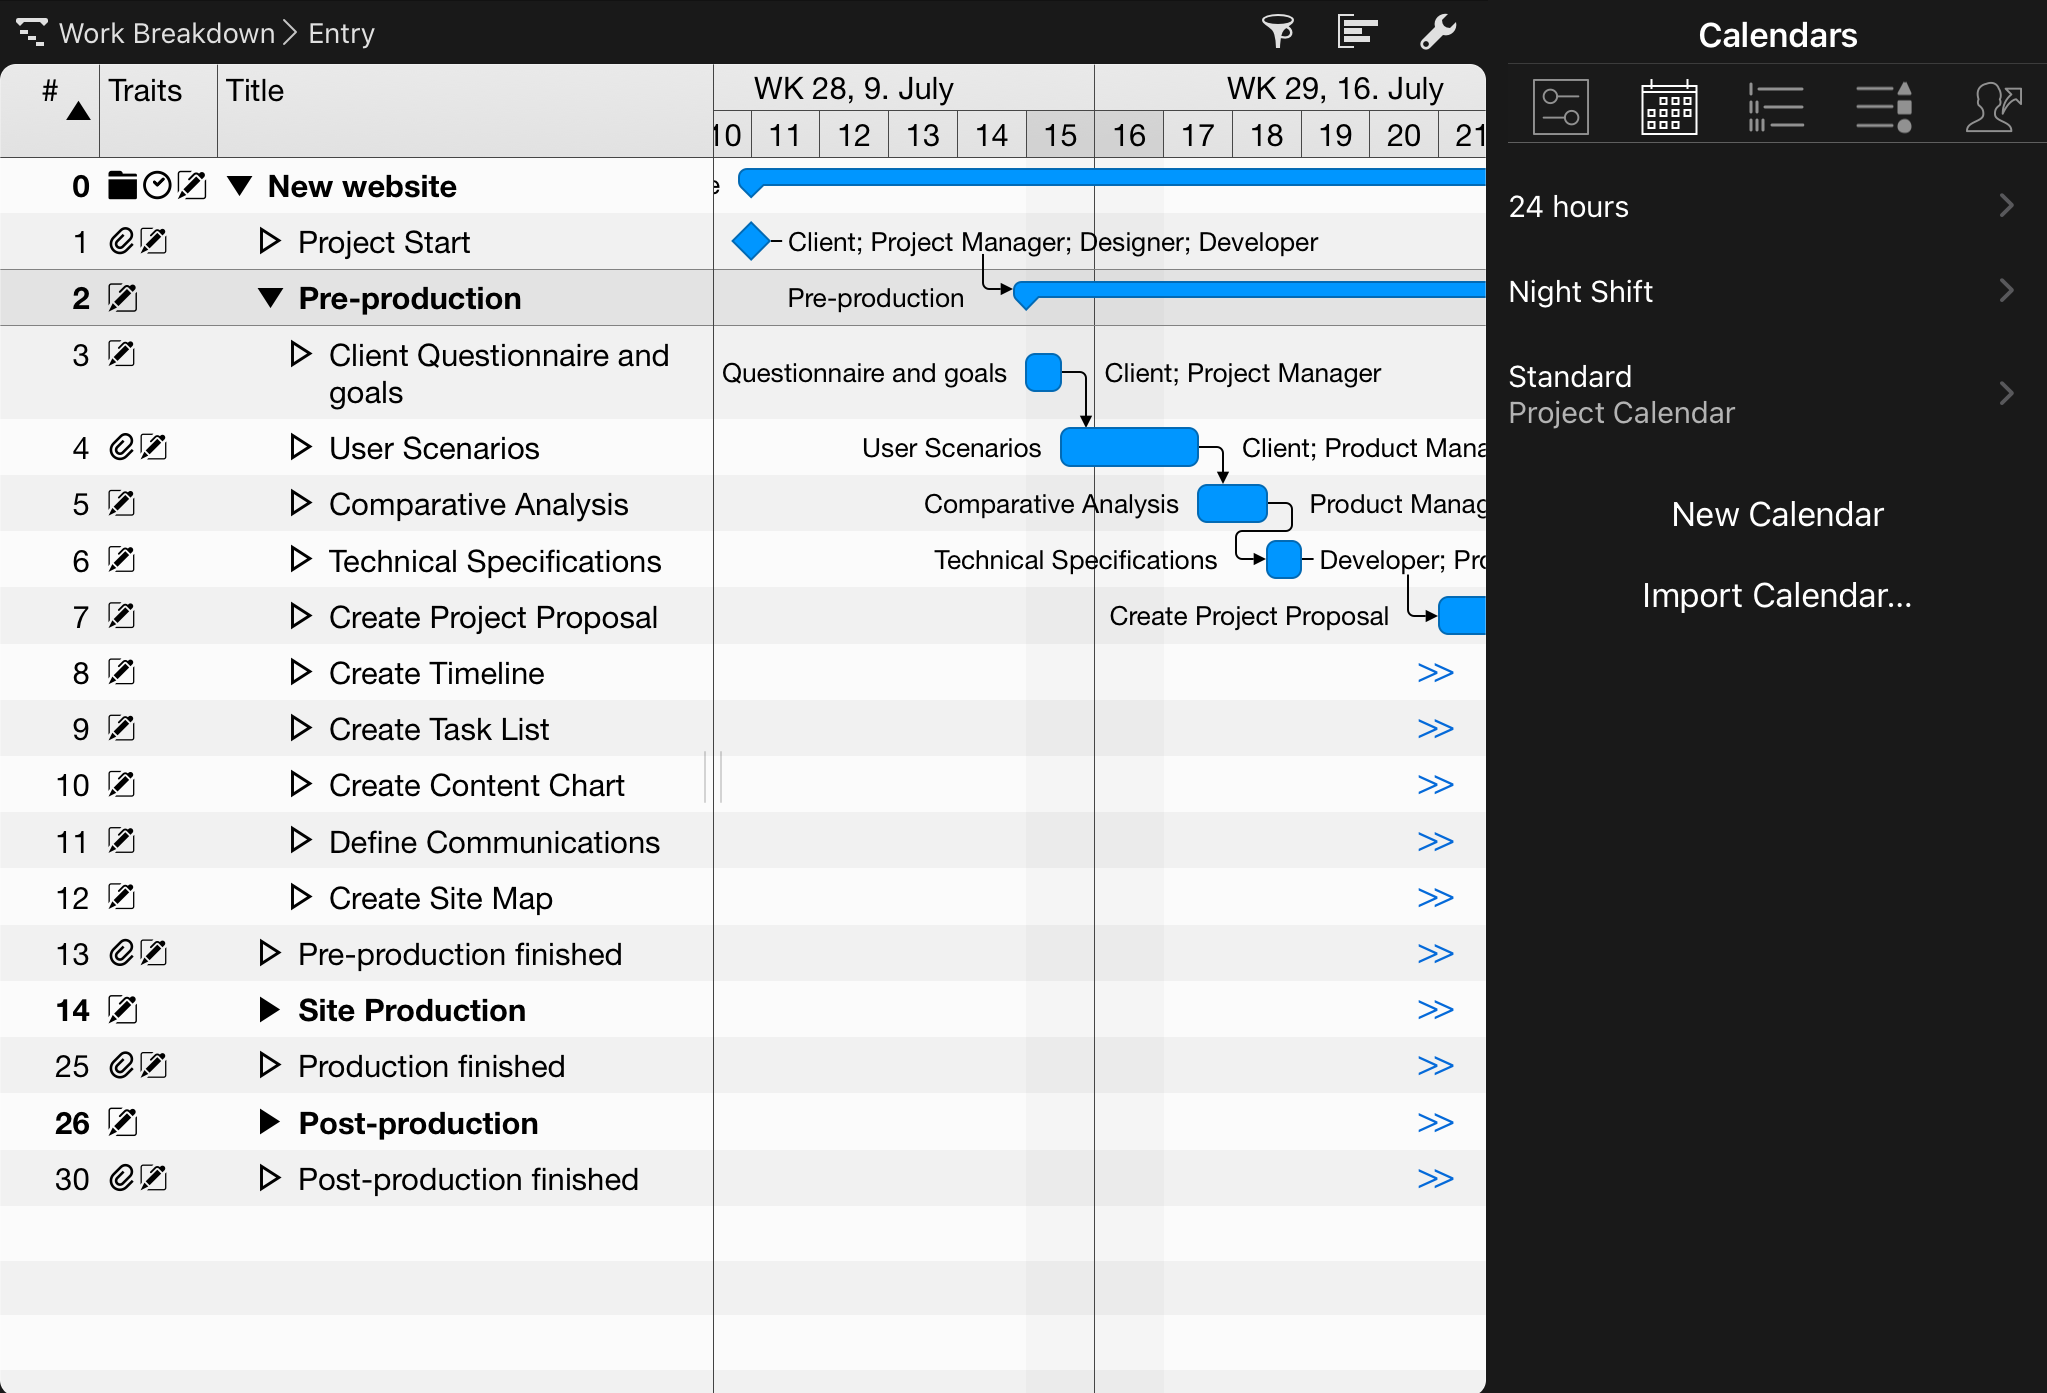
You can select another calendar as project calendar, insert new calendars, or edit regular working week and exceptions for working and non-working times.
Codes
The settings for Codes control the display and output of Outline Codes and WBS Codes.

Tap the + icon to create a new code formatting. Following that, tap the relevant fields in the row to select the options. The setting you have configured for the code is displayed as an example below the list.
The WBS Codes offers you two additional options:
-
Generate code for new tasks
-
Verify uniqueness of new codes
Value Lists
Value Lists are for use with attachments in Merlin Project.
Here you can modify existing value lists for the attachments or costs.

First select an attachment type from the For drop-down menu, and then tap the + icon to create a new entry in the value list.
Change the name of existing entries by double-tapping the title of the entry.
Tap the - icon to remove values from the list.
Utilization
Under Utilization you can configure the utilization settings for the project.
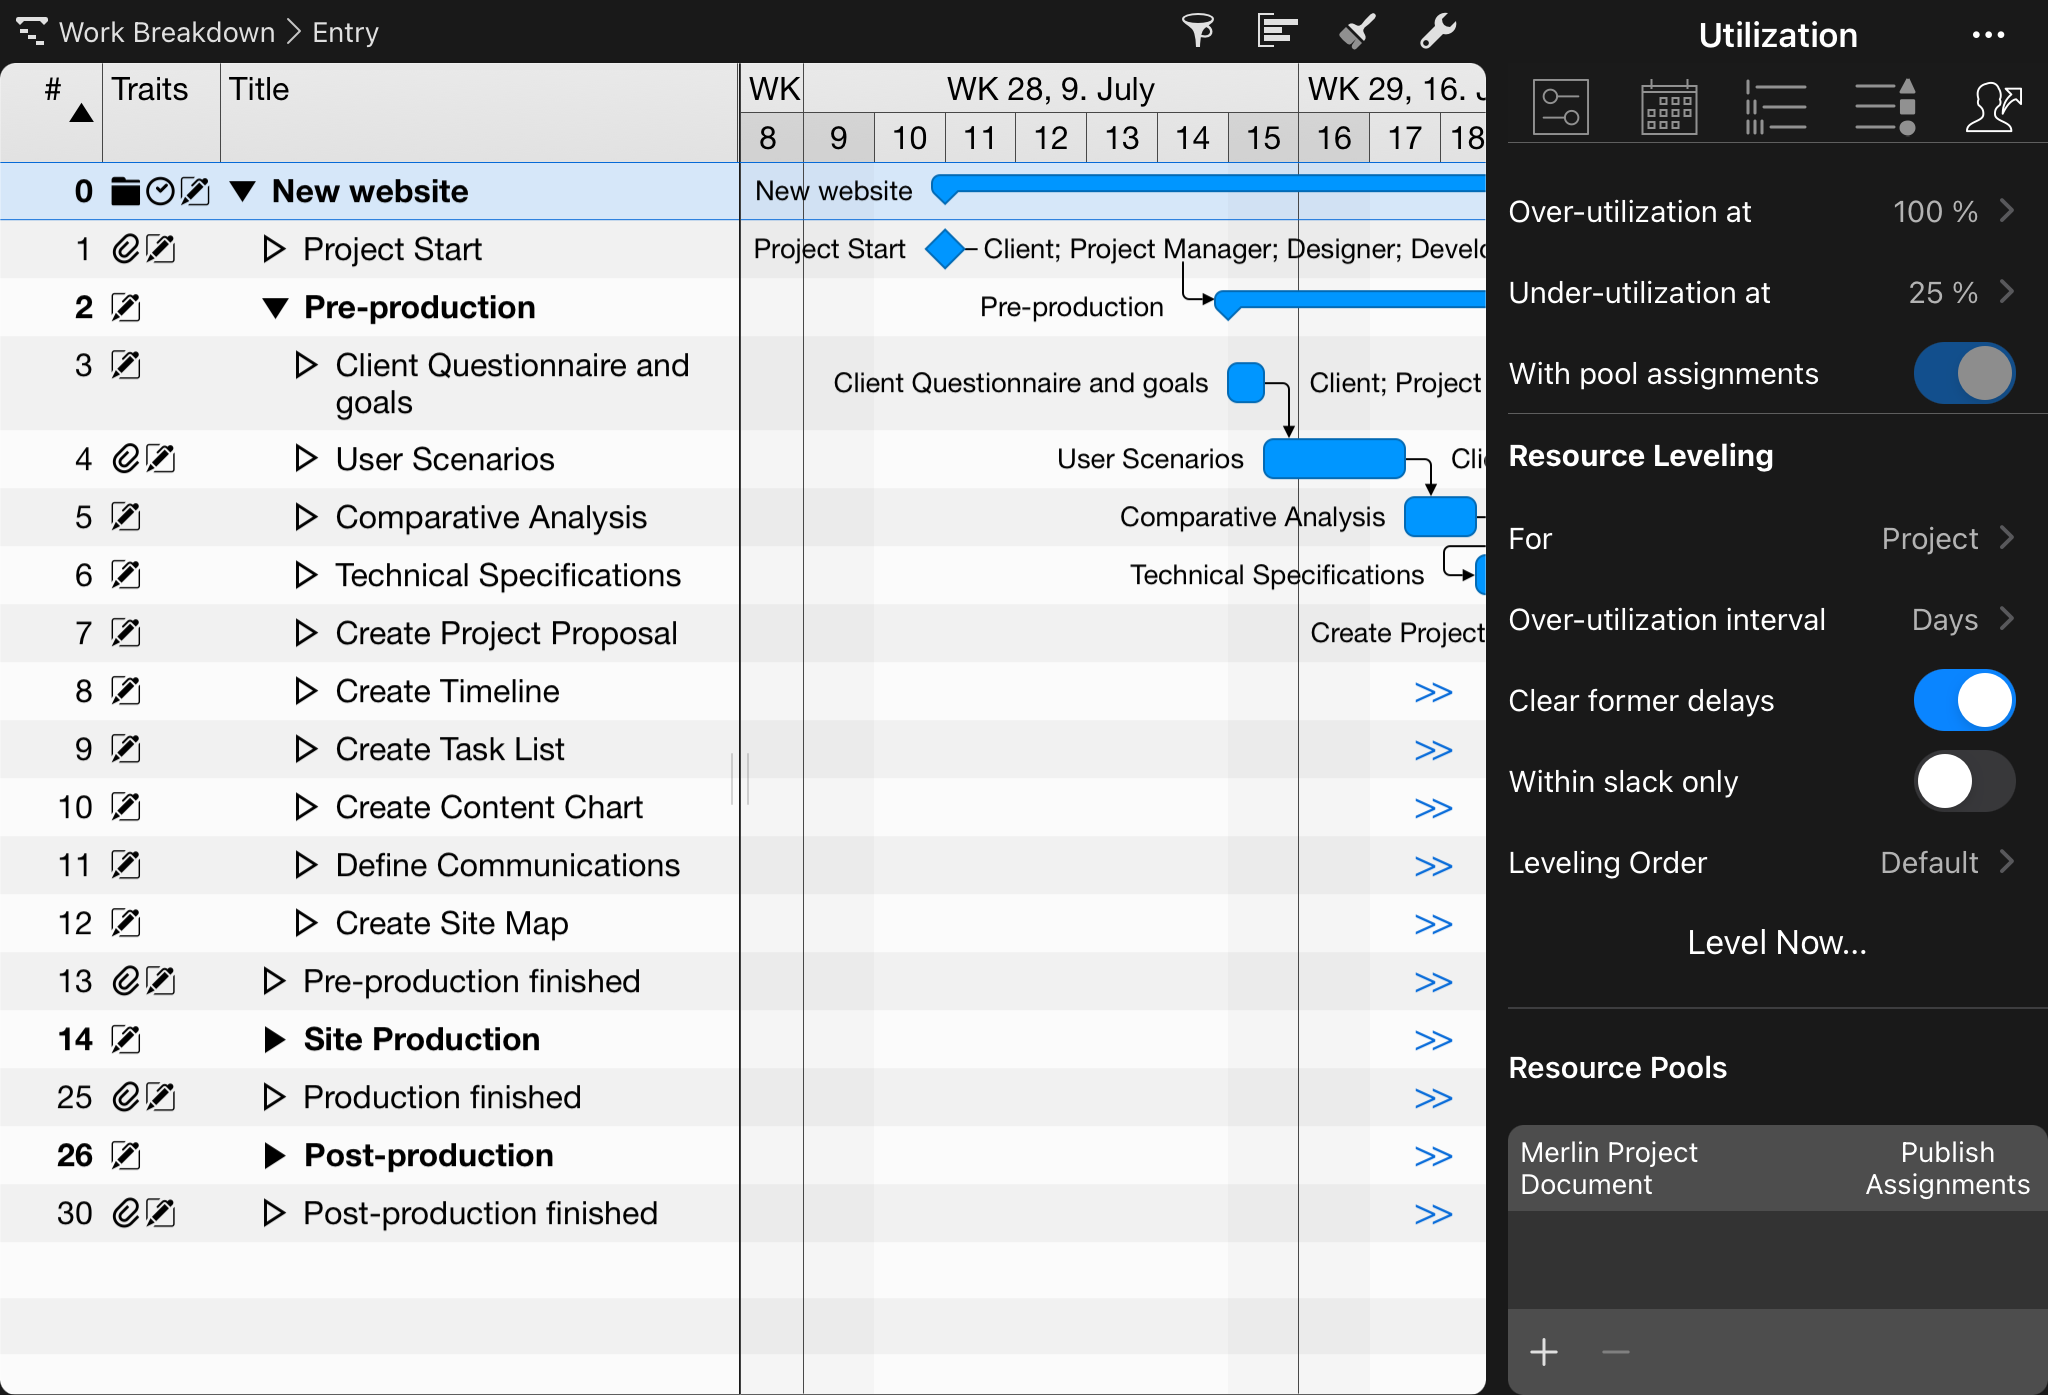
Settings are available for the following areas:
Utilization calculation
Three options are available for Utilization Calculation.
Here you can set the % values for the over-utilization and under-utilization thresholds. These values have a direct influence on the utilization calculation in the project.
The With pool assignments option also lets you include resources assigned from resource pools in the utilization calculation.
Resource Leveling
You have a multitude of options at your disposal to perform resource leveling in the project:
-
For (entire project or an area)
-
Over-utilization interval (unit)
-
Clear former delays (on by default)
-
Within slack only (off by default)
-
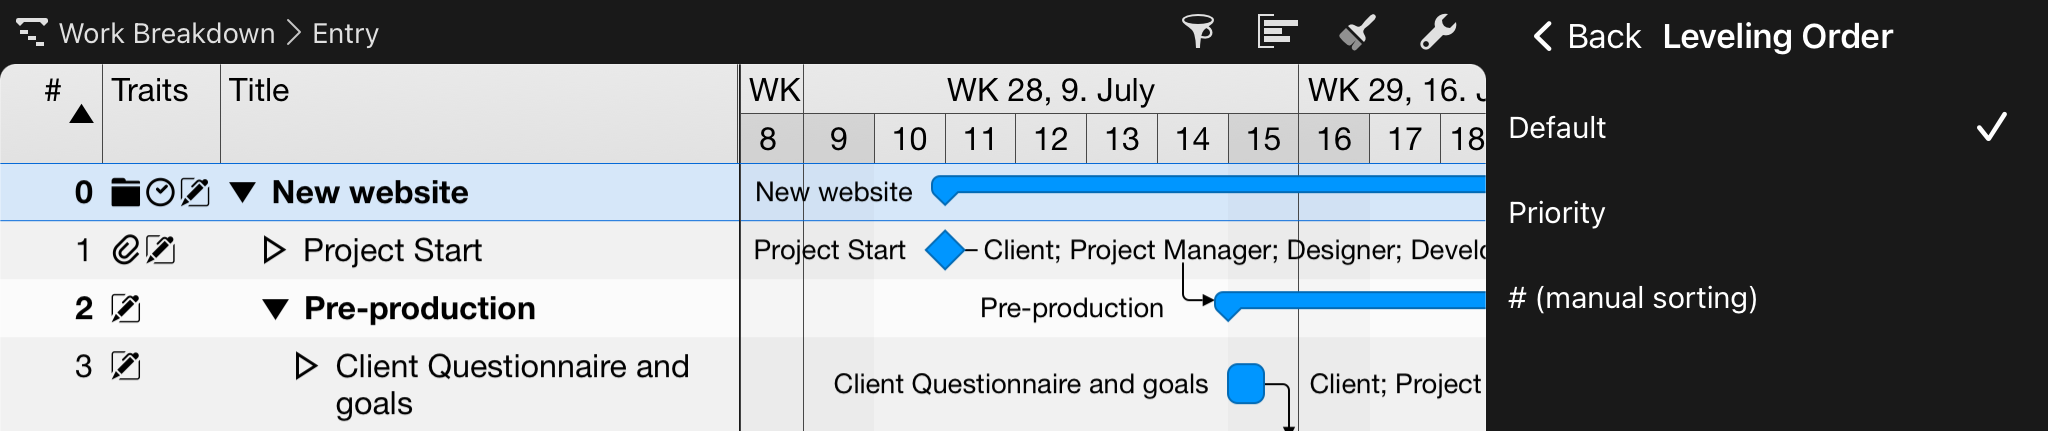
Leveling Order (default, priority, or # manual order)
-
Level Now
Click the Level Now gear icon and select one of the leveling options:
-
Level All
-
Reset All (restores the original state)
-
Level Selection
-
Reset Selection (restores the original state)
Resource pools
Project files can be added as pools in the Resource Pools list.
The Publish Assignments option lets you forward assignments of resource pool resources back to the resource pool.
Search
To search for content within the visible columns of your project, tap the icon with the three horizontal lines in the upper right corner. Select Search from the drop-down menu.
If you enter a term in the search box, all hits will be highlighted automatically in the view, making them easy to spot.
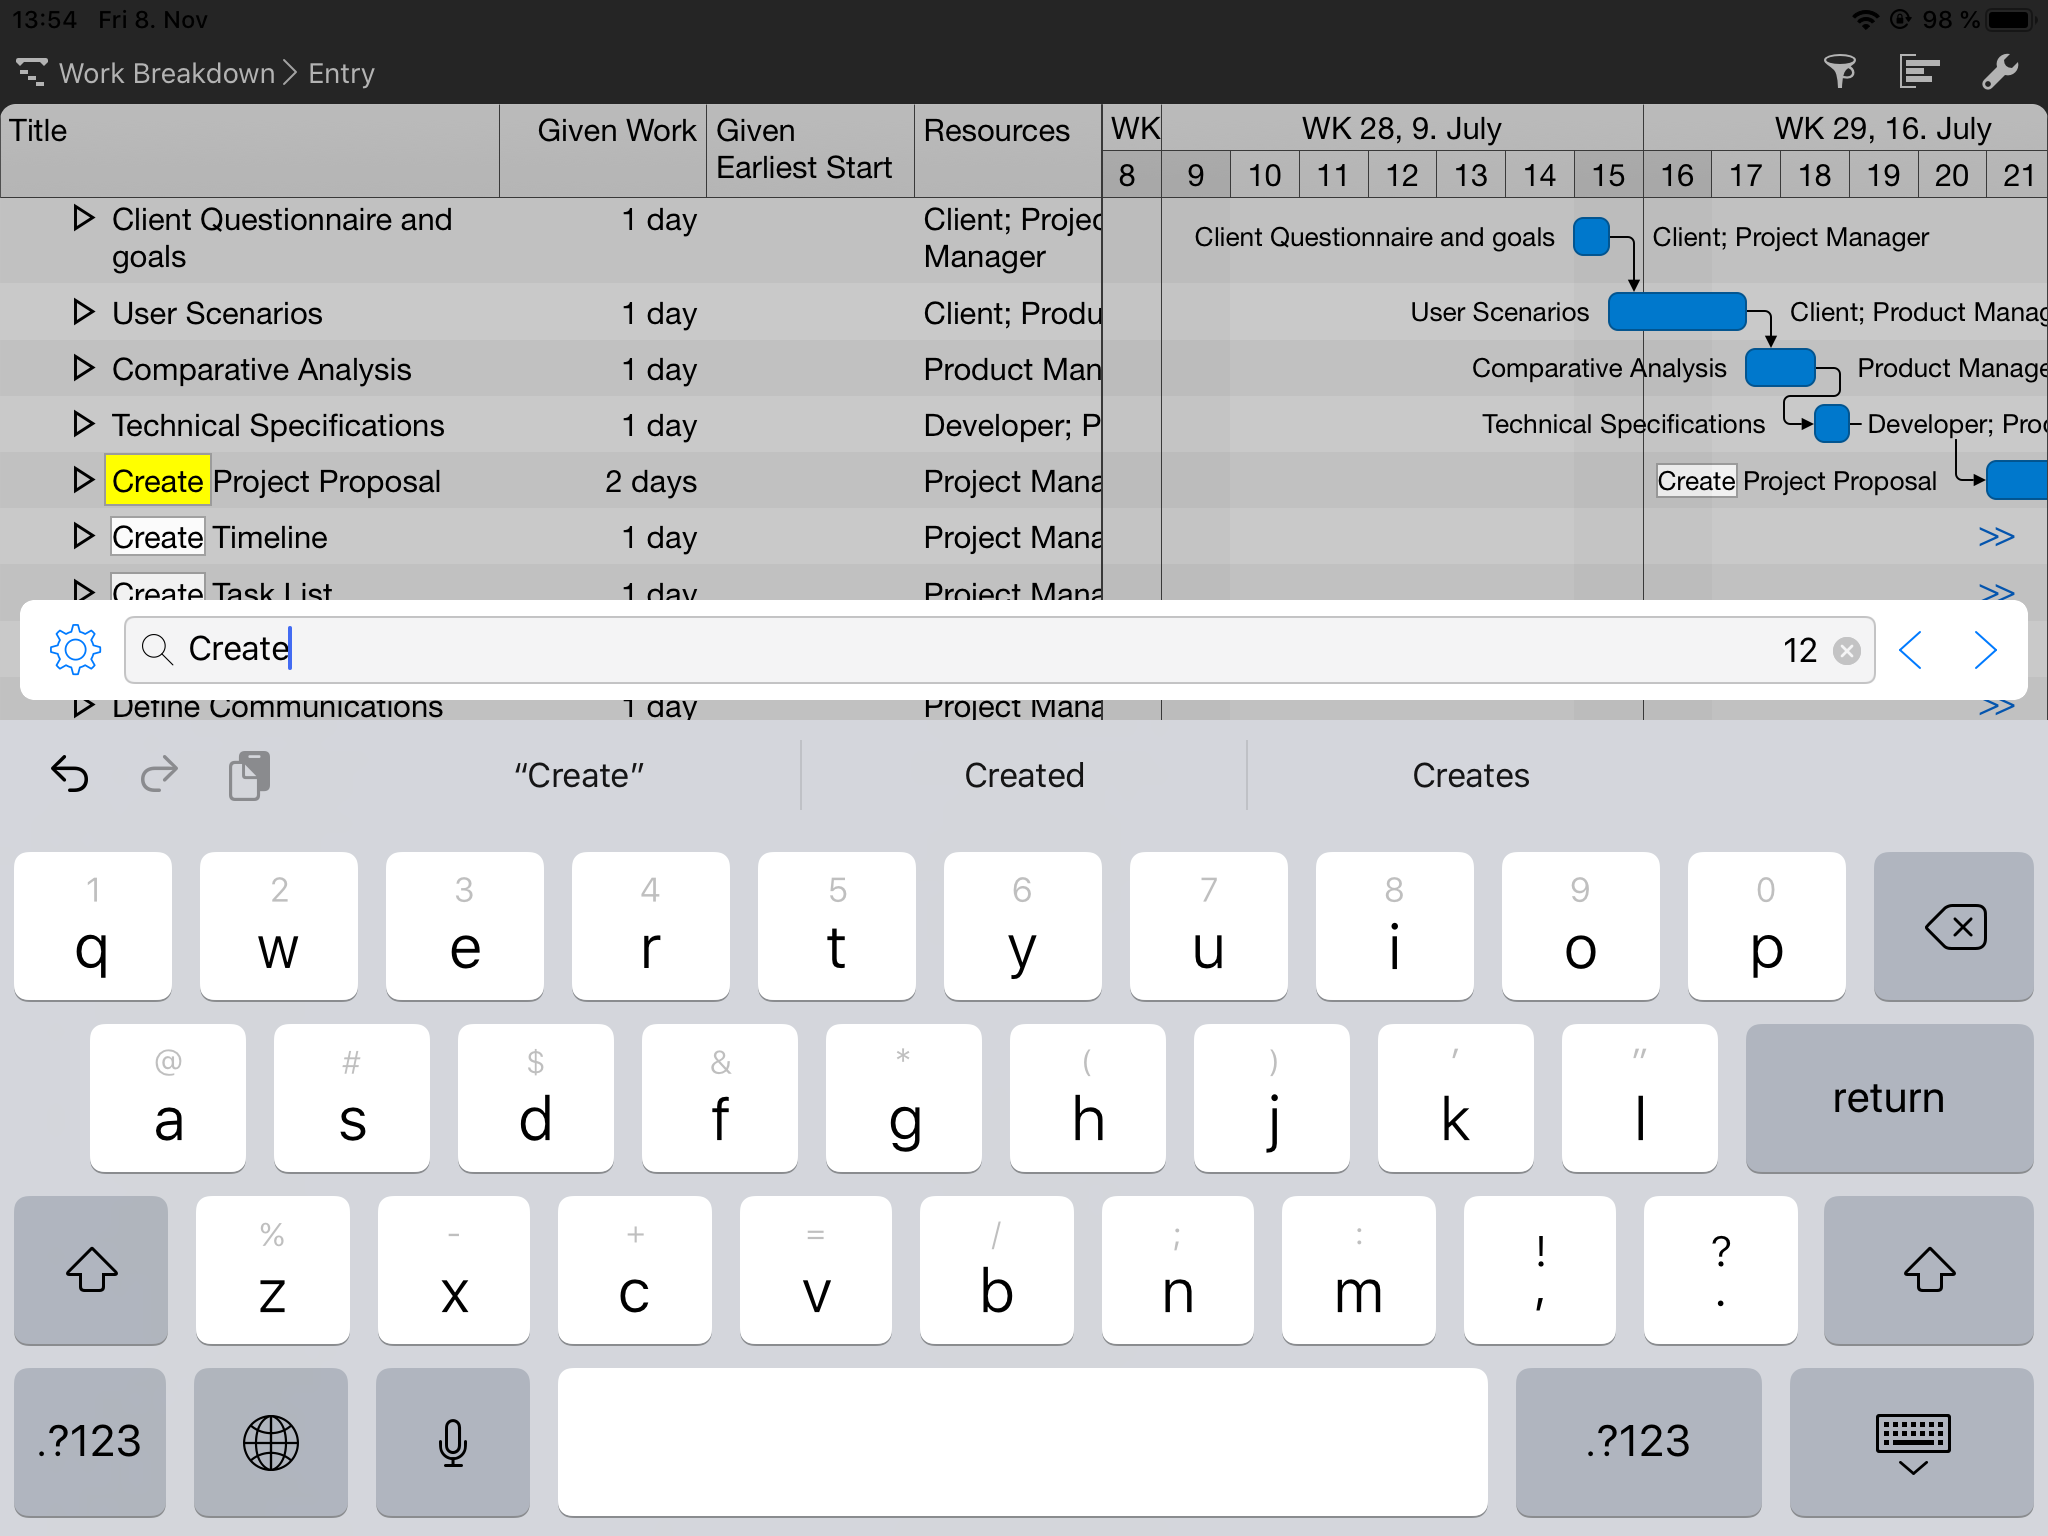
Use the < and > buttons to see next finds.
You will find the gear icon on the left side of the search box. Tap it and a menu will appear with the options shown.
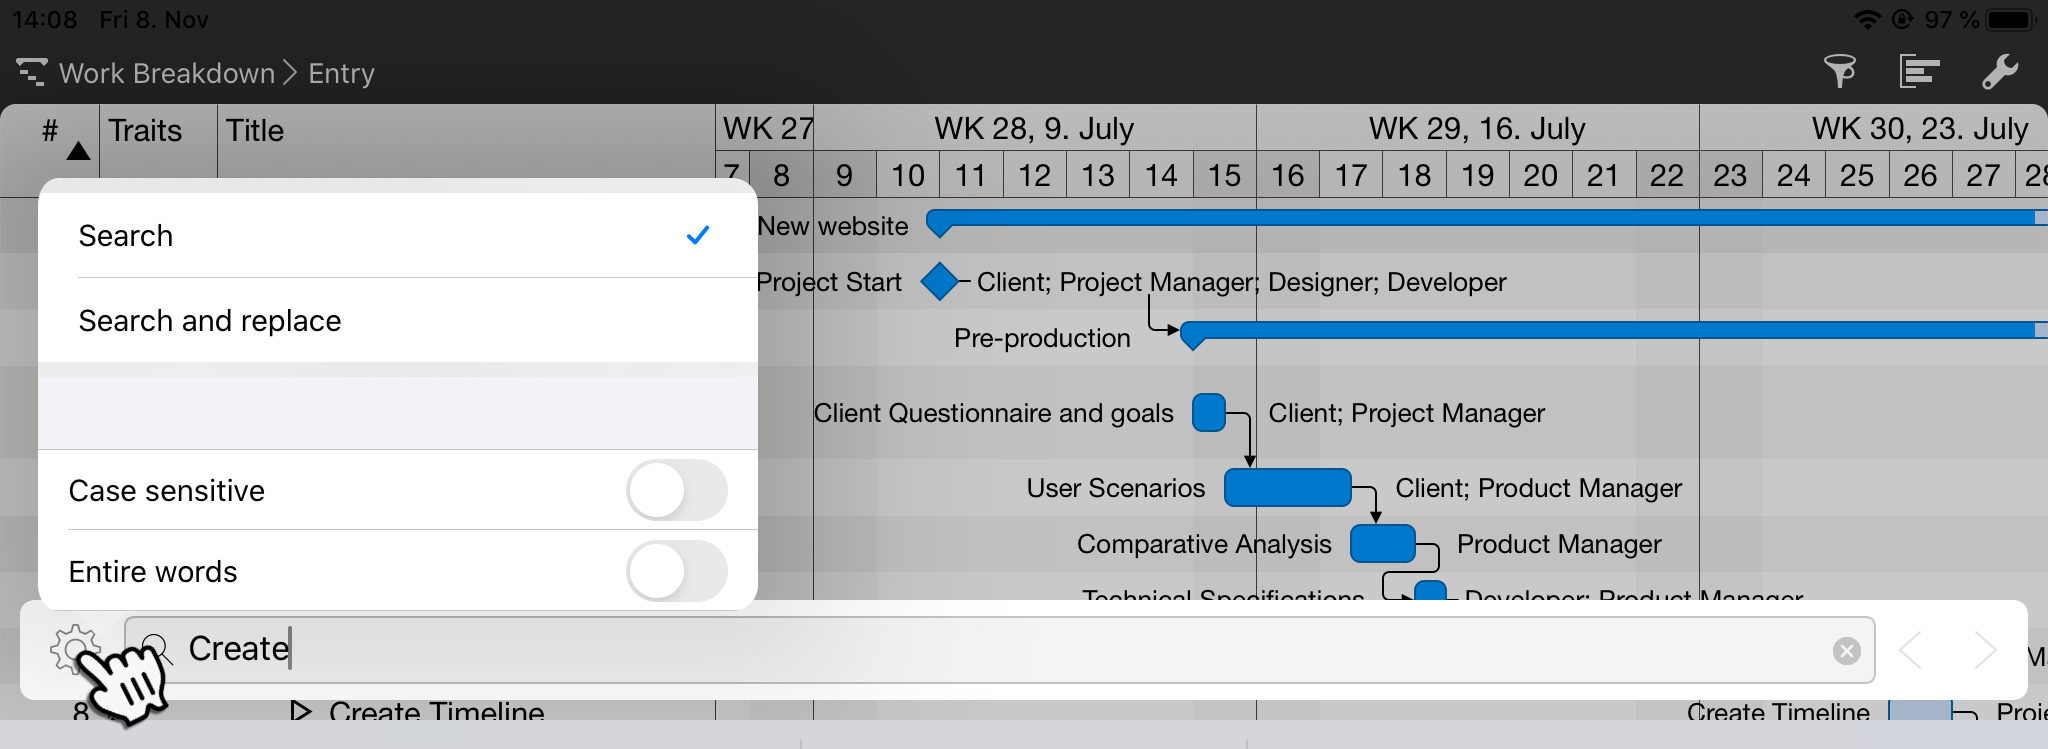
To replace the searched text, tap the gear icon and enable the Search and replace function.
Enter the word(s) in the according field you want to replace the hits with .

When done, tap on the Replace button.
First, make sure that your printer supports AirPrint.
To print your project view, tap the icon with the three horizontal lines in the upper right corner. Select Print from the drop-down menu.
In the following print dialog you have various options for the printout.
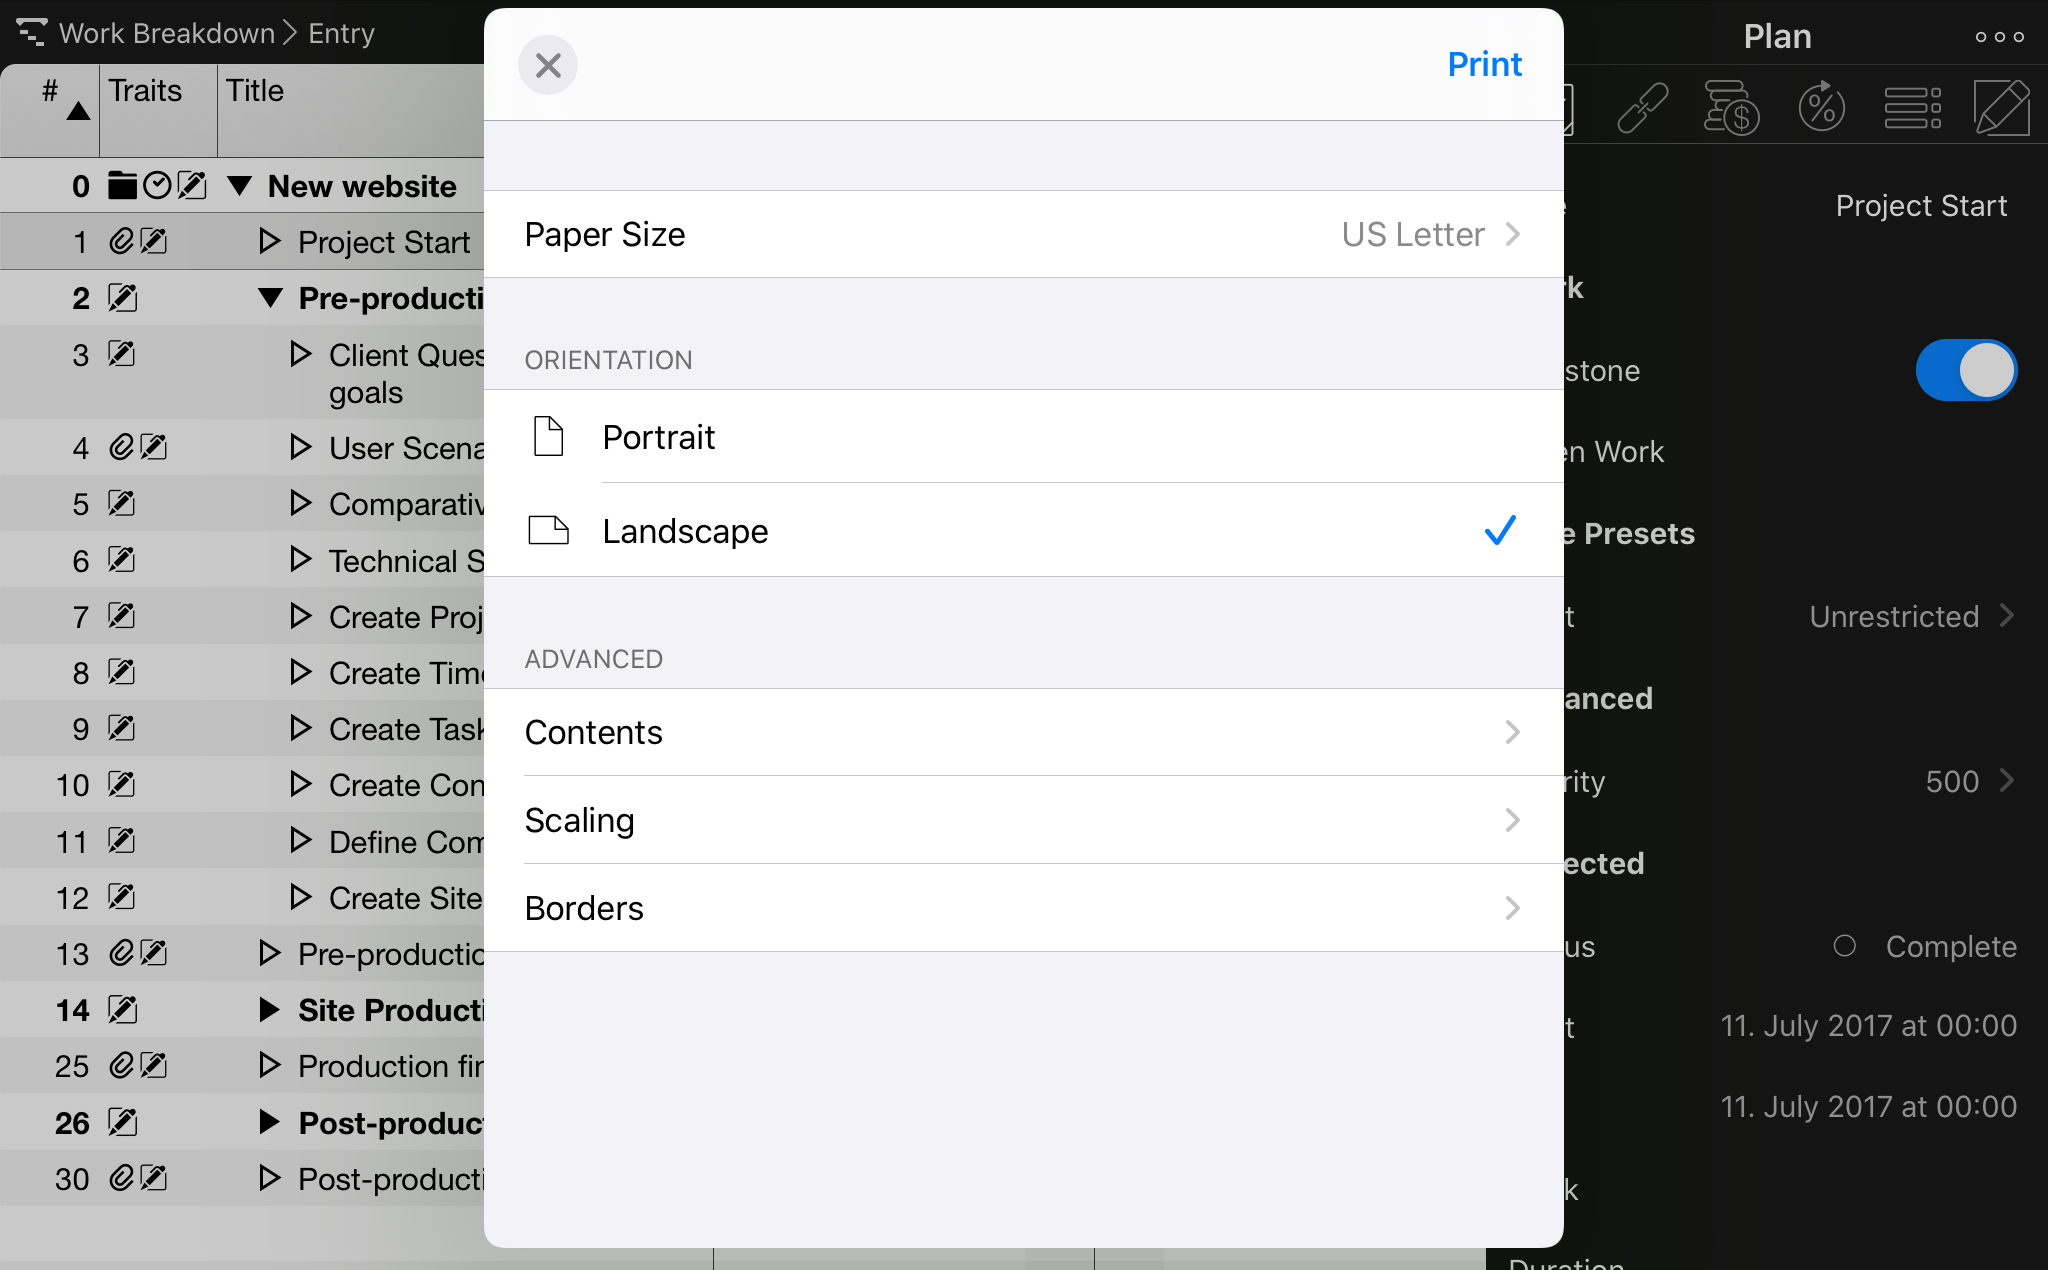
Here you select the paper size, orientation and can set advanced options for the printout.
After you have finished setting up your printout, tap Print.
The preview of the printout appears with the selection of the desired printer.
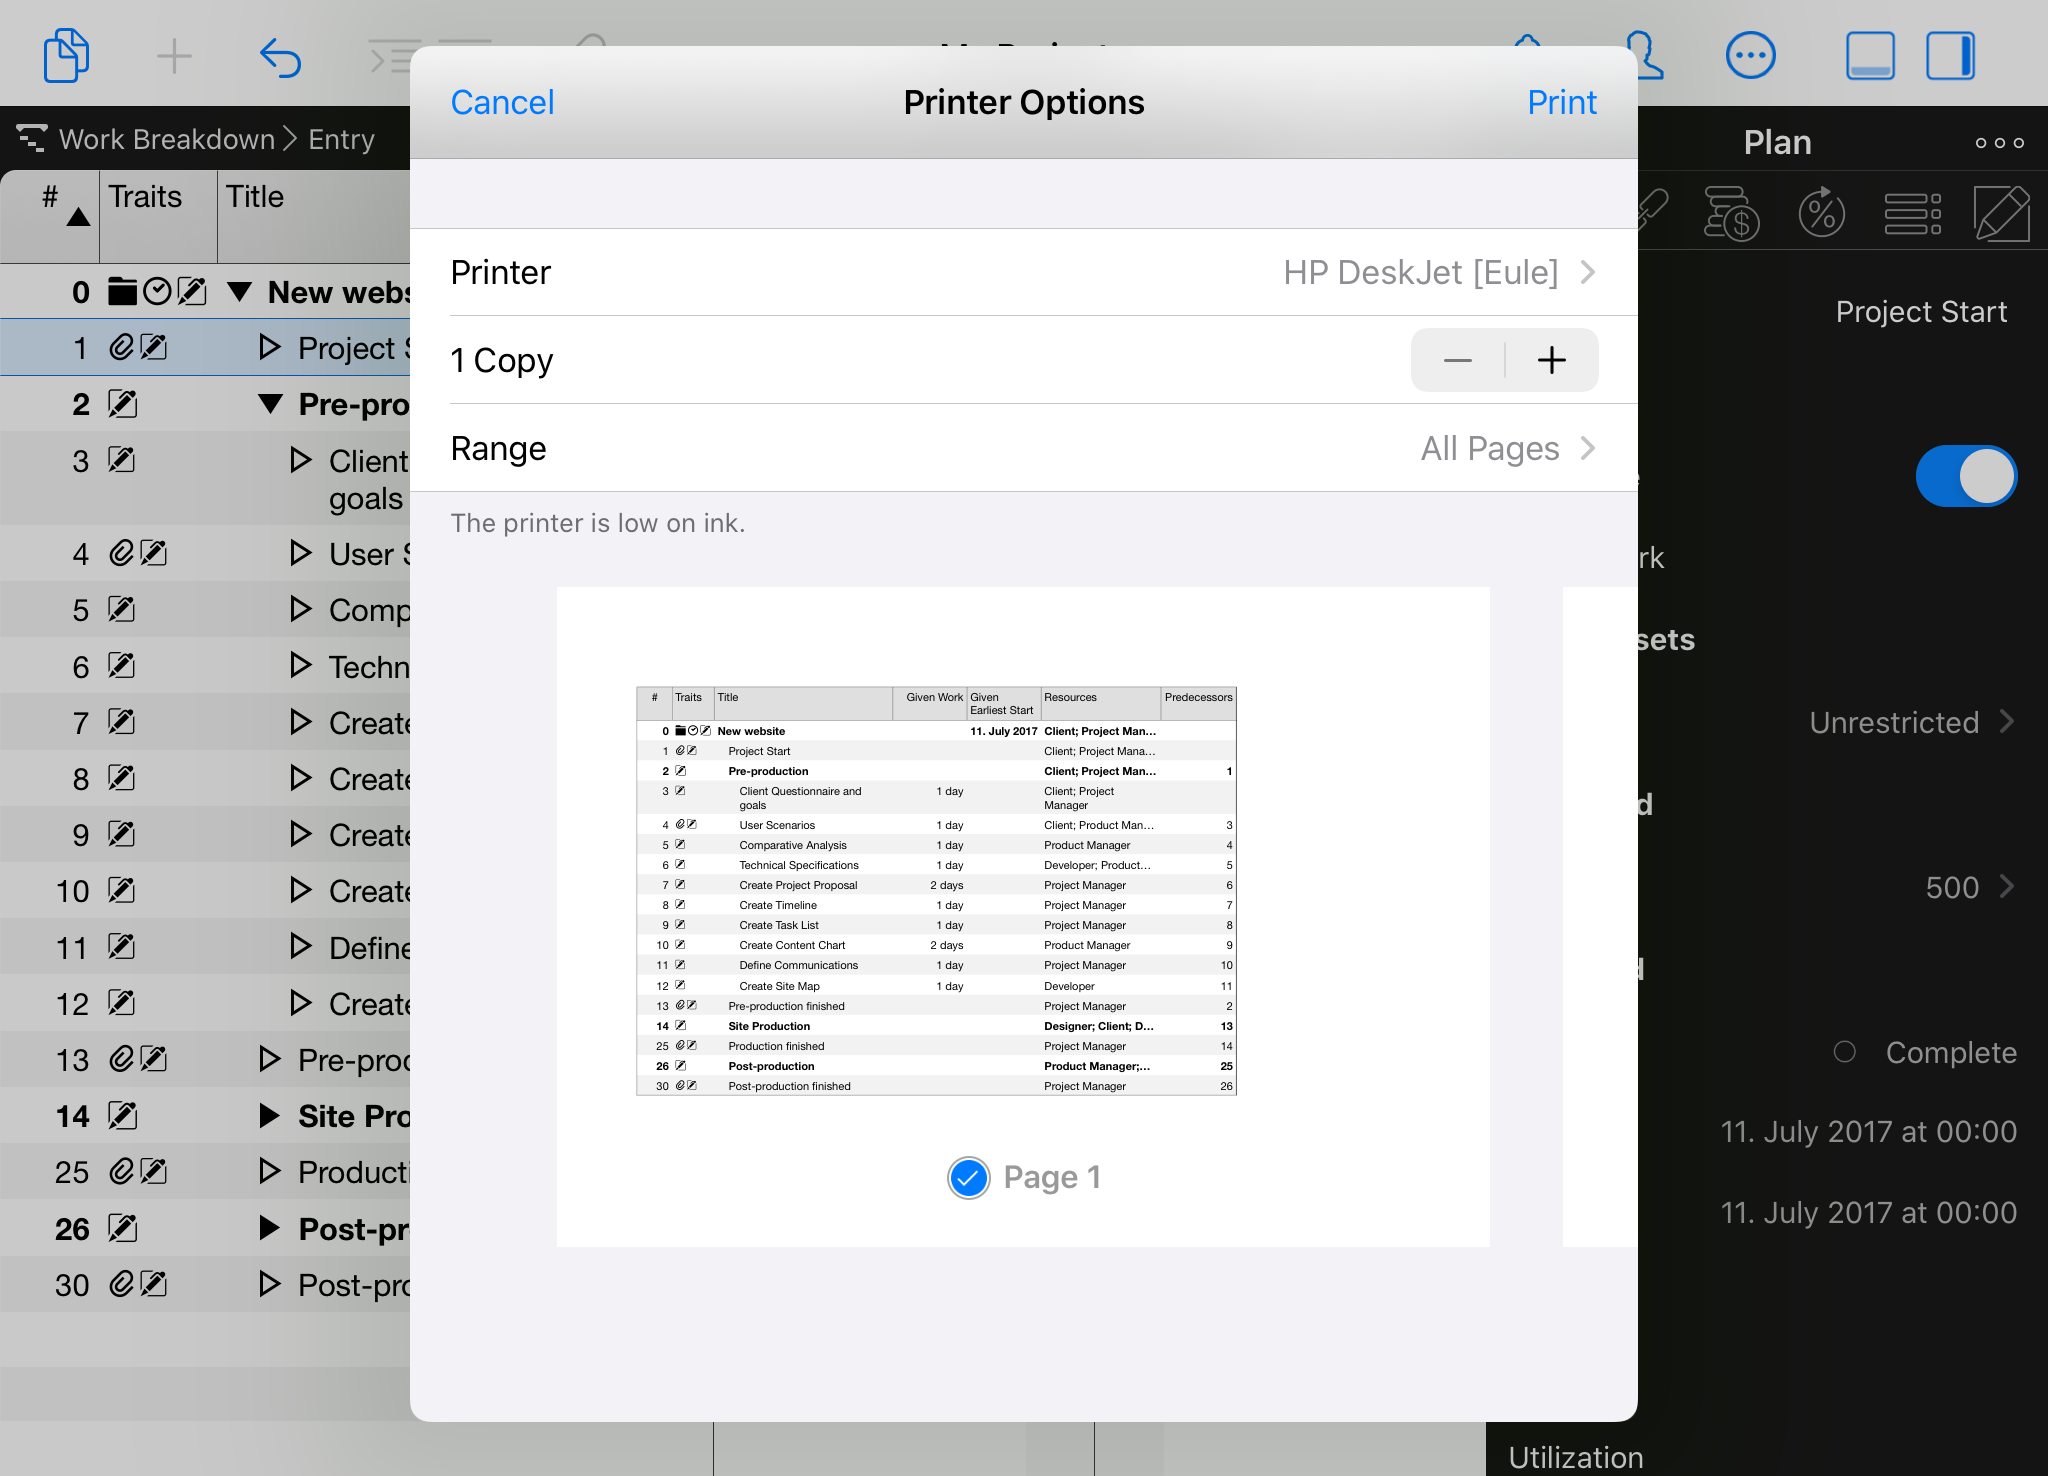
With a two-finger pinch gesture, you can open the preview of your printout and view it page by page.
|
|
Tap on the 'Share' icon to send this view as PDF via AirDrop, Mail, etc. |
Select your printer.
By default, a copy of the printed pages is created. Tap the + or - icon to print more or less copies.
If the printout consists of several pages, the area can be defined with the option of the same name. By default, all pages are printed.
After you have configured your printout, tap Print again.
Advanced
Under Advanced you will find options for the following print settings:
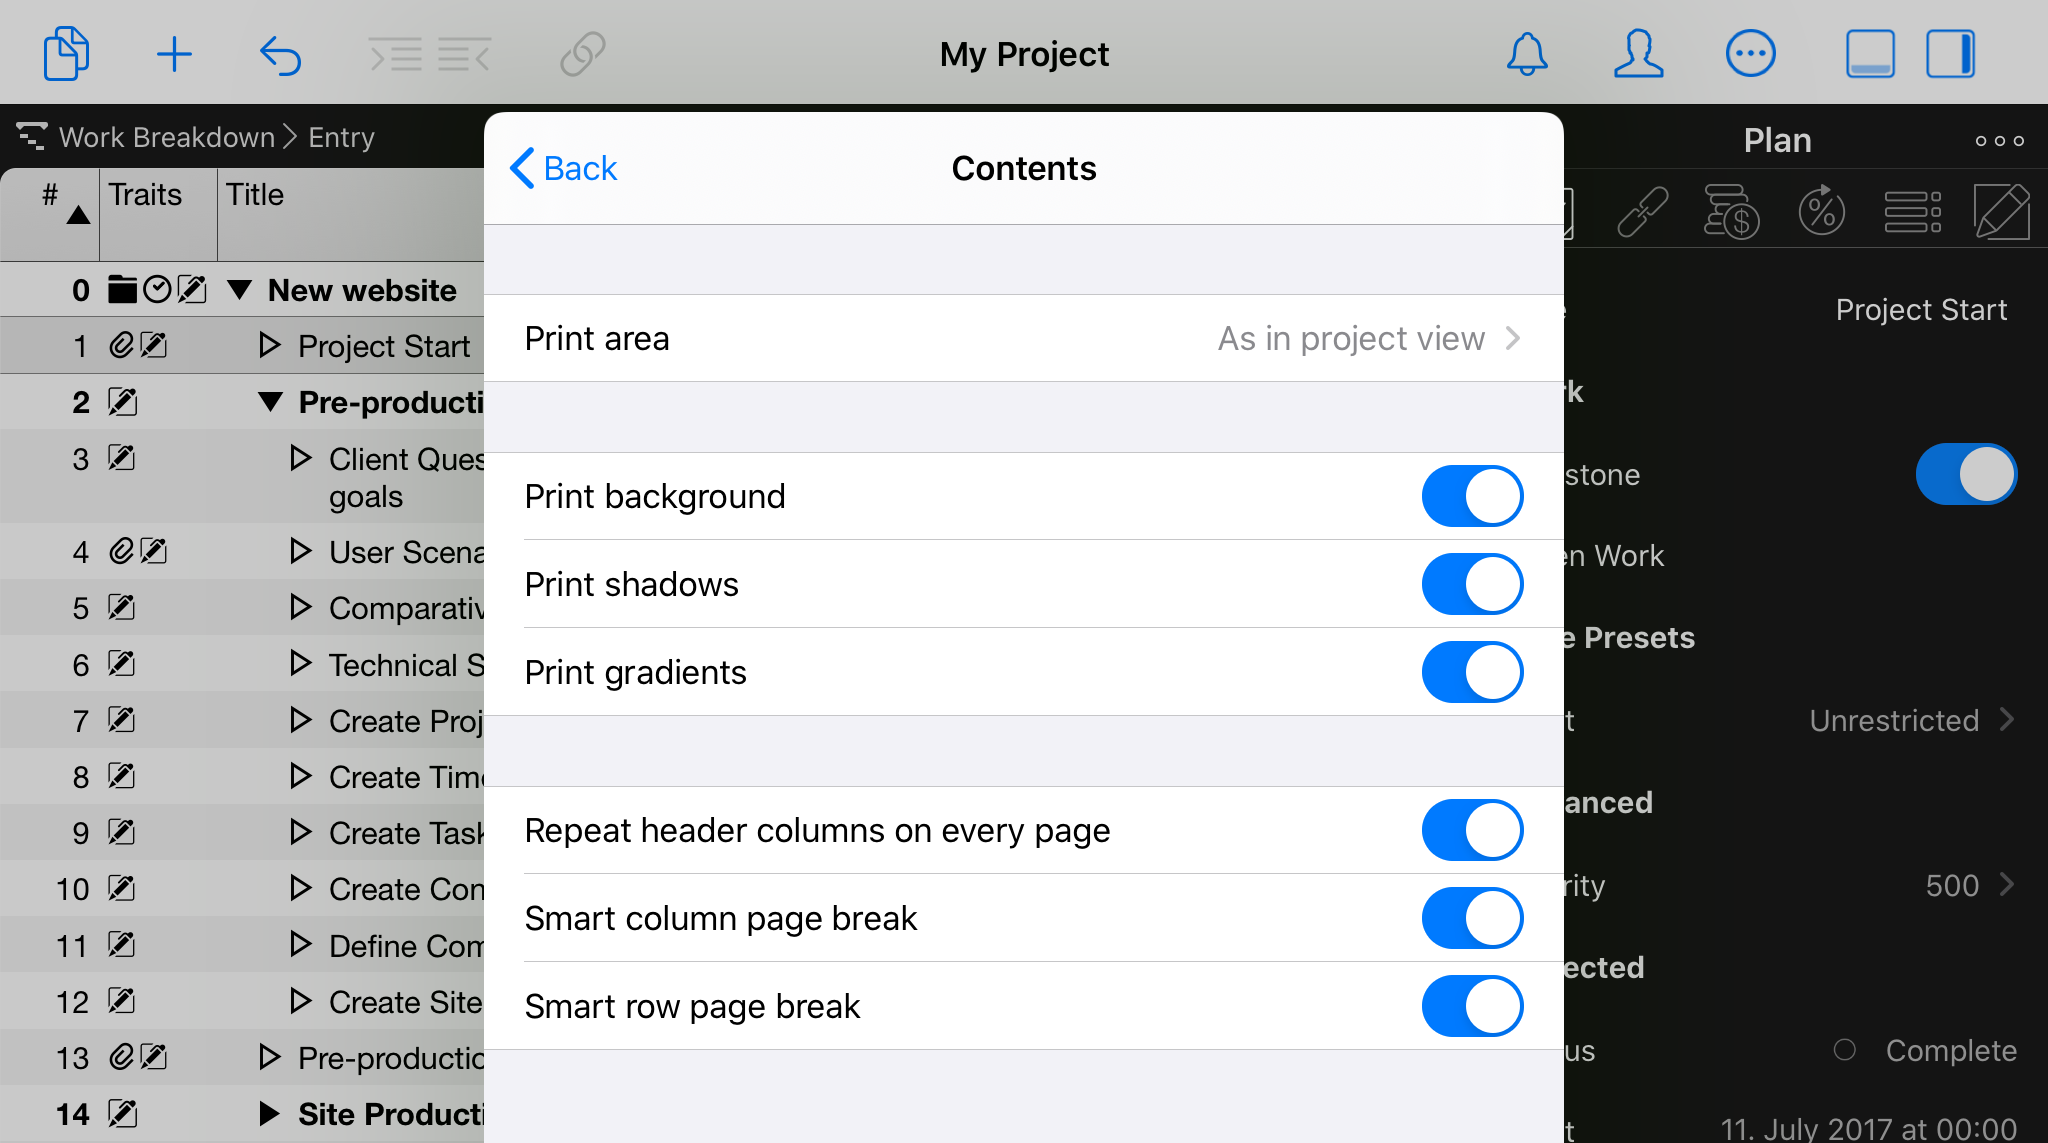
Contents
The Contents print settings provide options for adjusting the print area, background, shadows, and gradients:
-
Print area
-
Print background
-
Print shadows
-
Print gradients
-
Repeat header columns on every page
-
Smart column page break
-
Smart row page break
You can also set the options for repeating the column header on all pages and specify the break at the column and row borders.
Scaling
The Scaling print settings control the size, width, height, and number of horizontal and vertical pages of a multipage printout:
-
Scaling factor
-
Width
-
Height
-
Horizontal page count
-
Vertical page count

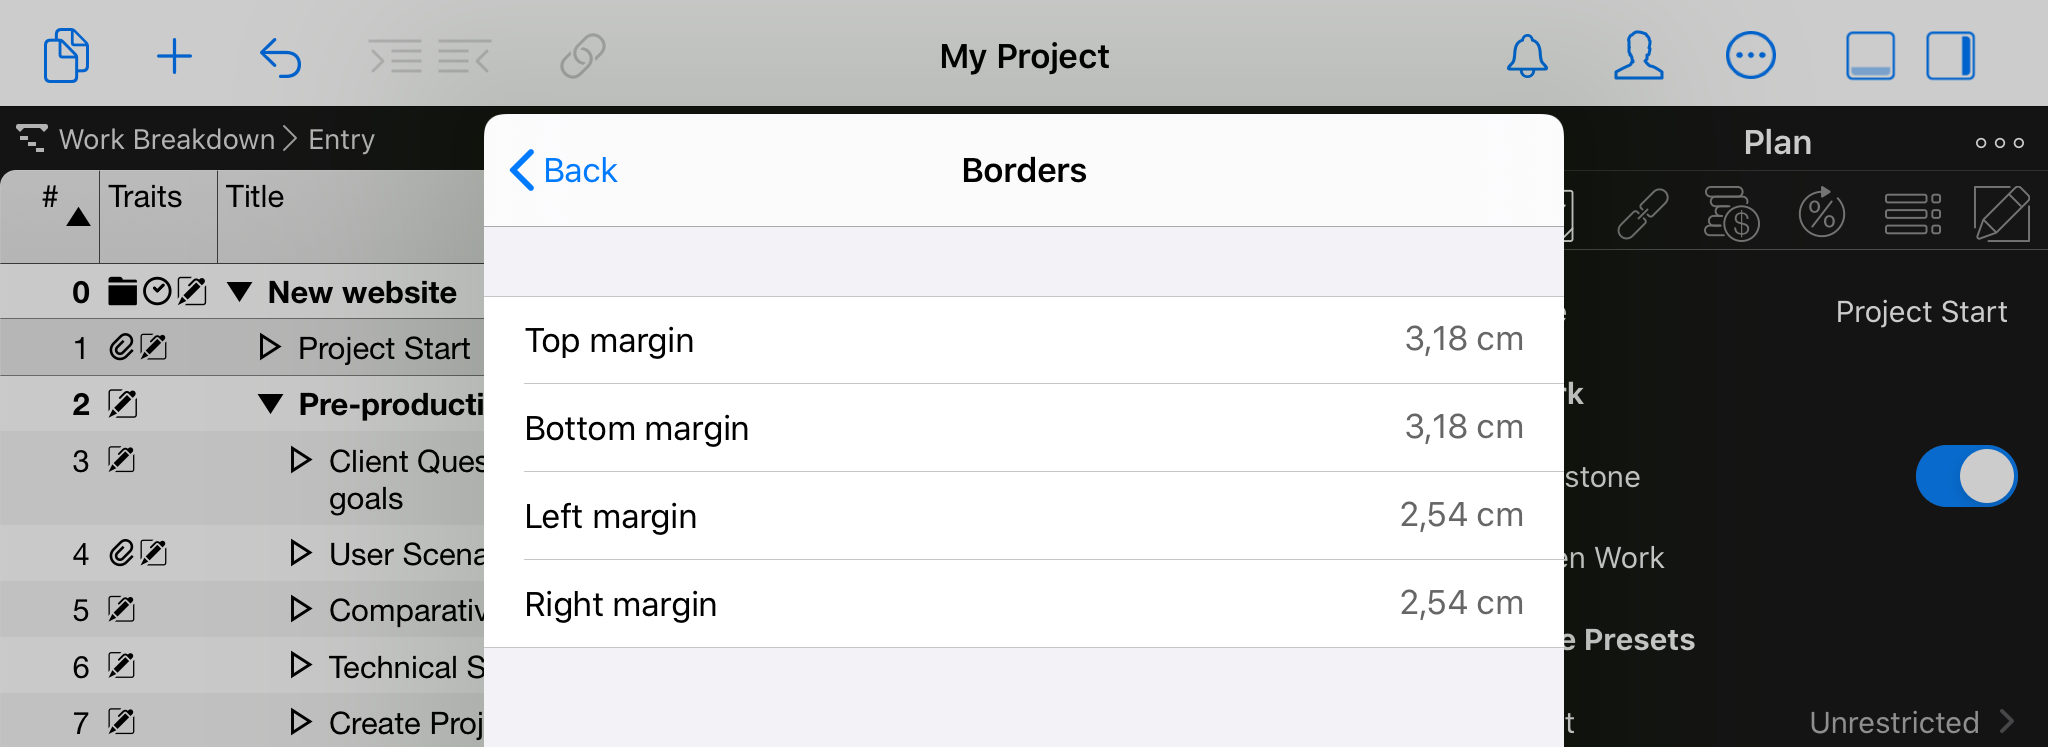
Borders
The Borders print settings control the size of the borders for the printout:
-
Top margin
-
Bottom margin
-
Left margin
-
Right margin
Export
To export your project, tap the icon with the three horizontal lines in the upper right corner. Select Export from the drop-down menu.
Merlin Project on iPad supports following formats:
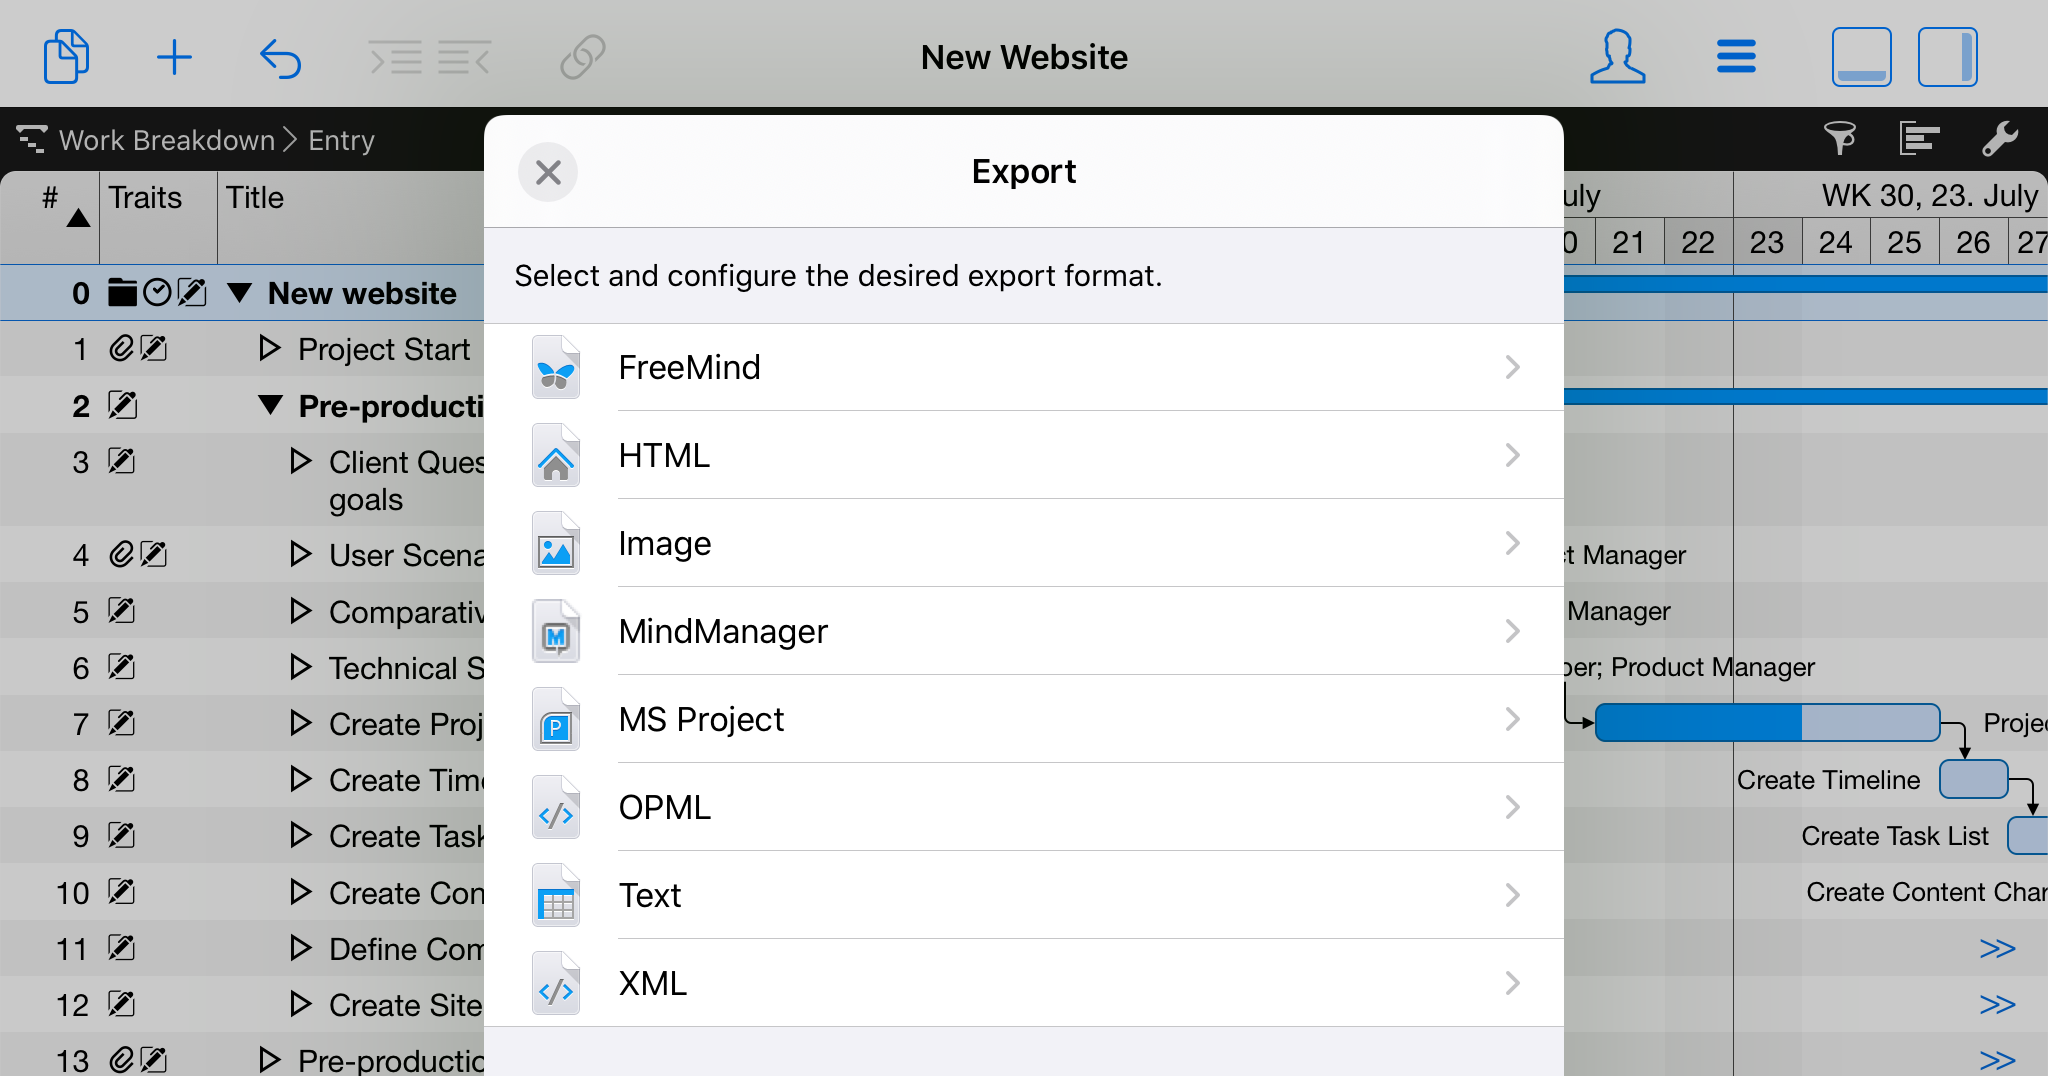
Select the desired format, configure if needing exporting options and tap Share…

|
|
The iOS option Share… allows you to save the exported file to the Files.app, Dropbox or send it via AirDrop, Mail, etc. |
HTML
With Merlin Project on iPad you can export your current project view as HTML files that can be viewed in a web browser.
The HTML export settings provide options for including media, inline web resources or a headline:
-
Media (affects custom fields of media type. Possible options: None, Thumbnails Only, Thumbnails and Originals)
-
Inline web resources (creates one flat html file with inline web resources, instead of a folder with html file and related images)
-
Headline (inserts a headline on the top of the HTML view)
Image
With Merlin Project on iPad you can export your current project view as images in one of the following formats:
-
PDF Vector Image
-
PNG
-
JPEG
-
JPEG 2000
-
TIFF
-
BMP
-
GIF

The Image export settings provide options for including the outline and Gantt chart, shadows, gradients, background and selecting a file format:
-
Parts (outline and Gantt chart or only one of the two areas)
-
With shadows (affects items on the Gantt chart)
-
With gradients (affects items on the Gantt chart)
-
With background (affects alternating row coloring)
-
Format
|
|
For PDFs in the current dark or light appearance of your device, use this Export option and select PDF Vector Image as a file format. |
MS Project
With Merlin Project on iPad you can export your project as MS Project XML document that can be viewed and edited in Microsoft Project and other applications.

|
|
The MS Project export setting Sub-projects > Inline is only then available in case you are exporting a file with sub-projects. You can select between None, Inline, In separate files. |
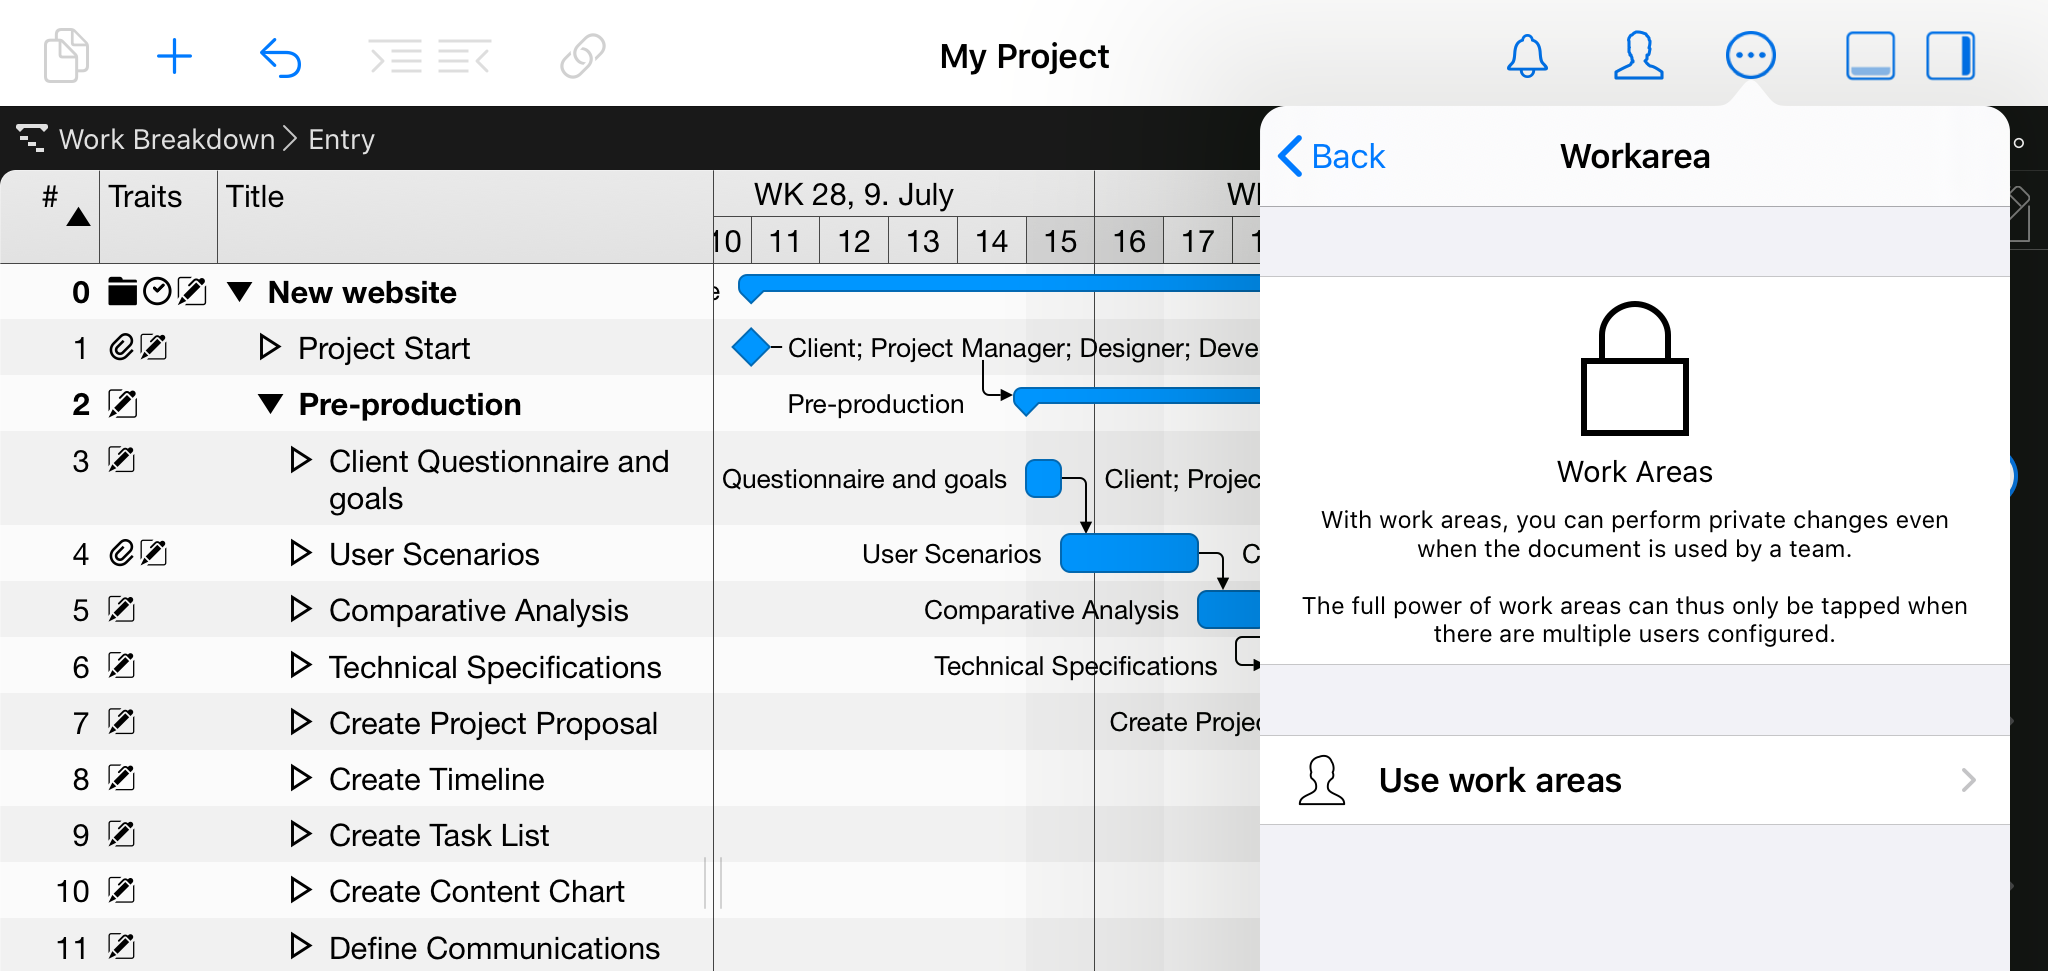
Work Area
In the Work Area settings, you can find options for shared documents, which allow you to work on the project independently and separately from the other users.
|
|
This function unleashes its full potential when used by multiple users. |
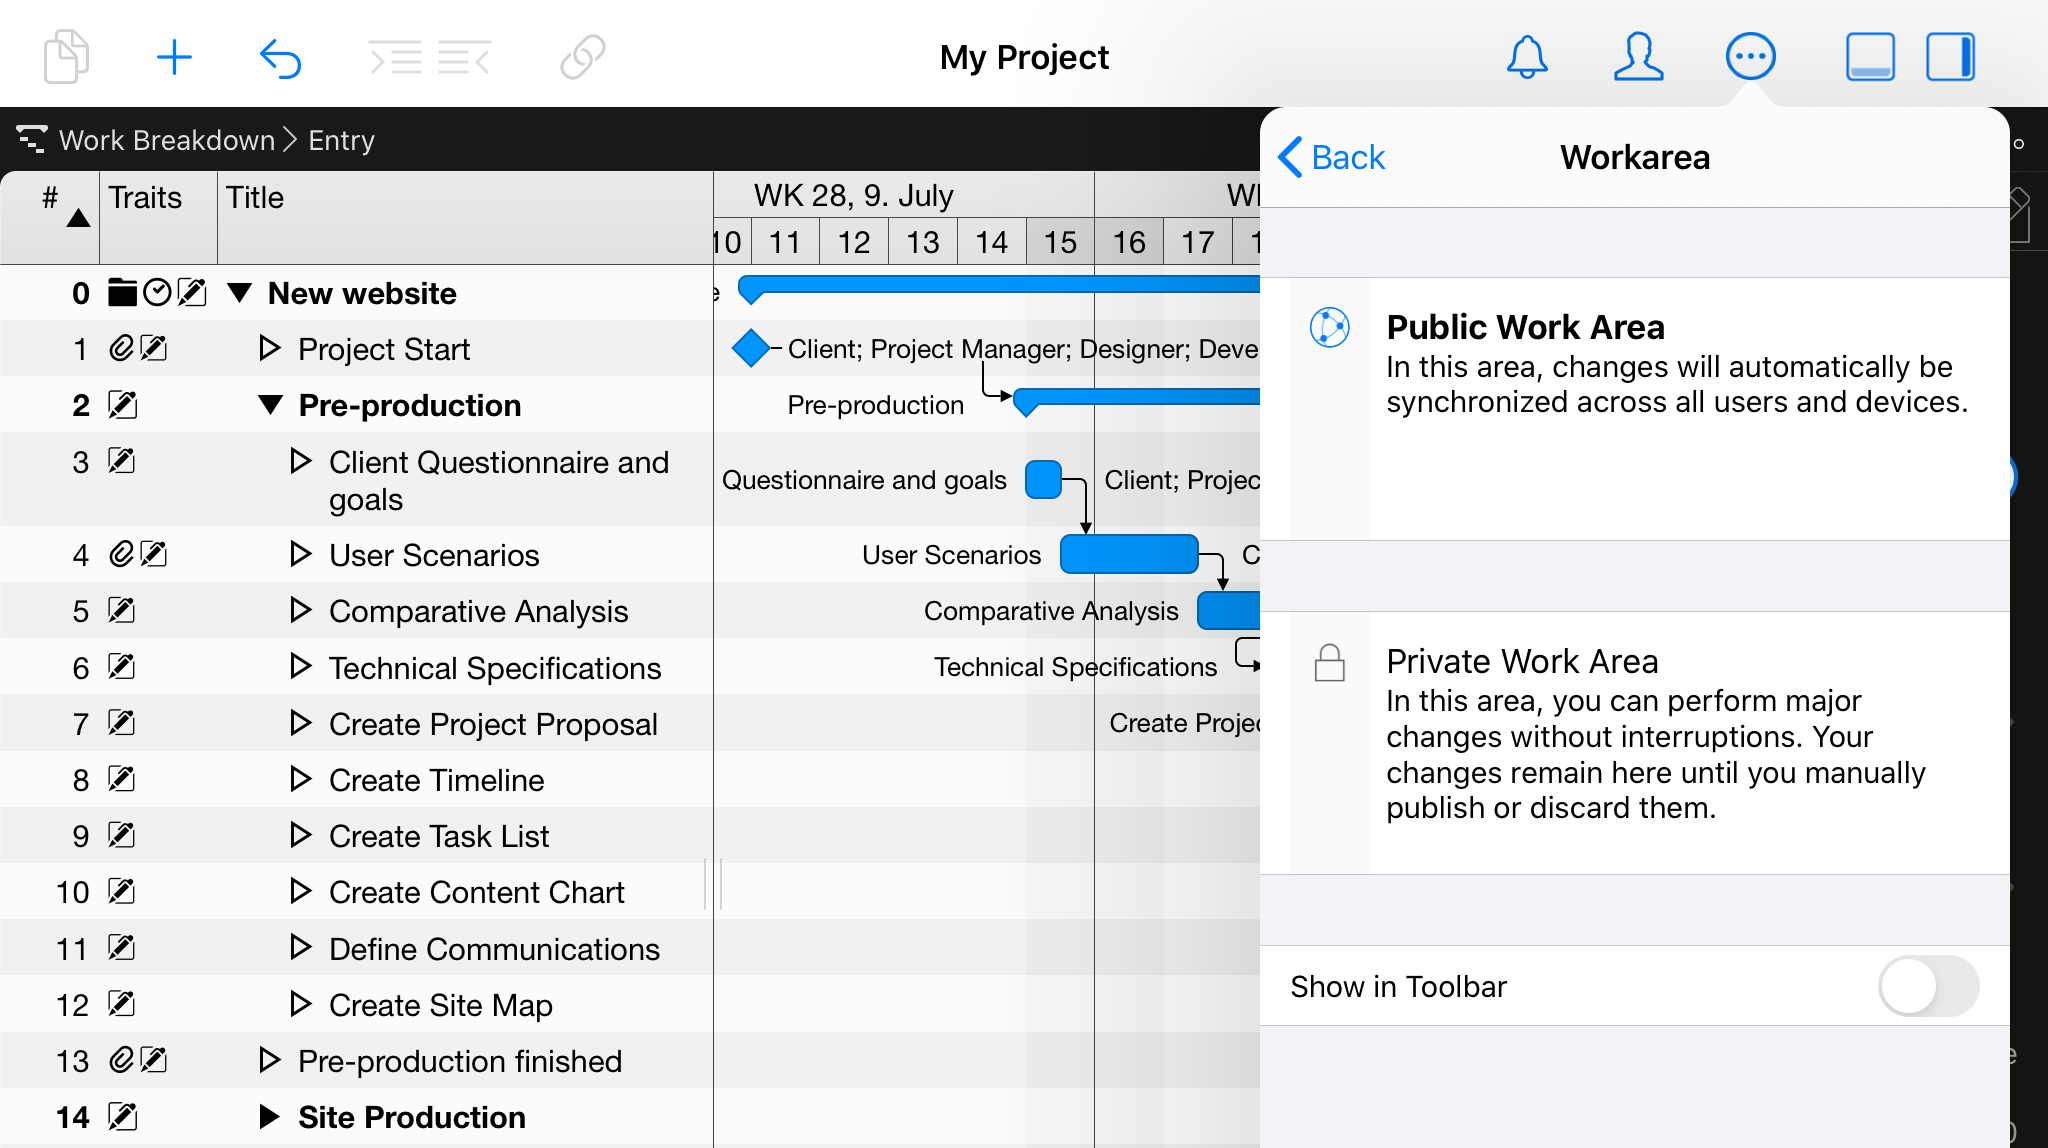
When you start using a Work Area, you can choose from two options:
-
Public Work Area (default)
-
Private Work Area
The »Publish« option lets you transfer changes from the Private Work Area and make them available to all users. Otherwise, delete the changes using the delete option and restore the document to its original state.
The »Integrate« option lets you integrate changes made in the Public Work Area.
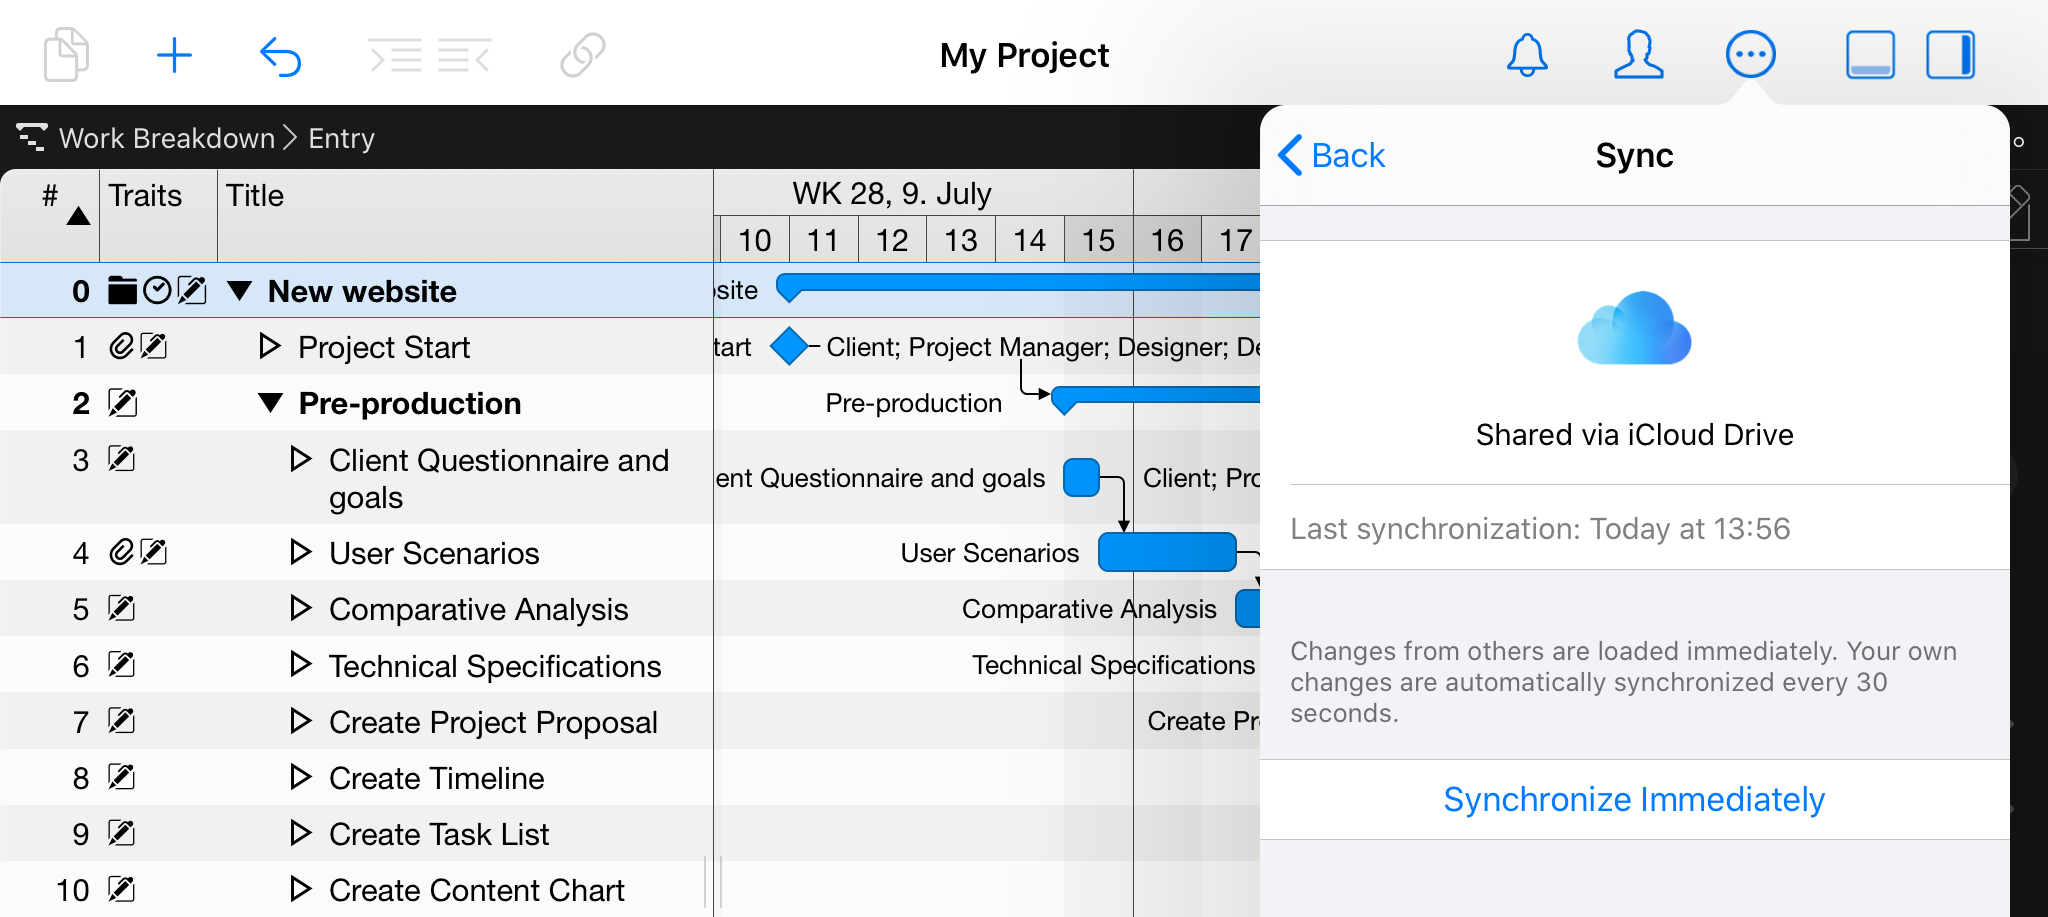
Sync
In the Sync settings, information is available about the shared use of the document.
If the document is shared via iCloud Drive, Dropbox or Merlin Server, you will find here its last synchronization date and the option to 'Synchronize Immediately'.
If the document is not yet shared, you can find options here to share it via iCloud Drive, Dropbox or Merlin Server.

Appearance
In Appearance settings you can define how your views and the inspector react on Dark or Light mode as offered by iOS 13.0 or later.
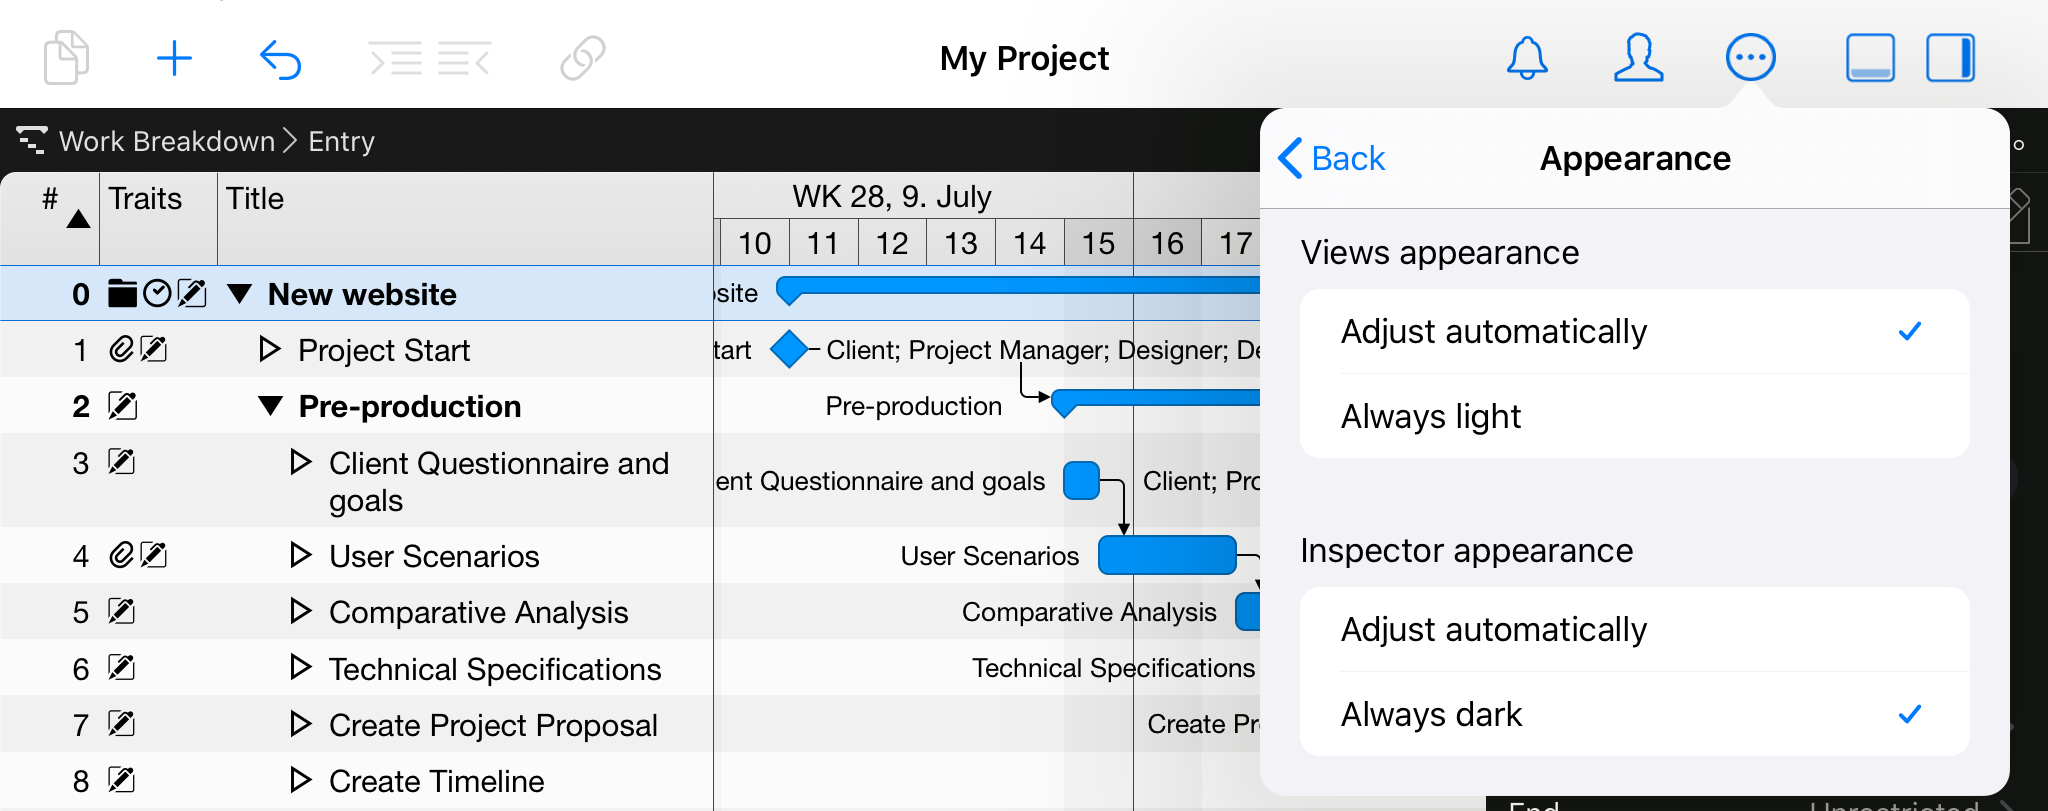
The Views appearance option contains two settings:
-
Adjust automatically
-
Always light
Select Adjust automatically for views to change into the Dark or Light mode of the iPad.
Select Always light to keep your views in Light mode even if your iPad is currently in Dark mode.
|
|
Even if using the app in Dark mode, printing always takes place in the light appearance, while image export takes place in the currently selected appearance. |
The Inspector appearance option contains two settings:
-
Adjust automatically
-
Always dark
Select Adjust automatically for the inspector to change into the Dark or Light mode mode of the iPad.
Select Always dark to keep your inspector in its dark mode even if your iPad is currently in light mode.
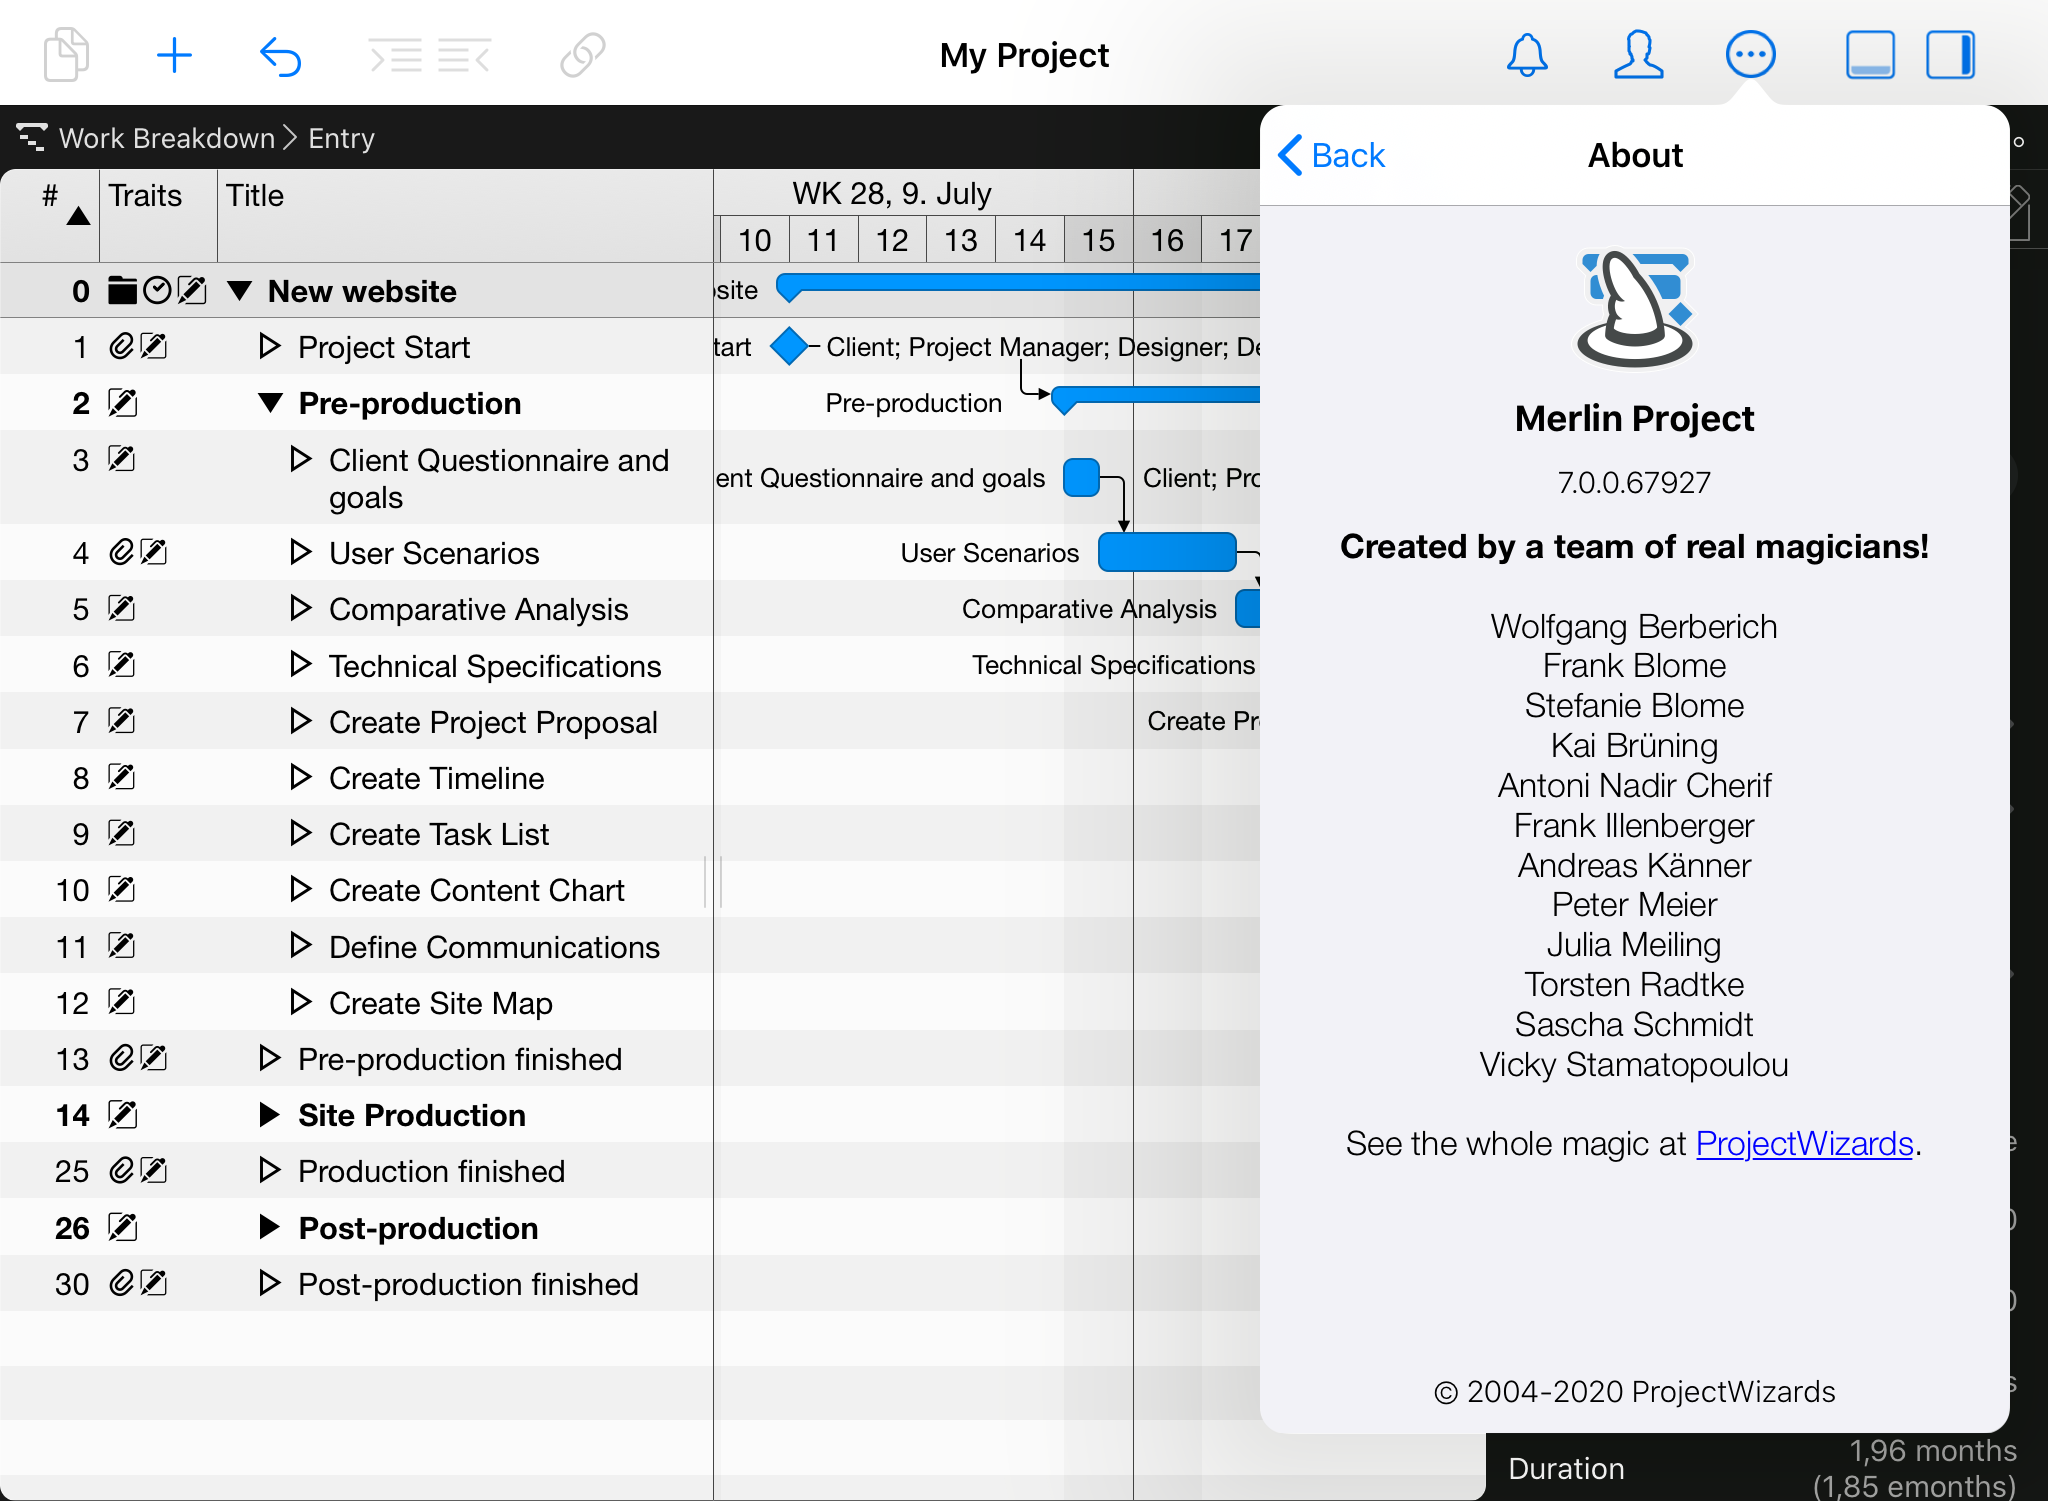
About Merlin Project
Here you can find information about Merlin Project and its version.
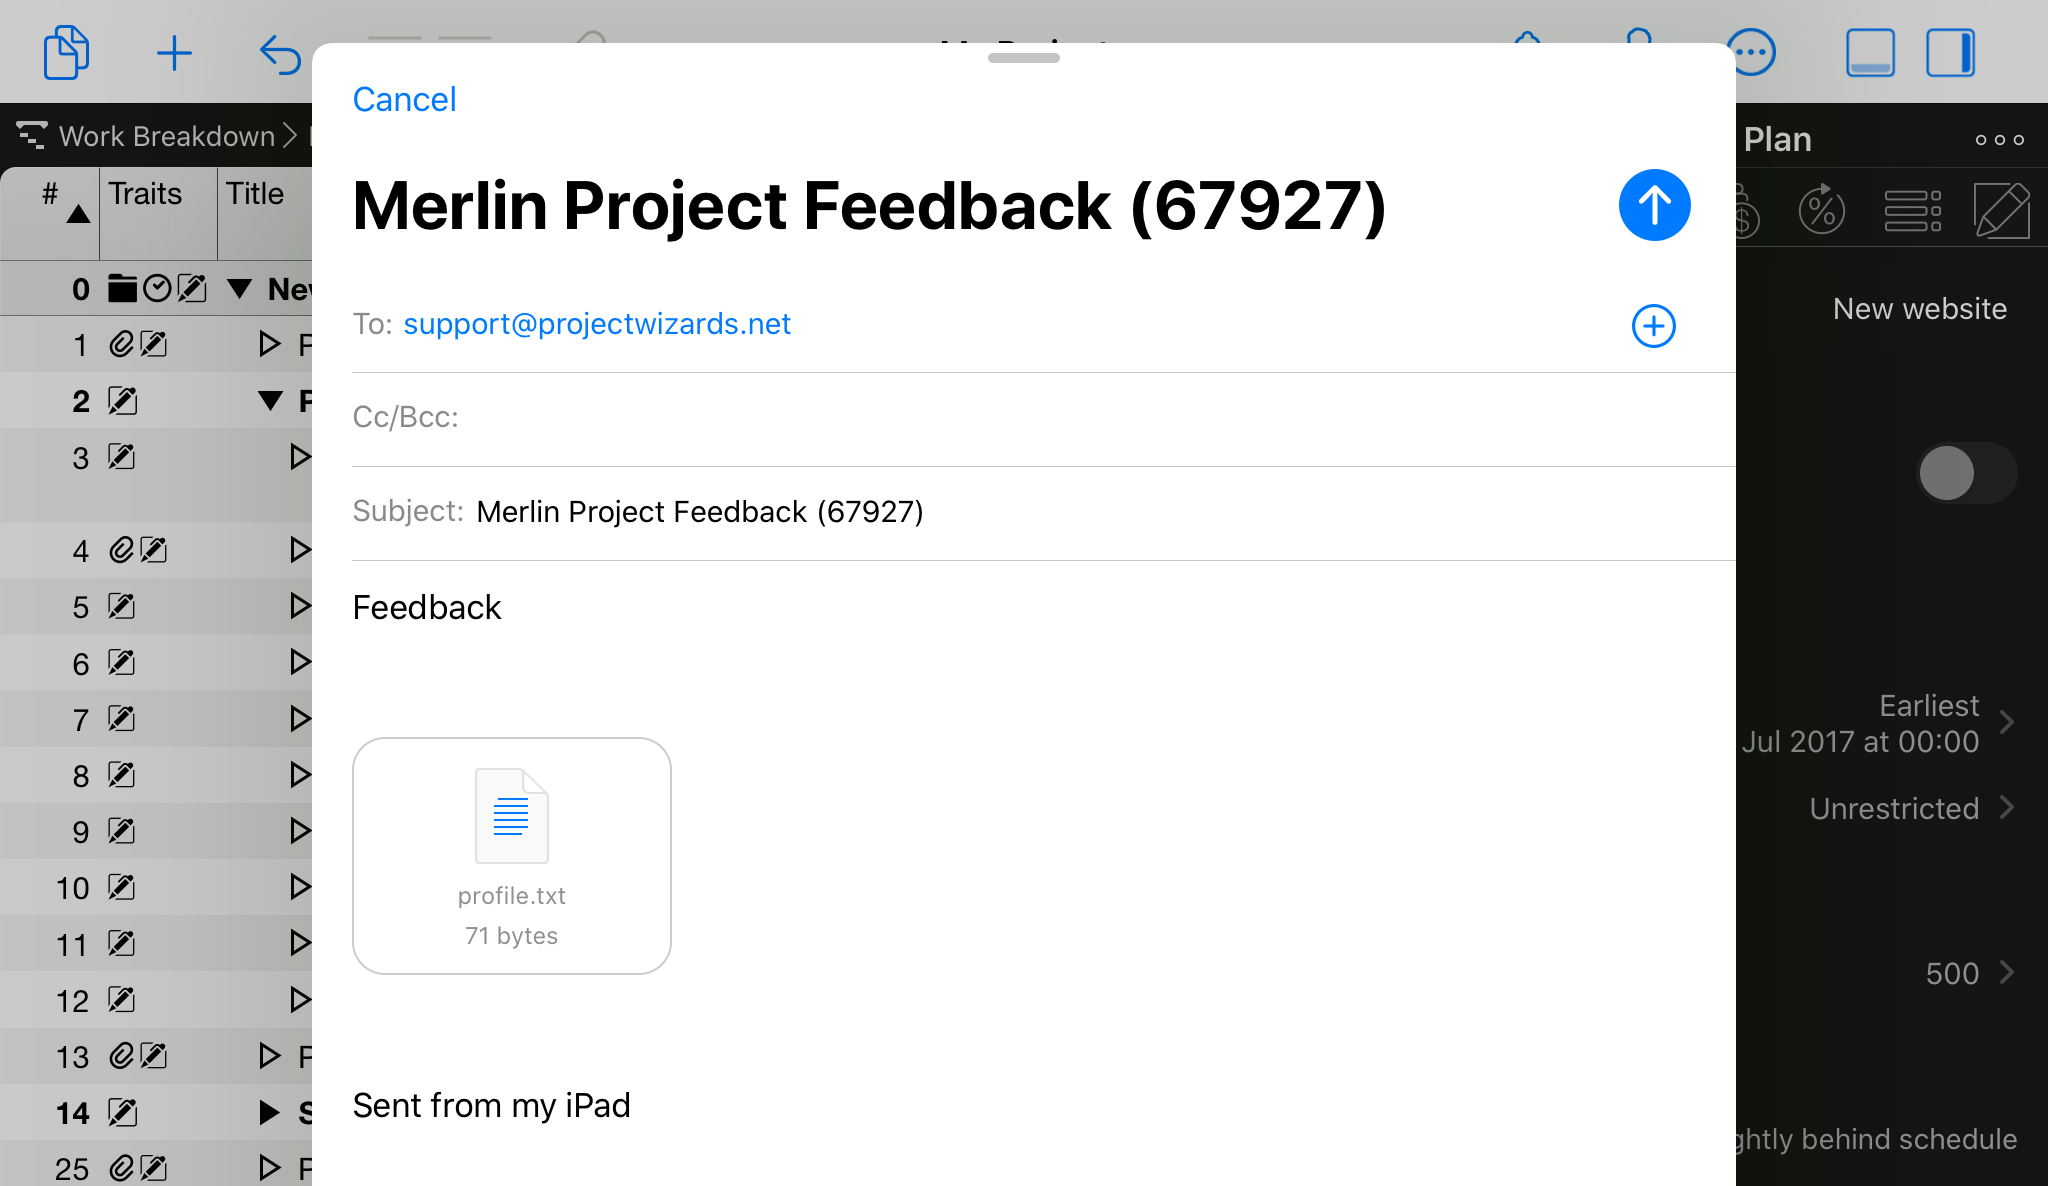
Send Feedback
This option lets you provide feedback directly by email to our Development team.
Filters
Filters help you to extract certain information from large projects and display it graphically in the various views. Merlin Project already contains a large number of ready-made filters.
Tap the funnel icon to open the inspector with the built-in filter list.

To activate a specific filter, tap the checkbox to the left of its name in the Filter inspector. The contents of the project will be altered automatically by the activated filter.
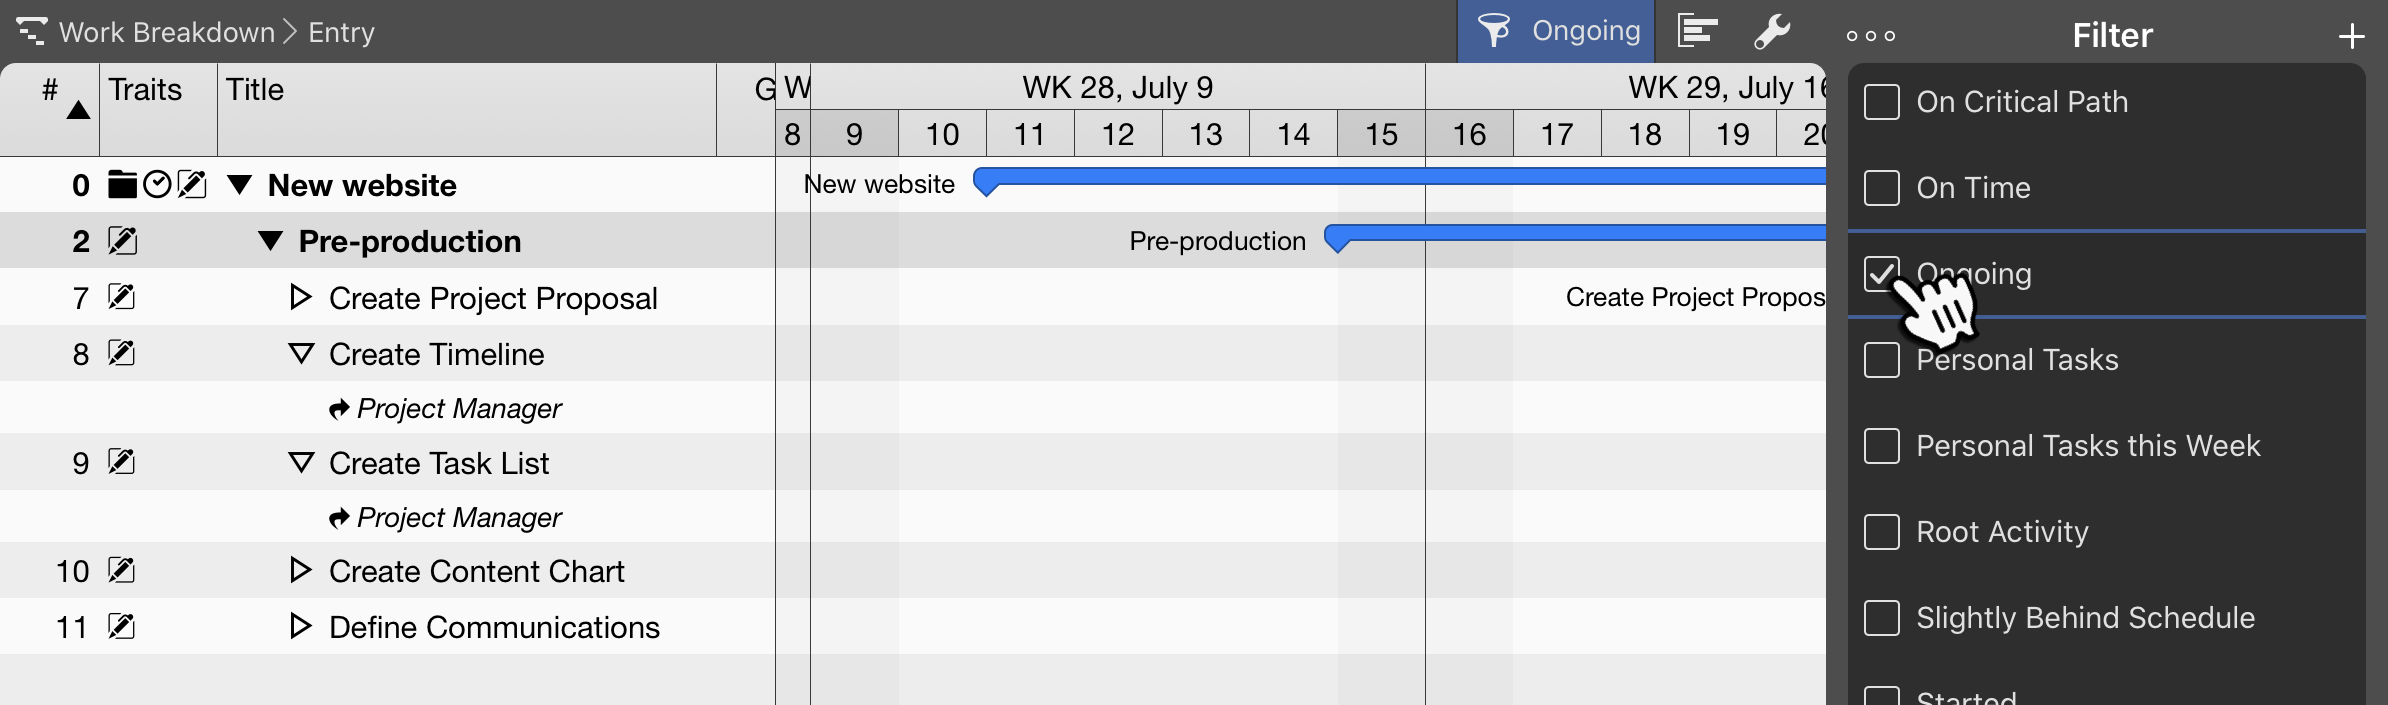
|
|
The active filter’s name is displayed next to the funnel icon at the top of the view and is applied until you tap again on the checkbox icon in the Filter inspector. |
Tap a filter in the inspector a second time, a menu with further options will appear:
-
Edit
-
Deactivate / Activate Filter
-
Cut
-
Copy
-
Delete
-
Duplicate
Adjusting Filters
Tap the name of a filter in the inspector, a magnifying glass will show up on its right.

Tap the magnifying glass and the inspector will show the filter criteria so you can view and edit them as required.
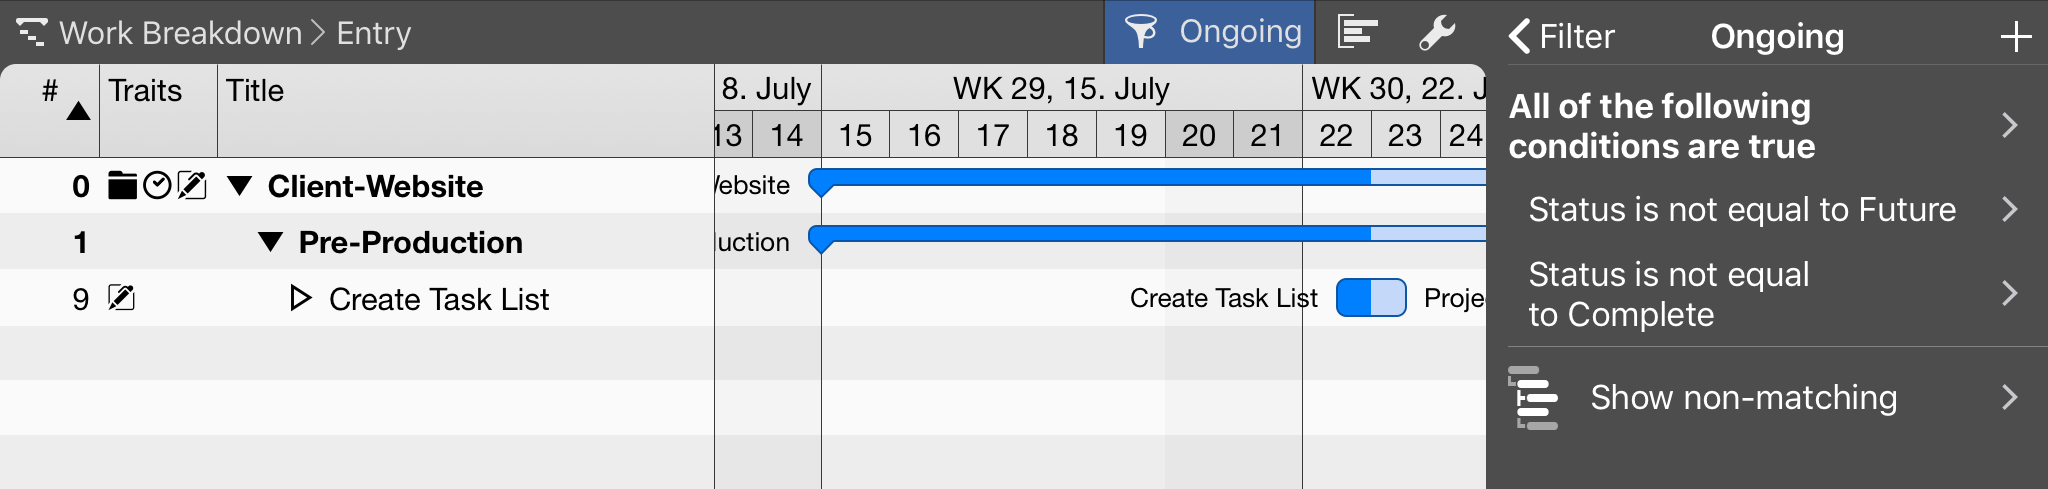
You’ll find information and values which allow you to configure the conditions for filtering your project.
Manage how the filtered results are displayed using these three options:
-
Show non-matching hierarchy
-
Show only matching hierarchy
-
Show as a flat list
Tap the plus icon to add additional conditions to the filter. Swap to the left to remove existing conditions from the filter.
New Filters
Tap the Plus symbol, to insert new filters into your project.

Tap the magnifying glass and use the options shown in the inspector, to set the filtering criteria.
Groupings
Groupings help you to consolidate information in the respective view according to different specifications and to sort it individually.
For example, you can quickly visualize different project progresses, rapidly classify tasks, and easily evaluate and visualize information.
Merlin Project already contains a large number of ready-made groupings.
Tap the Groupings icon to open the Inspector with the built-in Groupings list.

To activate a specific grouping, tap the box to the left of its entry in the Groupings inspector. The contents in the current view will then be re-arranged and displayed accordingly.
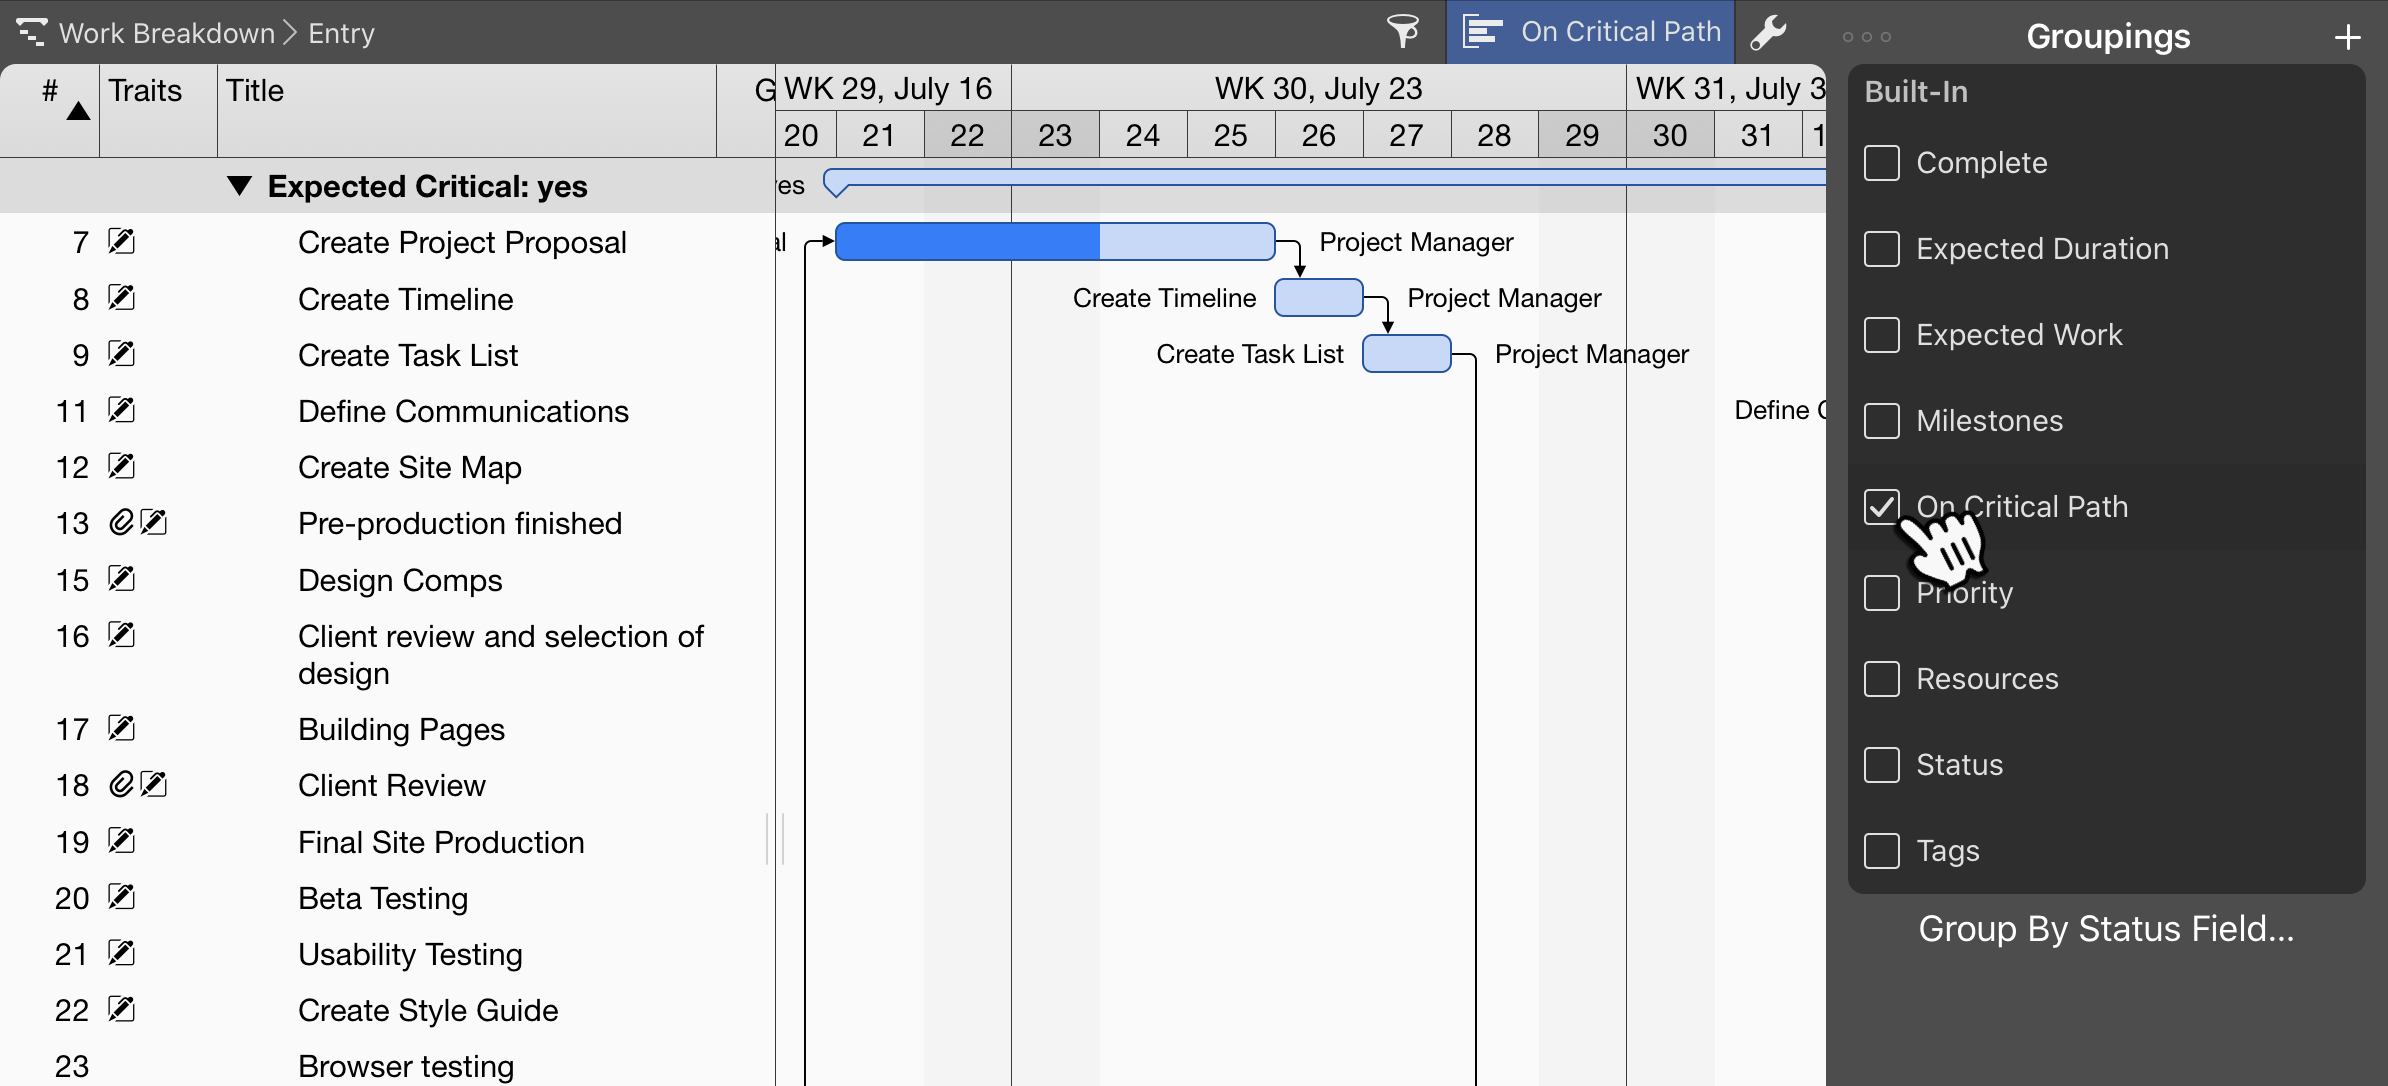
|
|
The name of an active grouping is displayed next to the grouping icon at the top of the view and remains active until you tap again the checkbox in the Groupings inspector. |
Tap a grouping in the inspector a second time, a menu with further options will appear:
-
Edit
-
Deactivate / Activate Grouping
-
Cut
-
Copy
-
Delete
-
Duplicate
Adjusting Groupings
Tap the name of a grouping in the inspector, a magnifying glass will show up on its right.

Tap the magnifying glass and the inspector will show the grouping criteria so you can view and edit them as required.
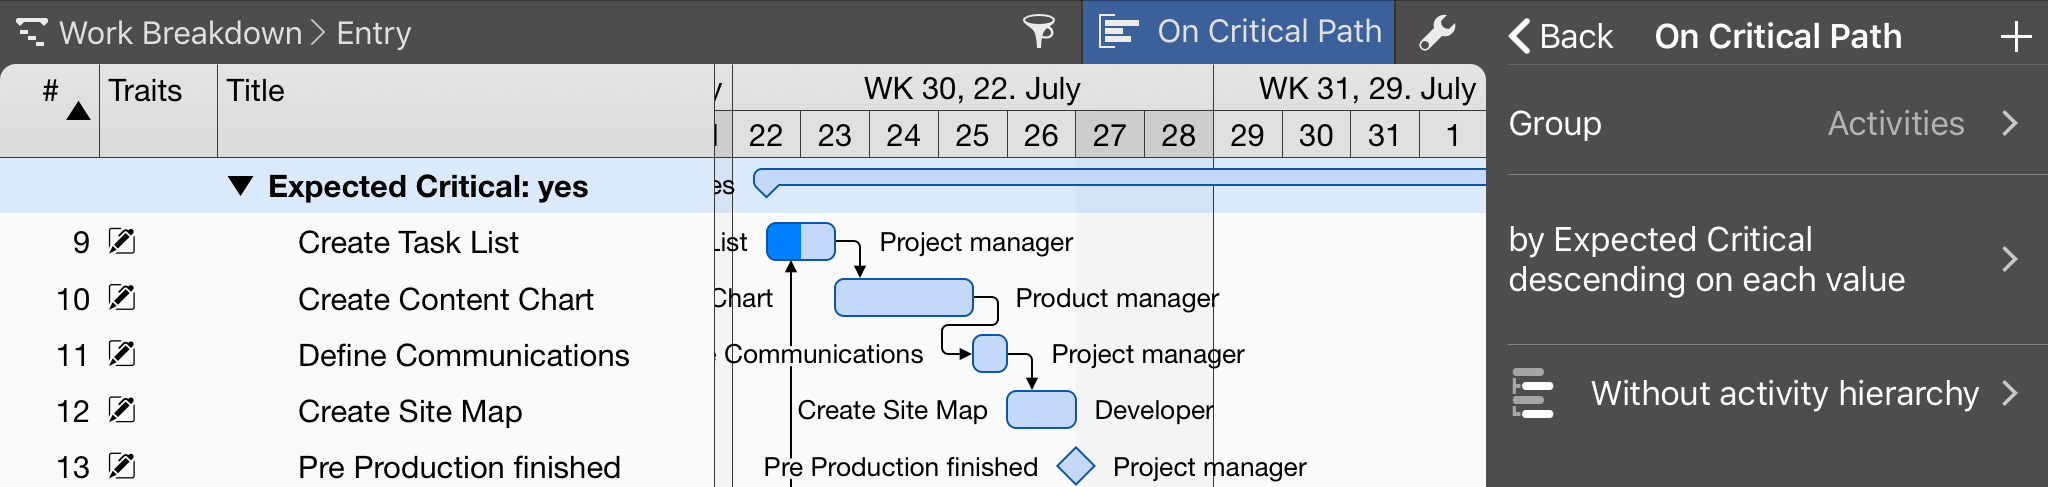
You’ll find information and values which allow you to configure the conditions for grouping your project.
Manage how the grouped results are displayed using these three options:
-
Without activity hierarchy
-
Flatten activity hierarchy
-
Include activity hierarchy
Tap the Plus symbol, to insert additional grouping criteria. Swap to the left to remove existing conditions from the grouping.
New Groupings
Tap the Plus symbol, to insert new groupings into your project.

Tap the magnifying glass and use the options shown in the inspector, to set the grouping criteria.
View Options
Each view offers different display options. Click the wrench icon to open and close the View Options inspector.

Comments
With Merlin Project you can use Comments to improve collaboration with your team members on your projects.
New comment
You may insert comments on every visible row item of any view if finding needed.
-
Select a row on its view
-
Press and hold the + icon on the toolbar
-
select Comment from the context menu
-
Enter the desired text in the inspector
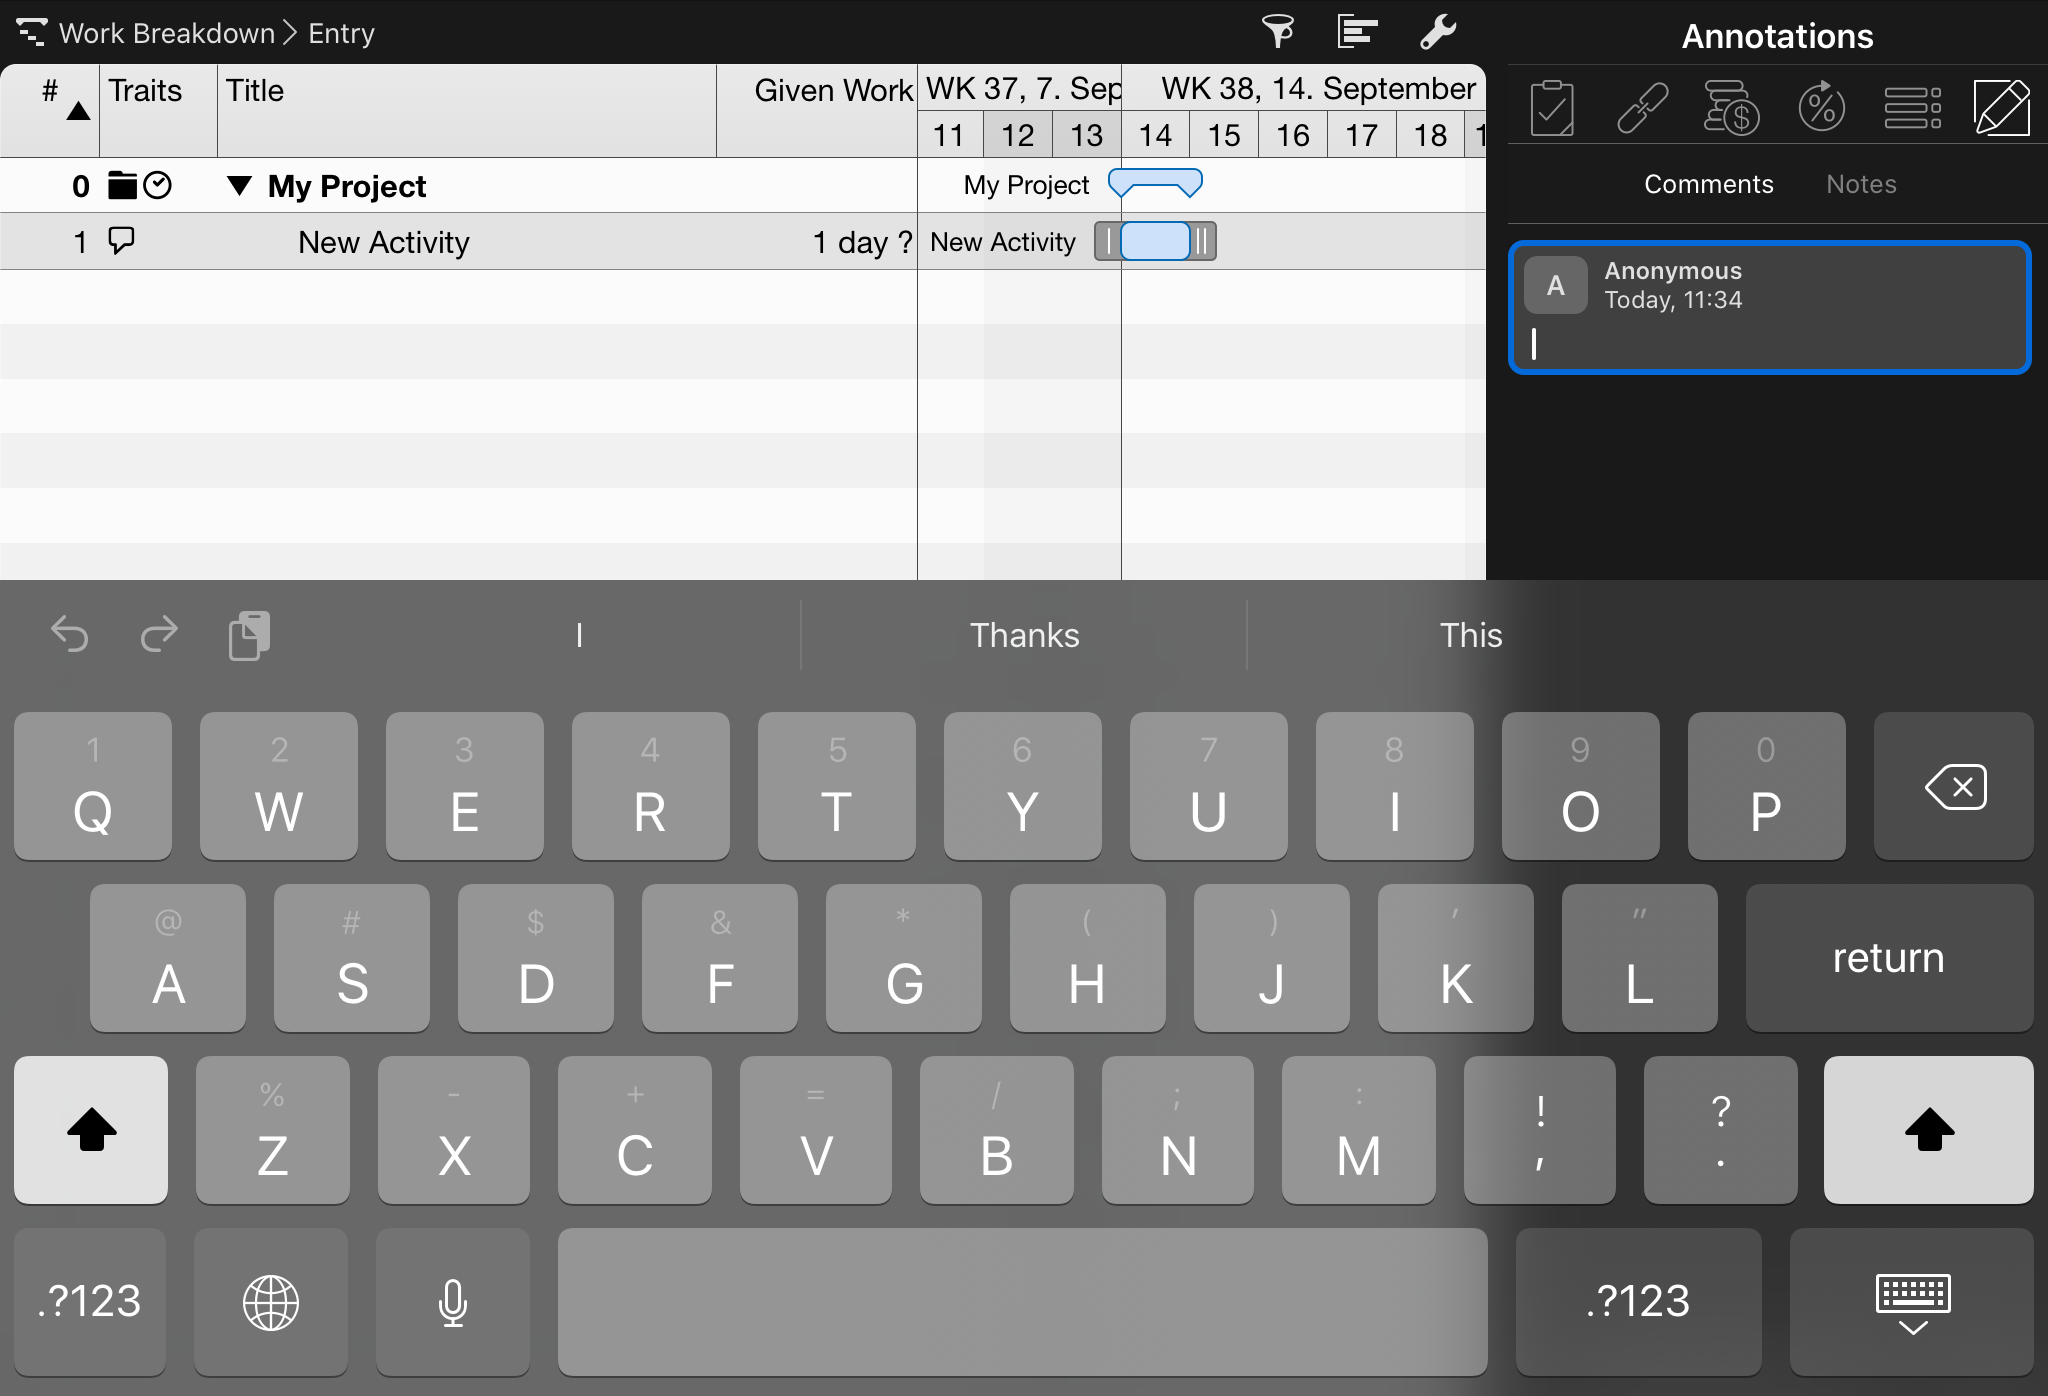
-
close the Keyboard to confirm new comment
Alternatively
-
Select a row in its view
-
Open the Annotations inspector
-
Switch to the Comments tab
-
Tap New Comment as shown at the bottom of the Annotations inspector

-
Enter the desired text.
-
close the Keyboard to confirm new comment
Inserted comments show following information:
Creation date
Creation date shown as relative time point (today, yesterday, etc) and contains the date and time of any given comment.
Author
Merlin Project calculates the author’s name into the comment.
There are various cases:
New comments on project files show Anonymous as author.

New comments on project files show Anonymous as author.
|
|
You can edit the comment and select a resource from the list to define the author of the comment. |
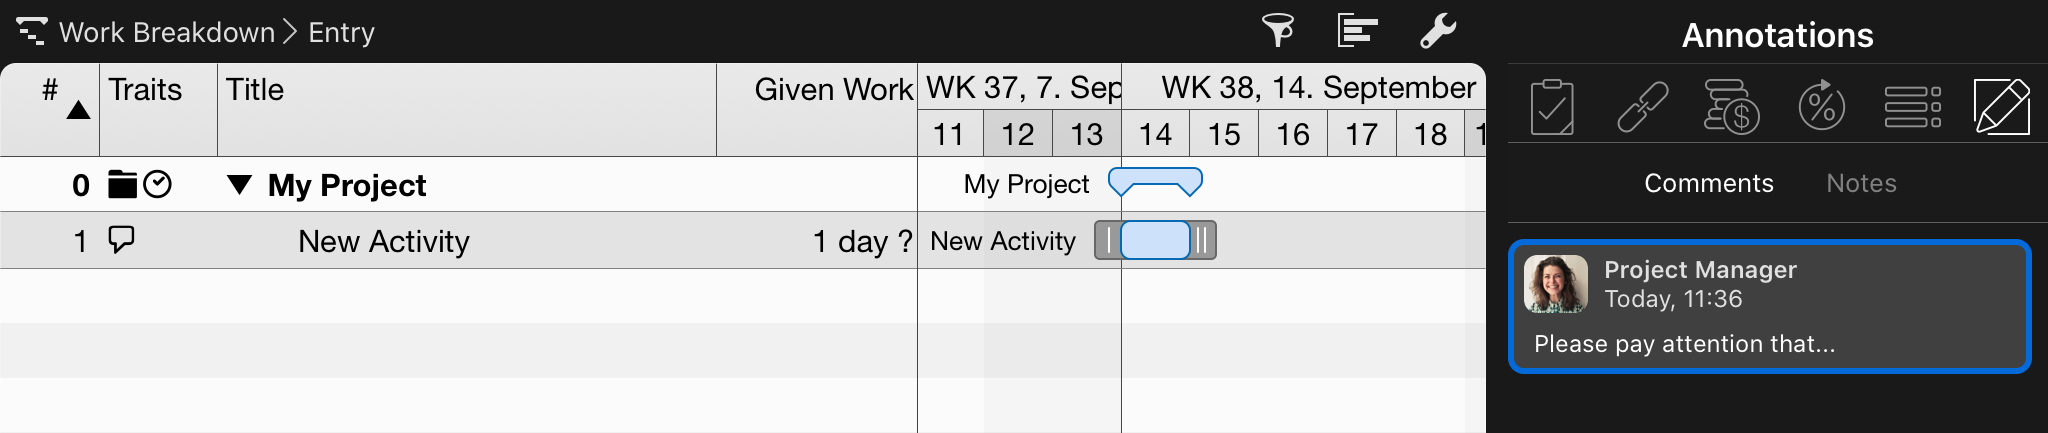
New comments on project files show the title of the user-resource which had inserted them.

Author initials or image
There are various cases:
New comments show the initials of the resource.
New comments show a thumbnail of the author’s image.
View comments
When opening a project having comments, there are various ways to view inserted comments.
-
Select a row in its view
-
Open the Annotations inspector
-
Switch to the Comments tab
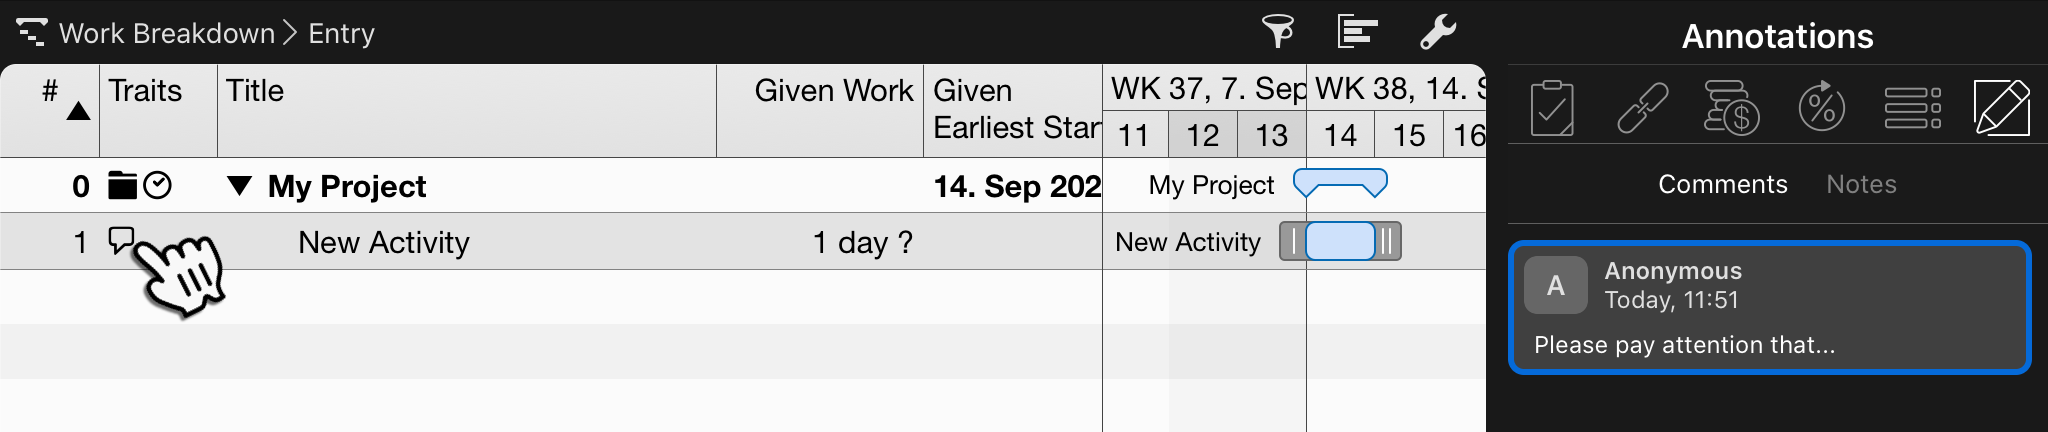
If the traits column is visible in the outline, and there is a comment inserted on items of this view, just tap the comment icon on any given row for Merlin Project to show all comments in the Annotations inspector for that specific row item.
New comments are listed in the Notifications window.
-
Tap the Notifications toolbar icon to open this window.

-
Switch to the Comments tab
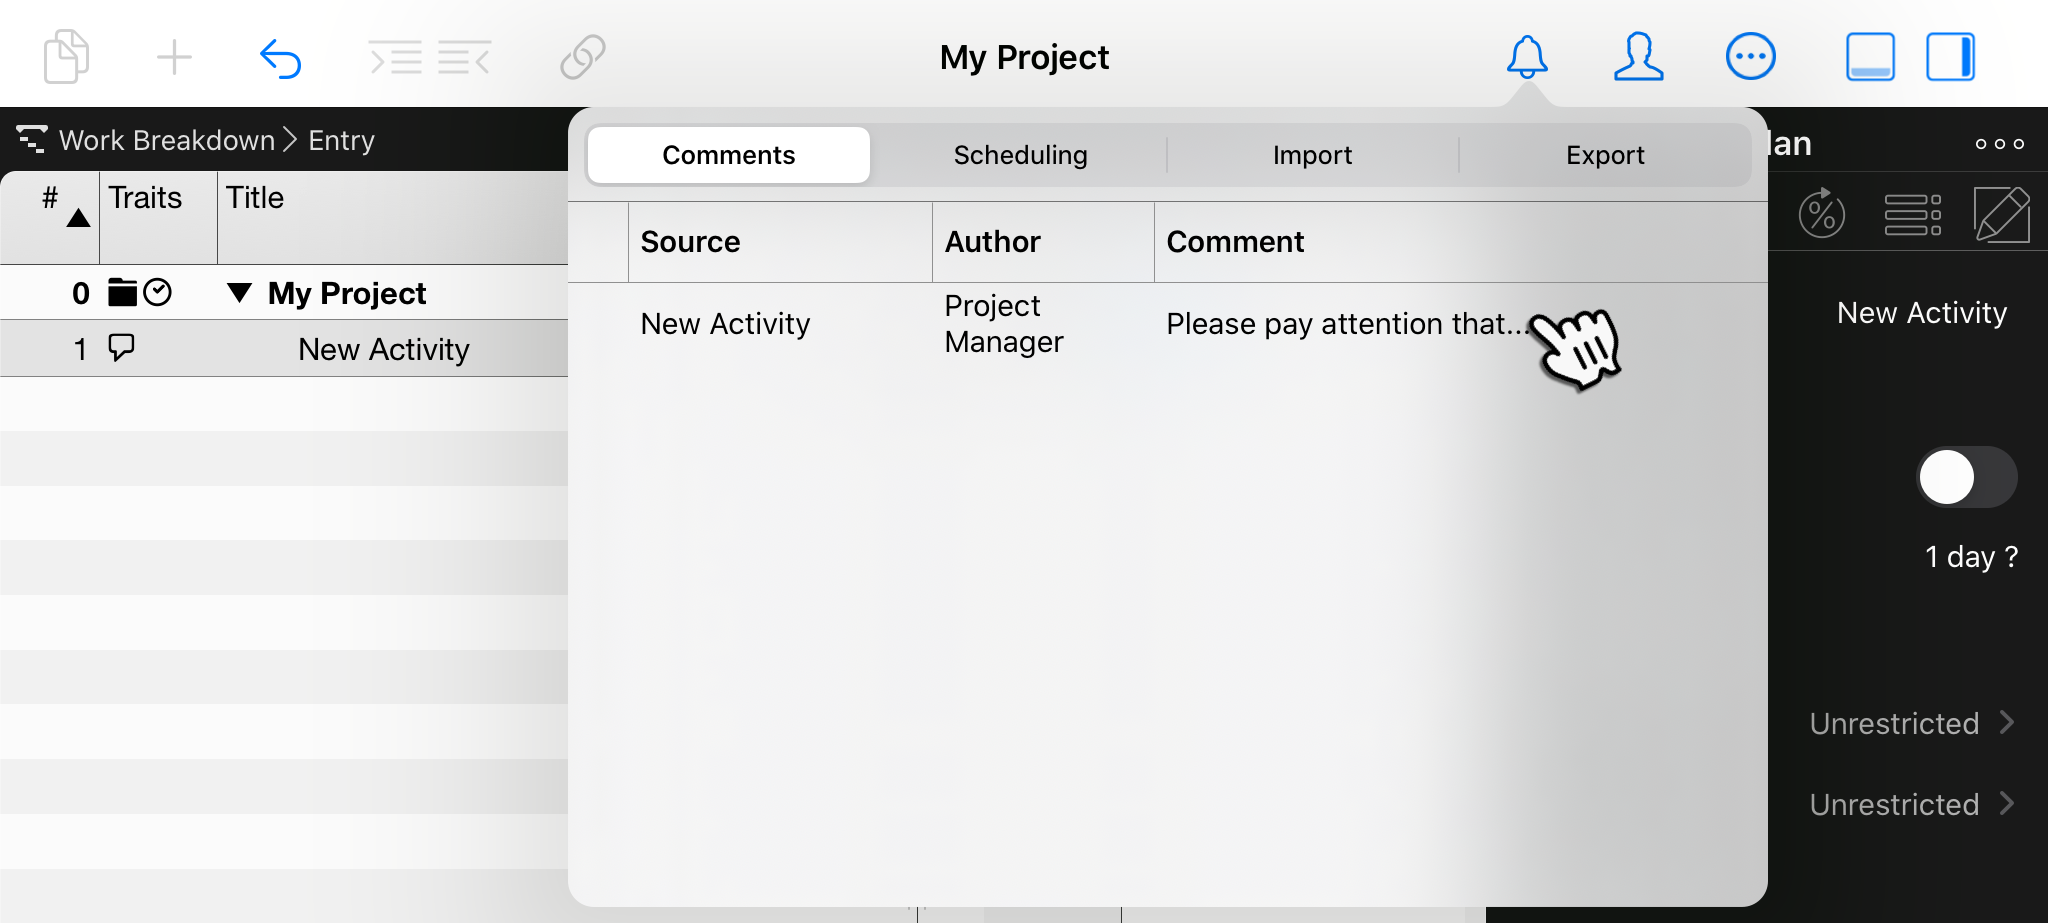
This view will list all comments inserted on all items. Tap any given row, for Merlin Project to switch focus to the given comment in the Annotations inspector, where you can reply by a new comment.
|
|
You may choose to remove read comments from the list. Double tap any given row, and select 'Remote read'. |
Edit
When wanting to edit comments, there are various use cases:
Anyone opening the file may edit any given comment.
-
Just select a comment rect in the inspector
-
Double tap the text to enter edit mode
-
Edit the text
Anyone opening the file may edit any given comment.
-
Select a comment rect in the inspector
-
Double tap the text to enter edit mode
-
Edit the text
-
Select a comment rect in the inspector showing your user-resource
-
Double tap the text to enter edit mode
-
Edit the text
|
|
You cannot edit comments entered anonymously or those of other user-resources. |
Alternatively
You can also select the Edit menu item from the (…) menu shown at the bottom of the Annotations inspector.
Delete
To delete any given comment:
-
Select its comment rect in the inspector showing your user-resource
-
Select Delete from the (…) menu shown at the bottom of the Annotations inspector.

Sorting order
Comments can be sorted in the following ways:
-
Newest Comments first
-
Oldest Comments first
Default order is Newest Comments first
To change the sorting order:
-
Open the Annotations inspector
-
Switch to the Comments tab
-
Select Newest Comments first or Oldest Comments first from the (…) menu shown at the bottom of the Annotations inspector.
Installation
iOS version 13.0 or later is required to install Merlin Project on iPad:
-
Download Merlin Project from the App Store
-
Tap the Merlin Project icon to start the app on your iPad.

Remove
By default, you remove an app in iOS by keeping a finger held on the app icon. Tap on »x« tp remove the app from the iOS device.

|
|
Removing the app does not automatically cancel an active subscription. For cancelation and further information on managing subscriptions please use iTunes Store and follow the Apple workflow: https://support.apple.com/en-us/HT202039 |
Get help
We at ProjectWizards GmbH care about our products. We develop software for small and complex projects. Our apps are intuitive to use and can be customized to suit, so you can focus on what really matters: your project.
If need help, just send us an e-mail. We’ll always get back to you within a few hours.
-
Help and technical support: support@projectwizards.net
-
Buying, subscription, and licensing support: sales@projectwizards.net.
-
Training inquiries: sales@projectwizards.net